The new Air Conditioning vents upholstered
Here we have the new air conditioning vents covered in the black leather to match the brand new interior soon to be fitted to our


Here we have the new air conditioning vents covered in the black leather to match the brand new interior soon to be fitted to our

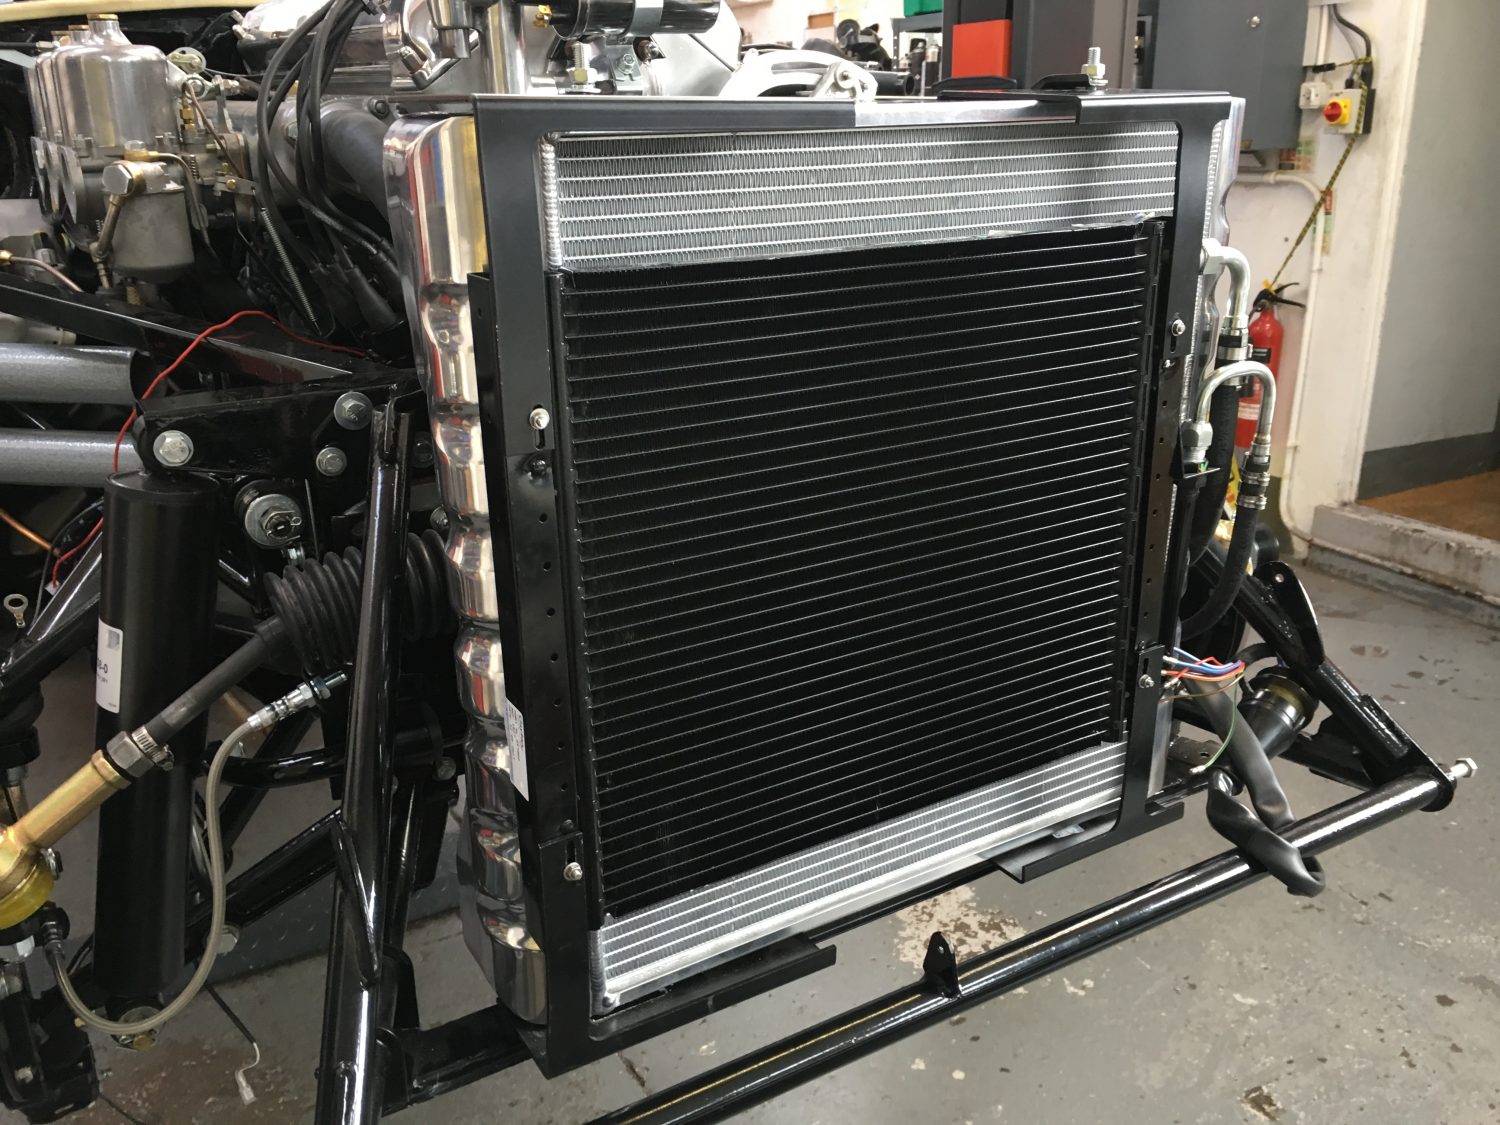
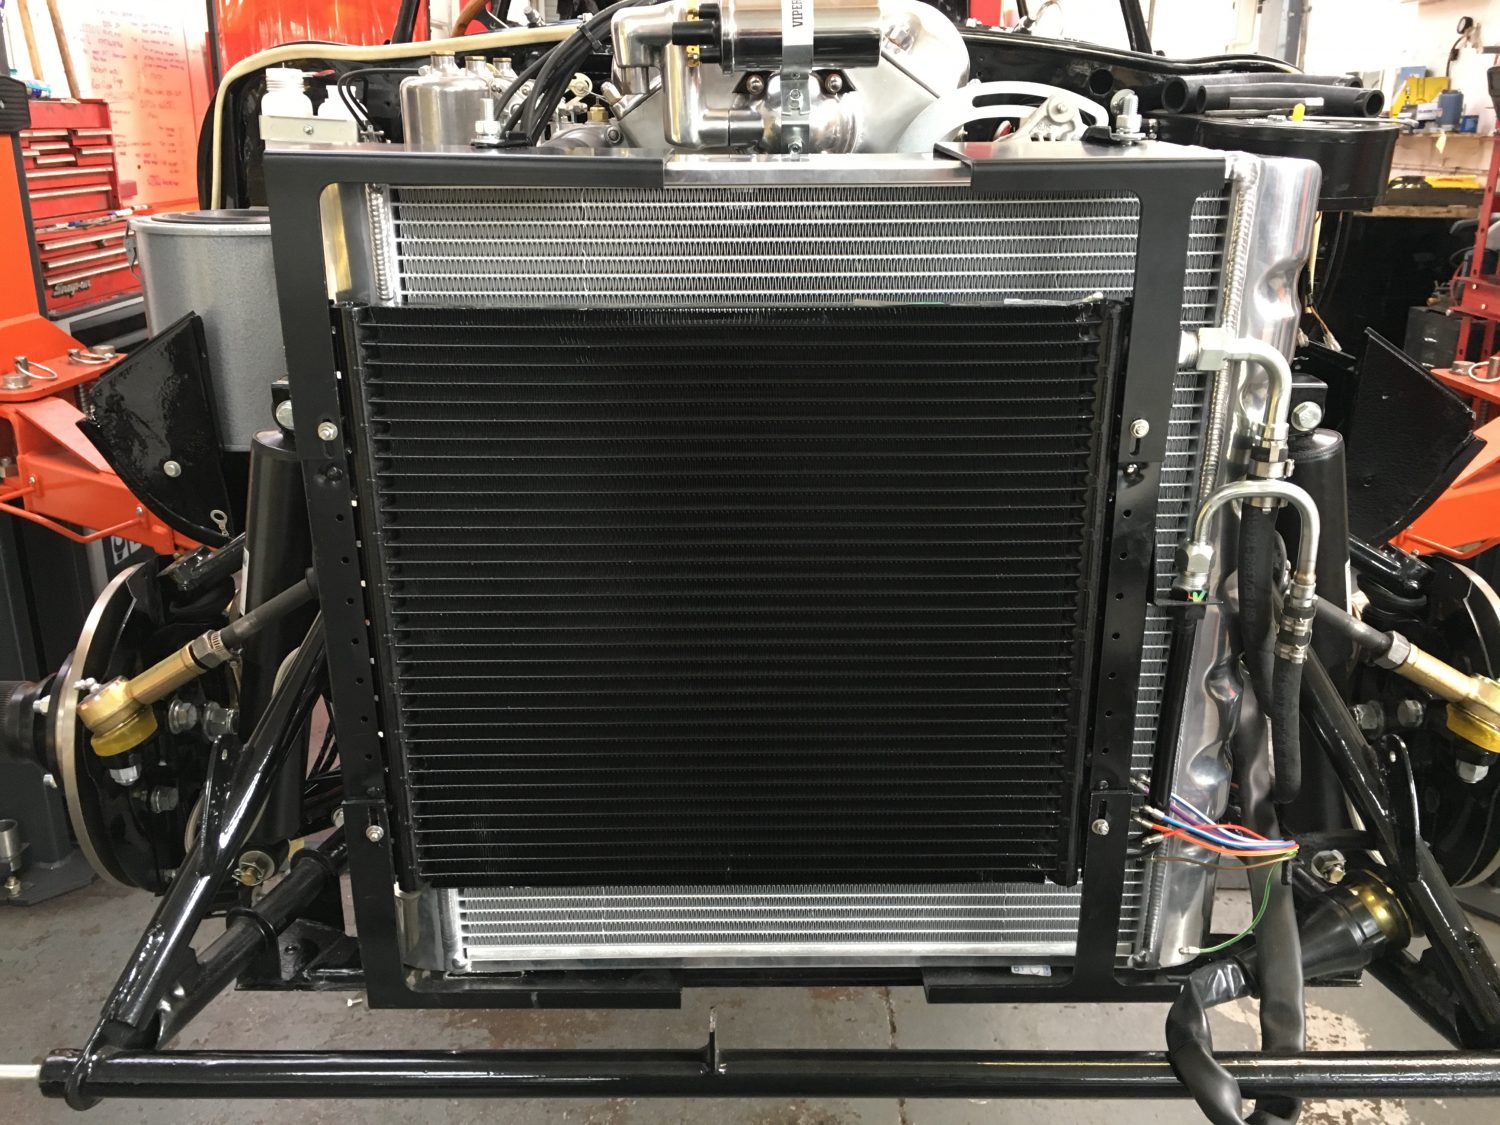
The polished aluminium radiator and header tank has now been fitted up and looking fantastic.
Tommy is now away sailing the Suffolk coast for a couple of days but before he left our workshops yesterday he managed to complete the installation

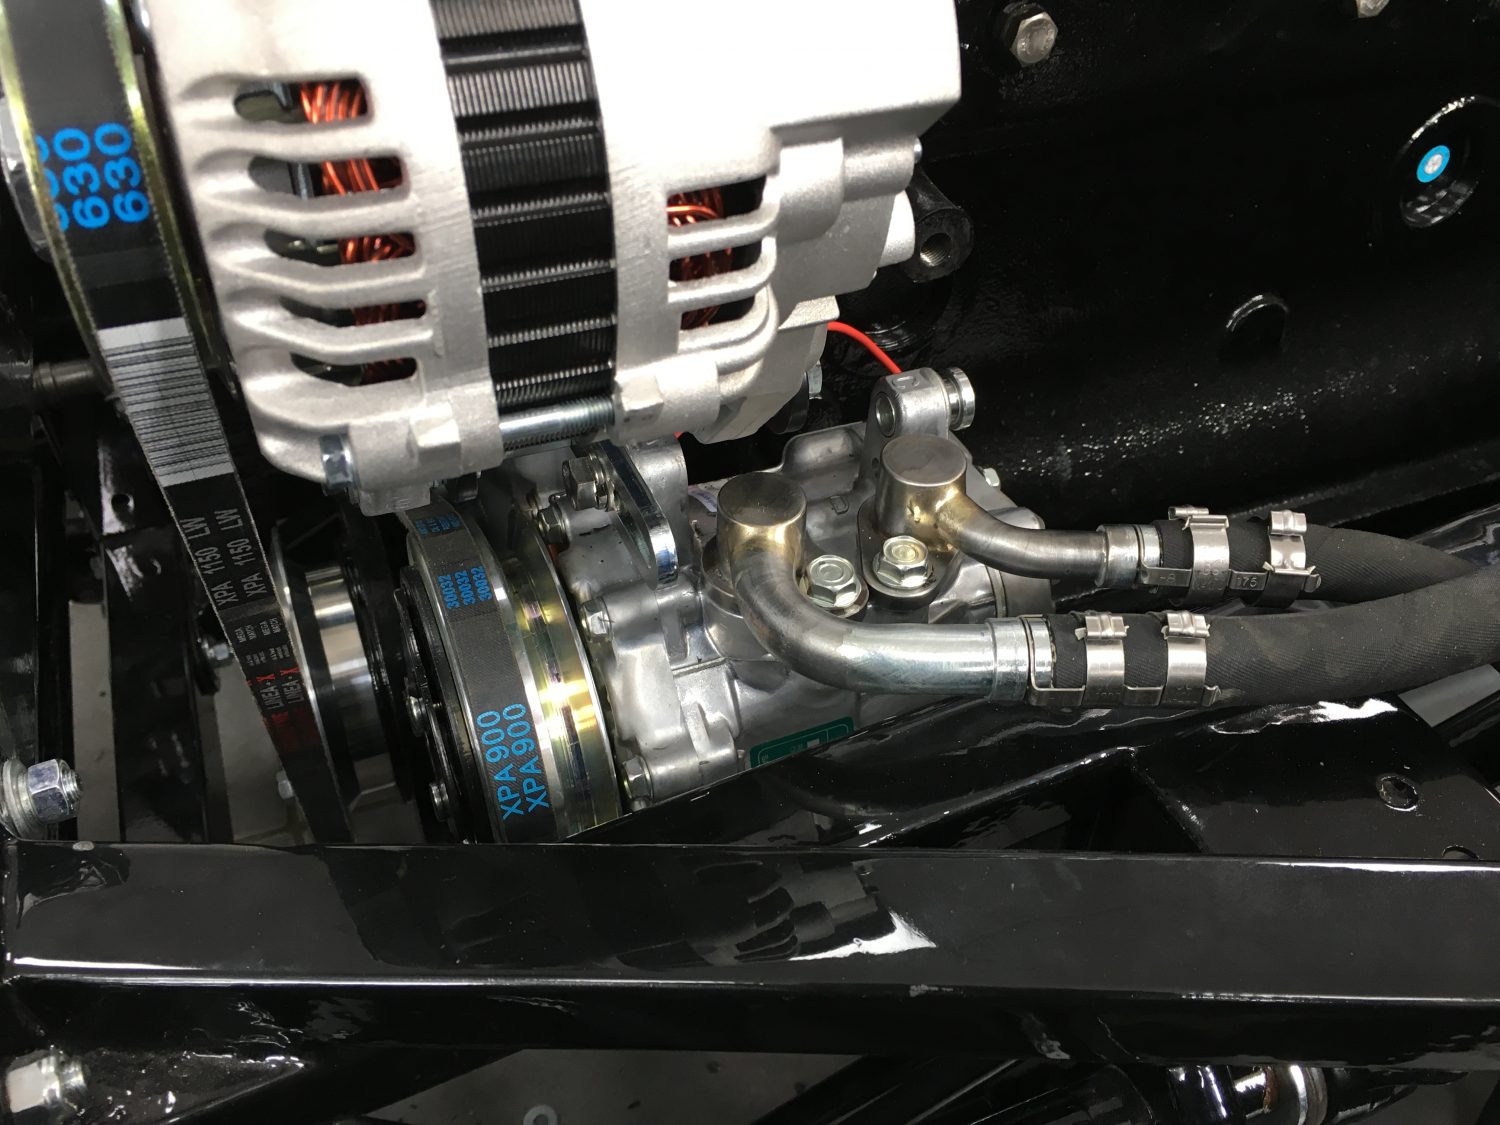
The brand new air filter and housing has now been fitted to our 1967 E-Type.
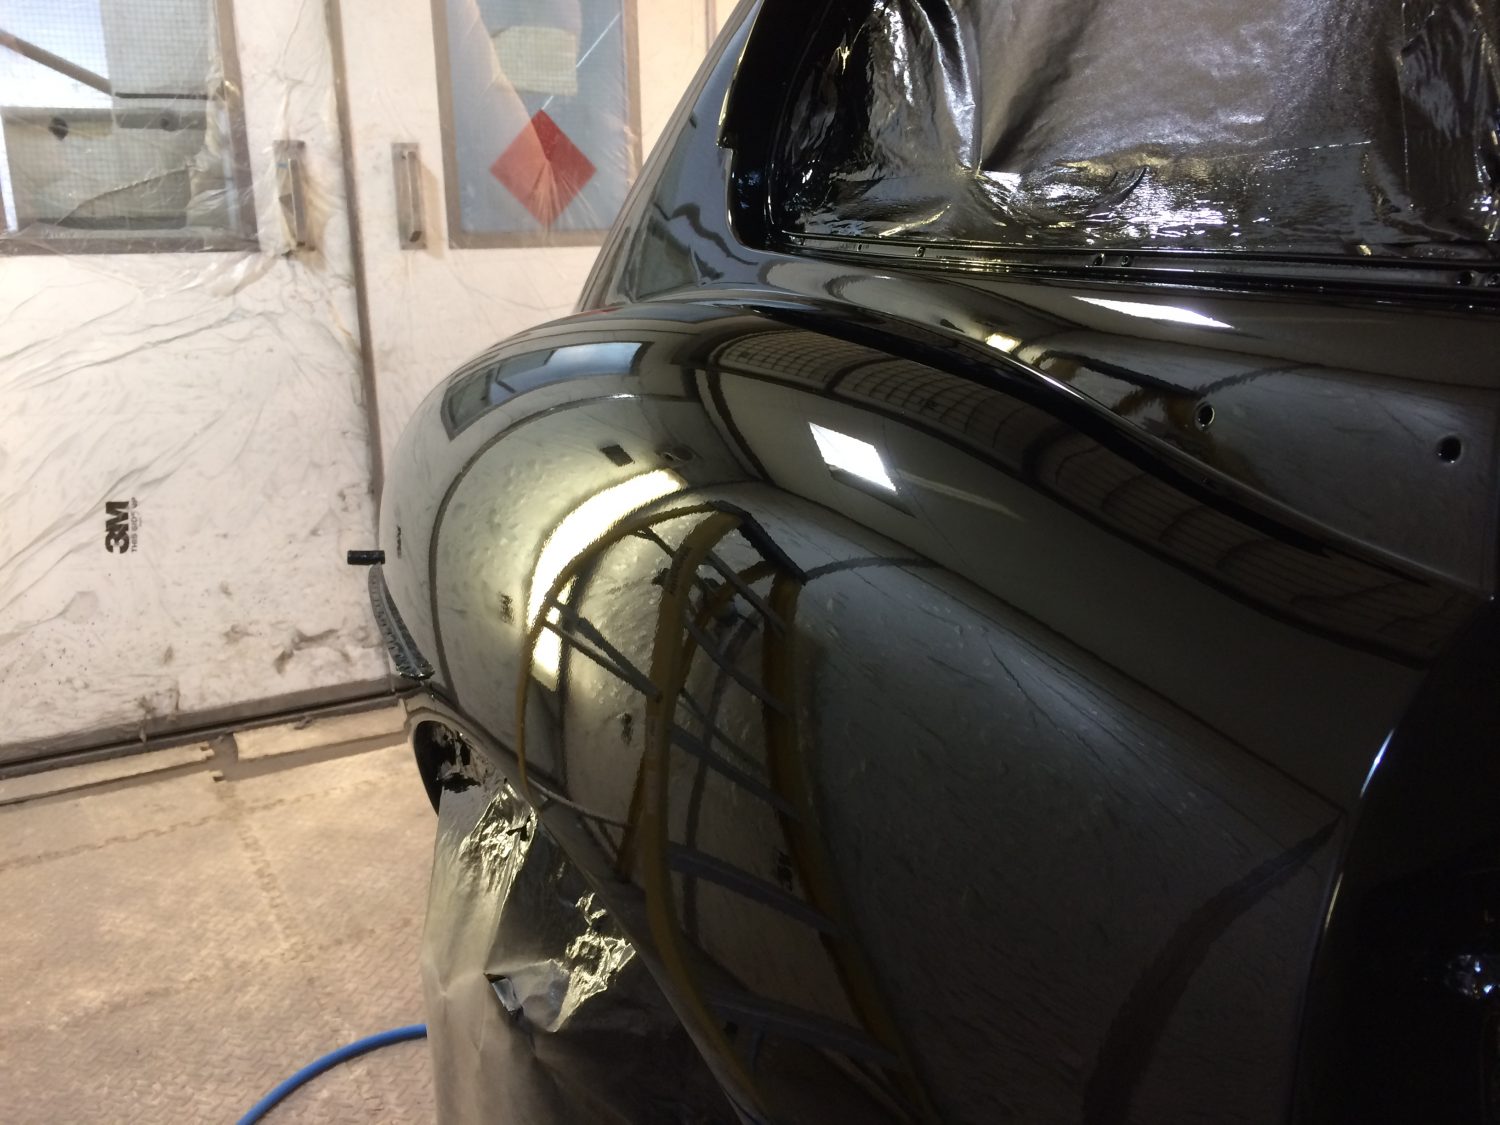
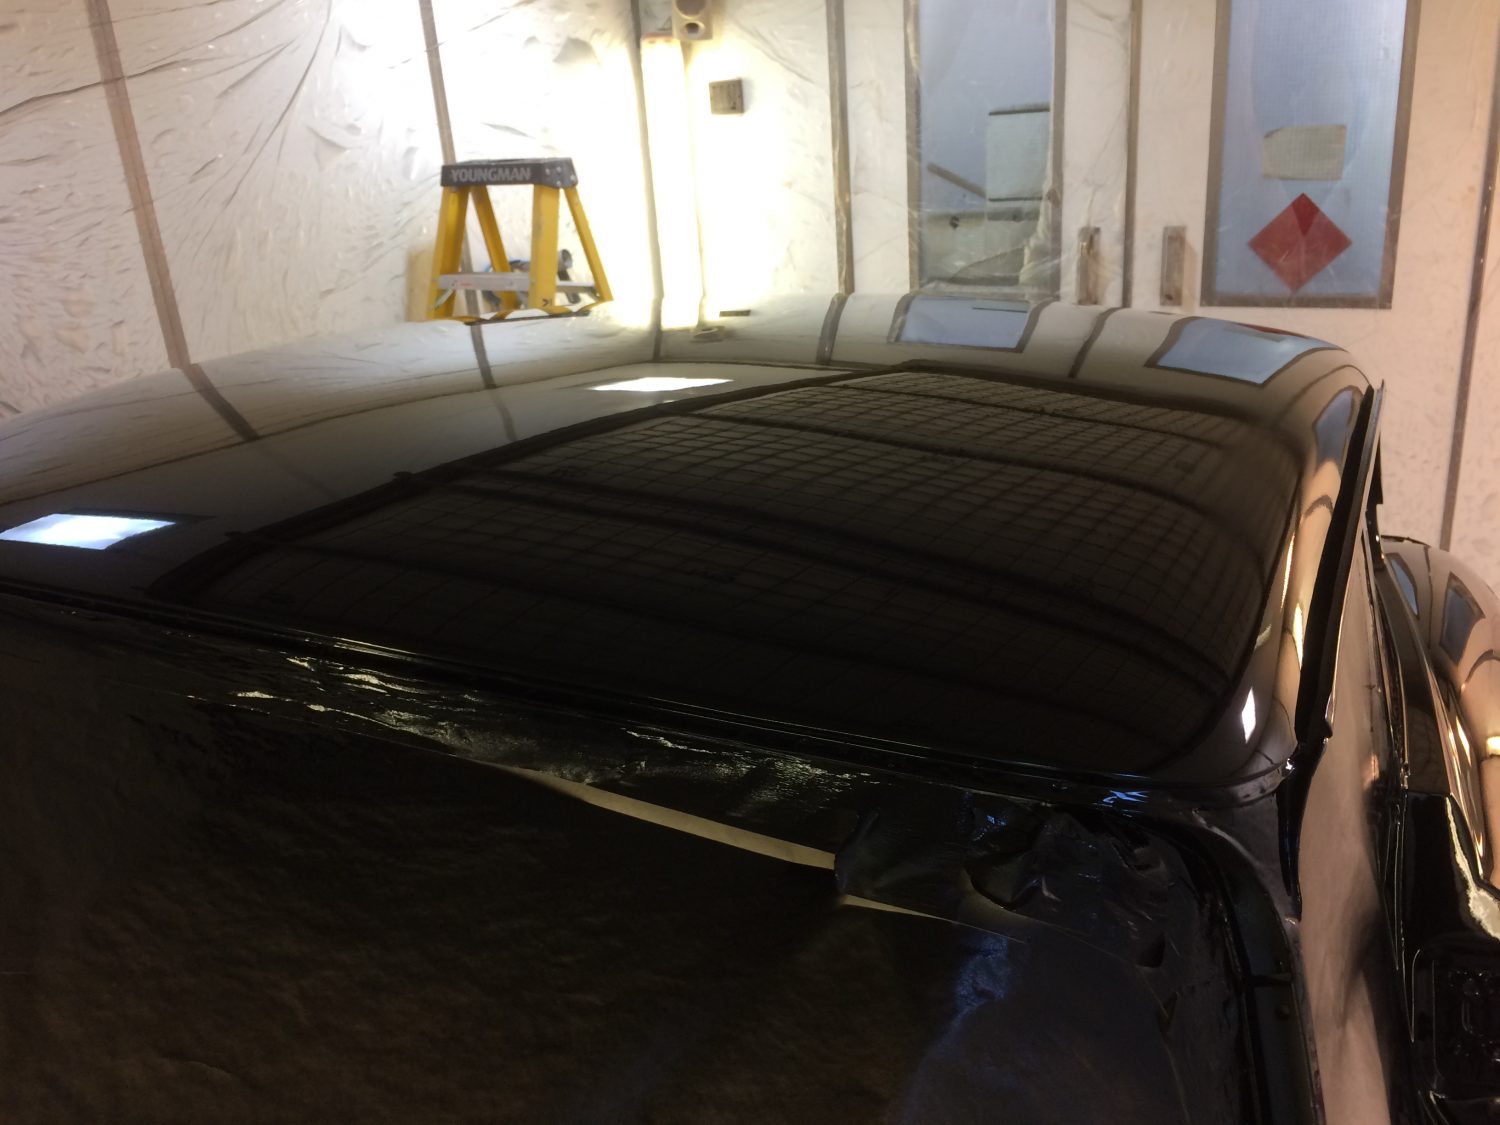
[vc_row][vc_column][vc_column_text]It’s the end of another day at Bridge Classic Cars and as I’m here on my own (Craig) I thought I’d take some up-to-date pictures
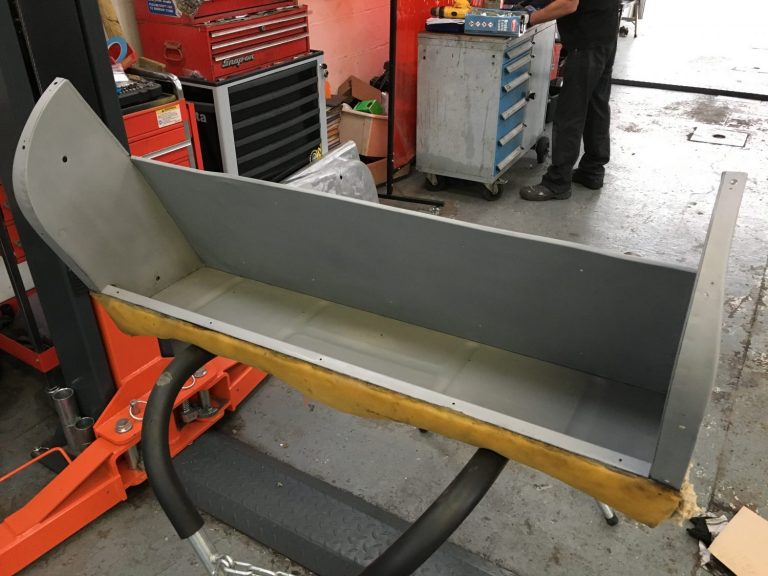
Work has now commenced on refurbishing the original rear interior panel of our 1967 Jaguar E-Type. Now the brand new interior has arrived from Aldridge

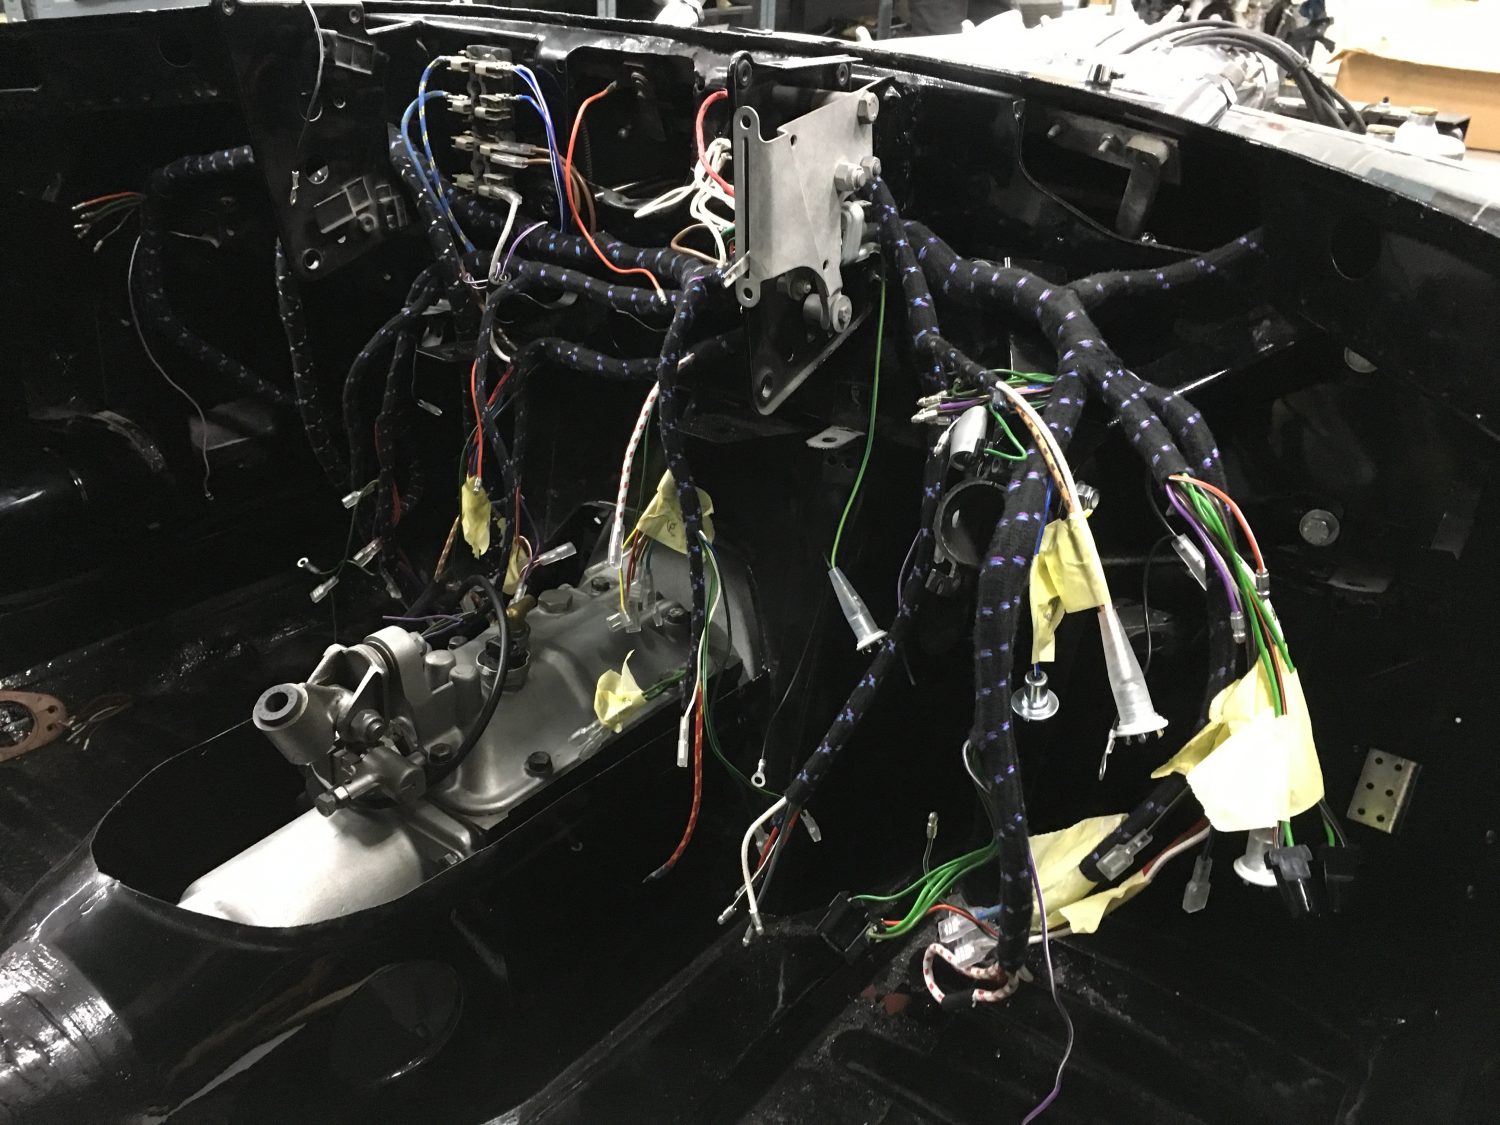
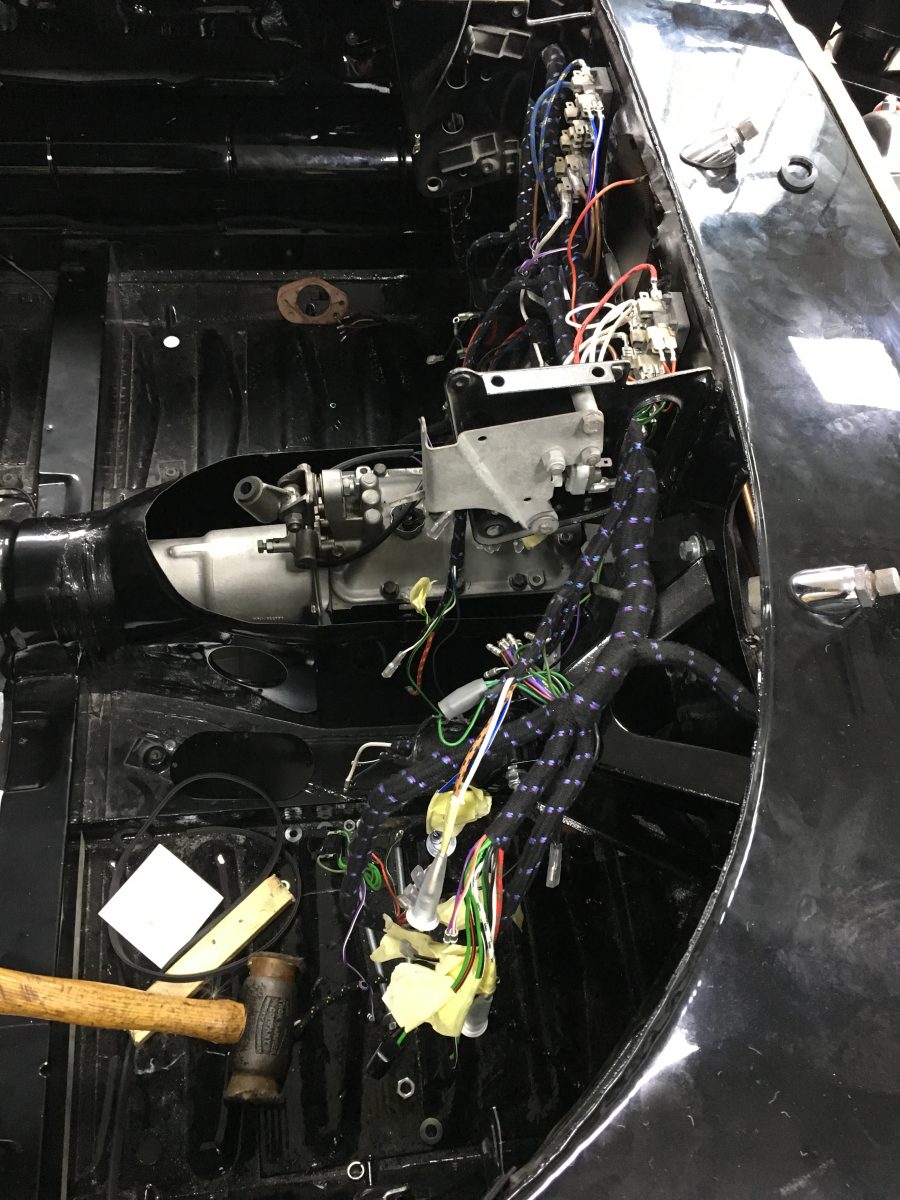
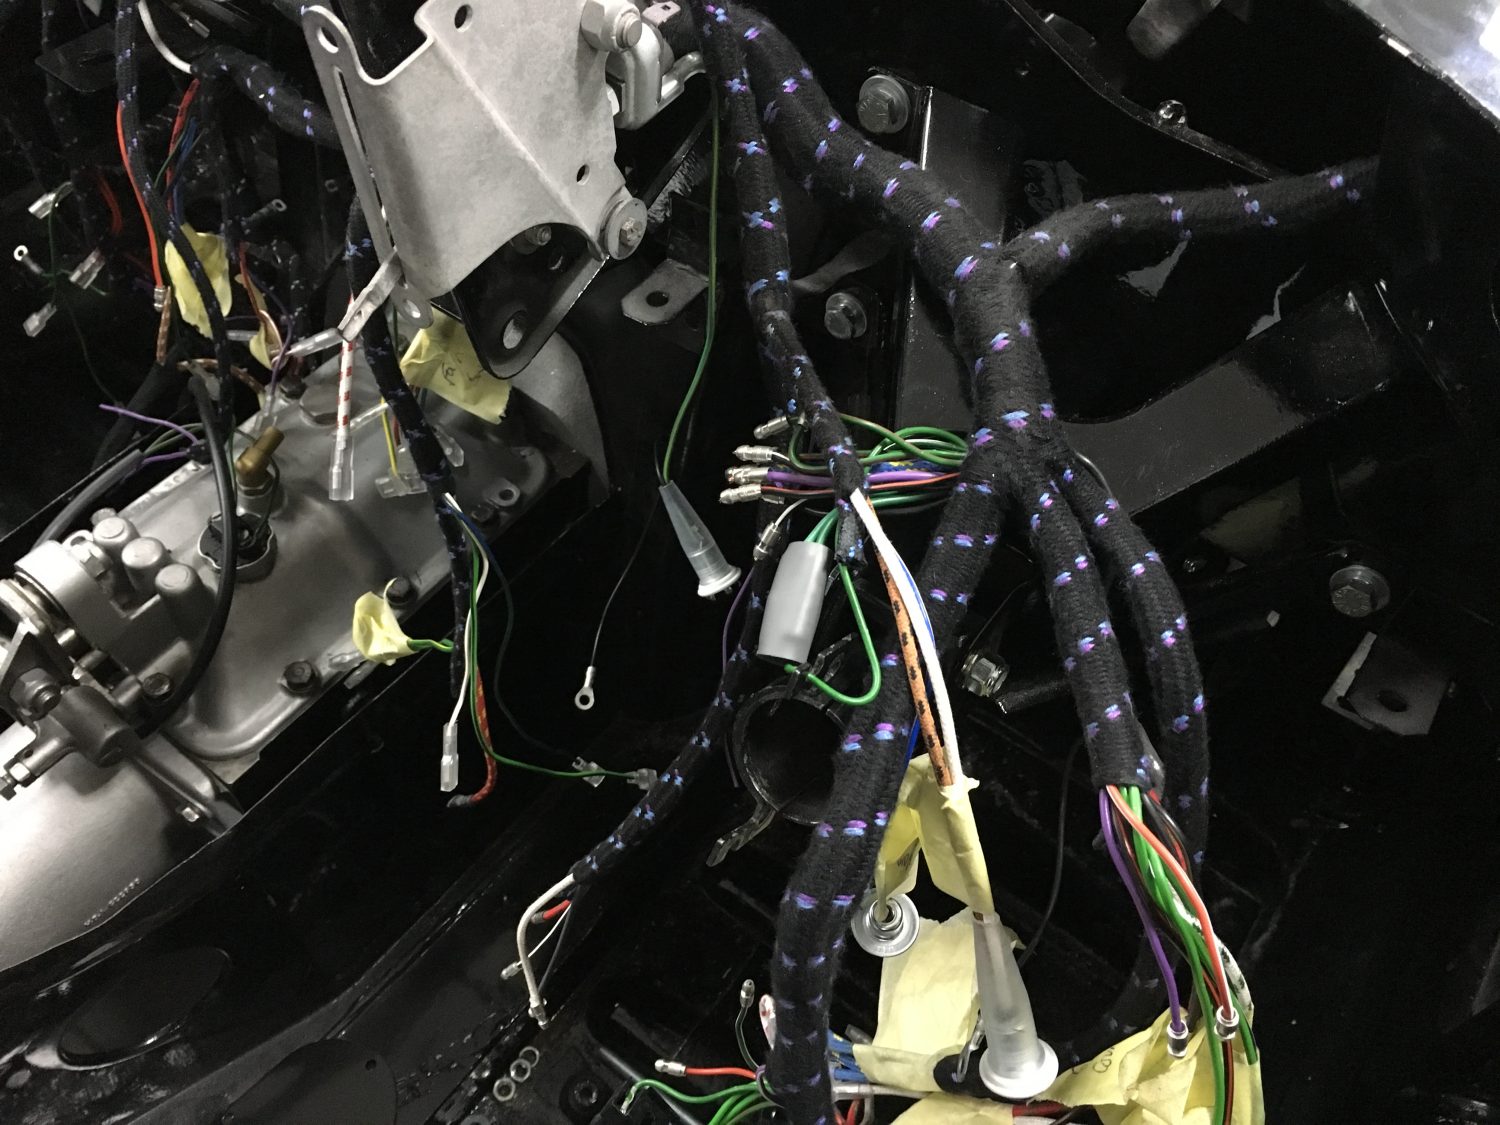
As with the majority of our wiring harness’, we deal directly with Autosparks. Autosparks are the market leaders in manufacturing bespoke harness’. They use British Standard

The brand new upgraded throttle linkage has now been fitted to our 1967 Jaguar E-Type. As you can see, the stunning new set up is

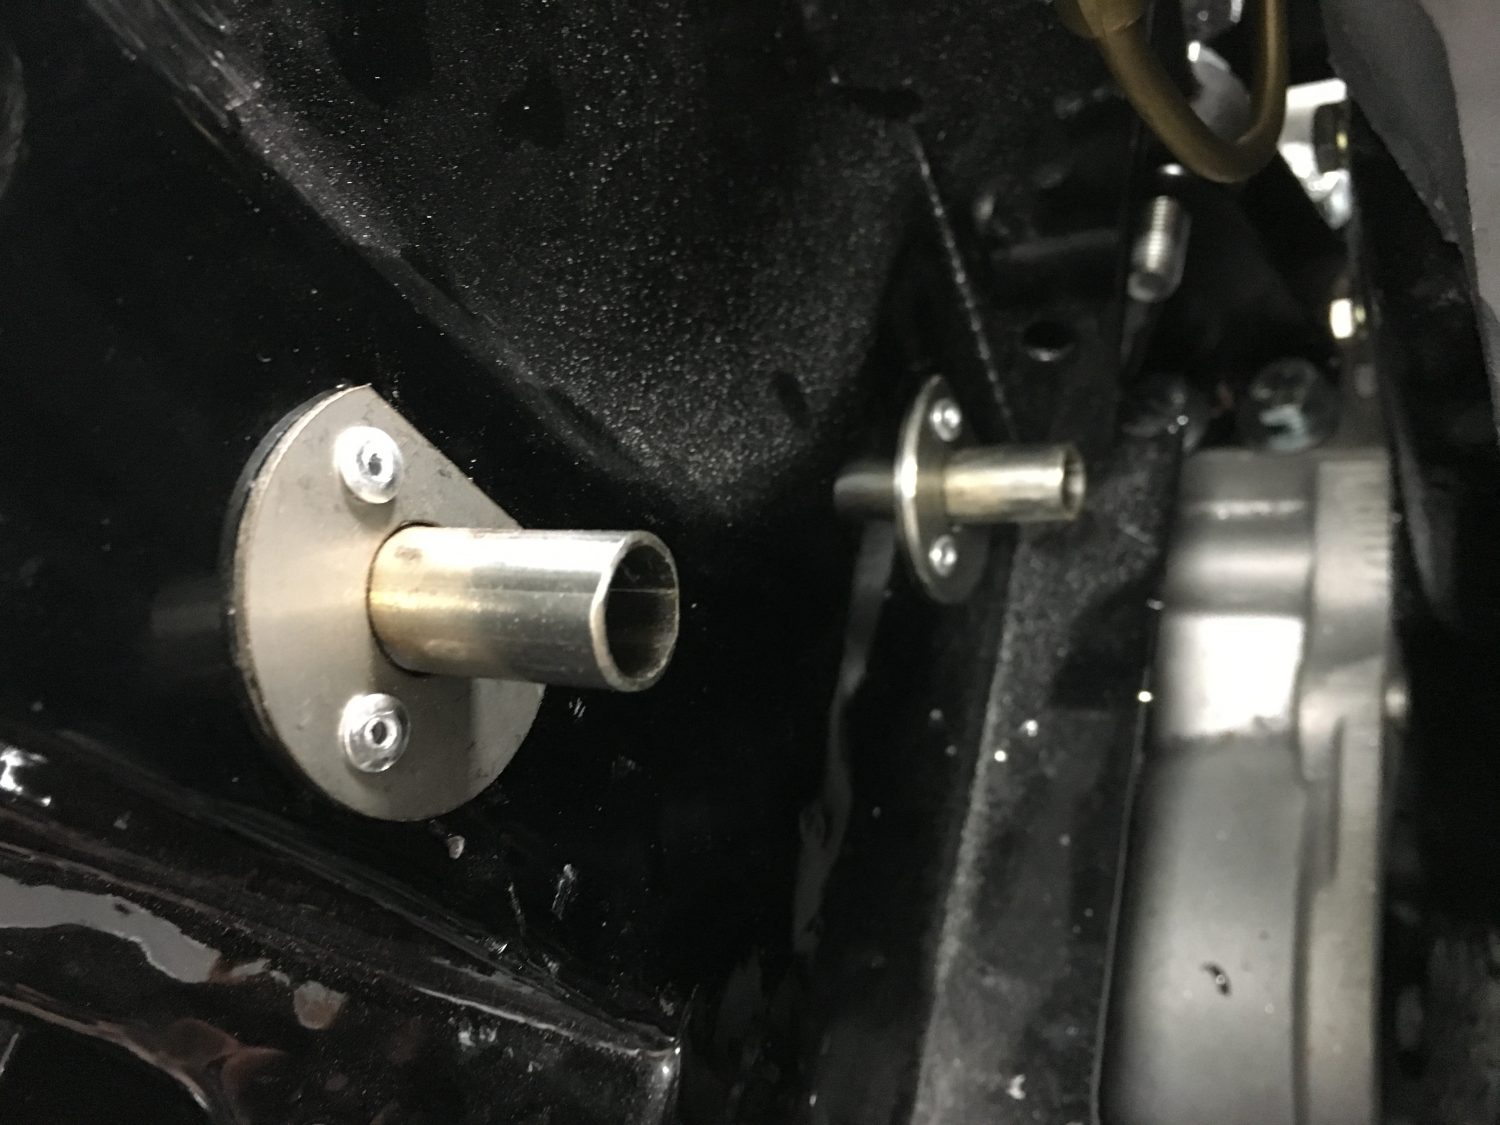
The new heater blower has been temporarily fitted up. Before we make this 100% secure, firstly the engine will need to be fitted up and
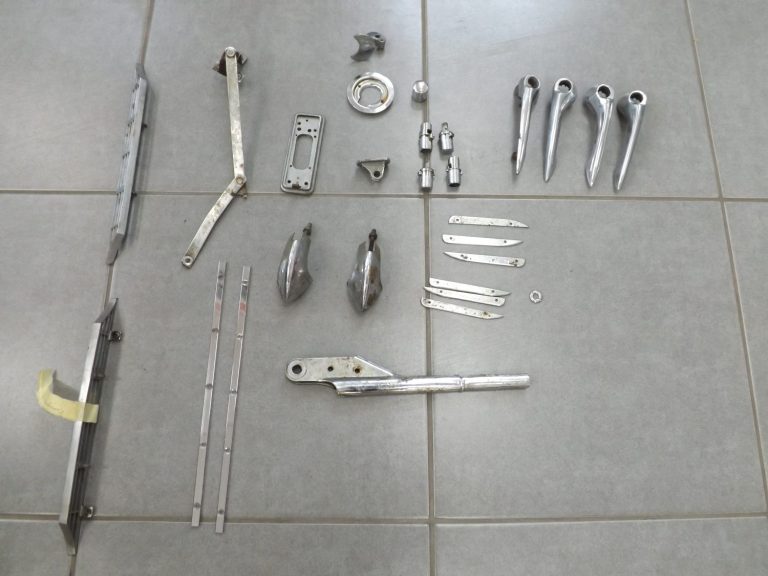
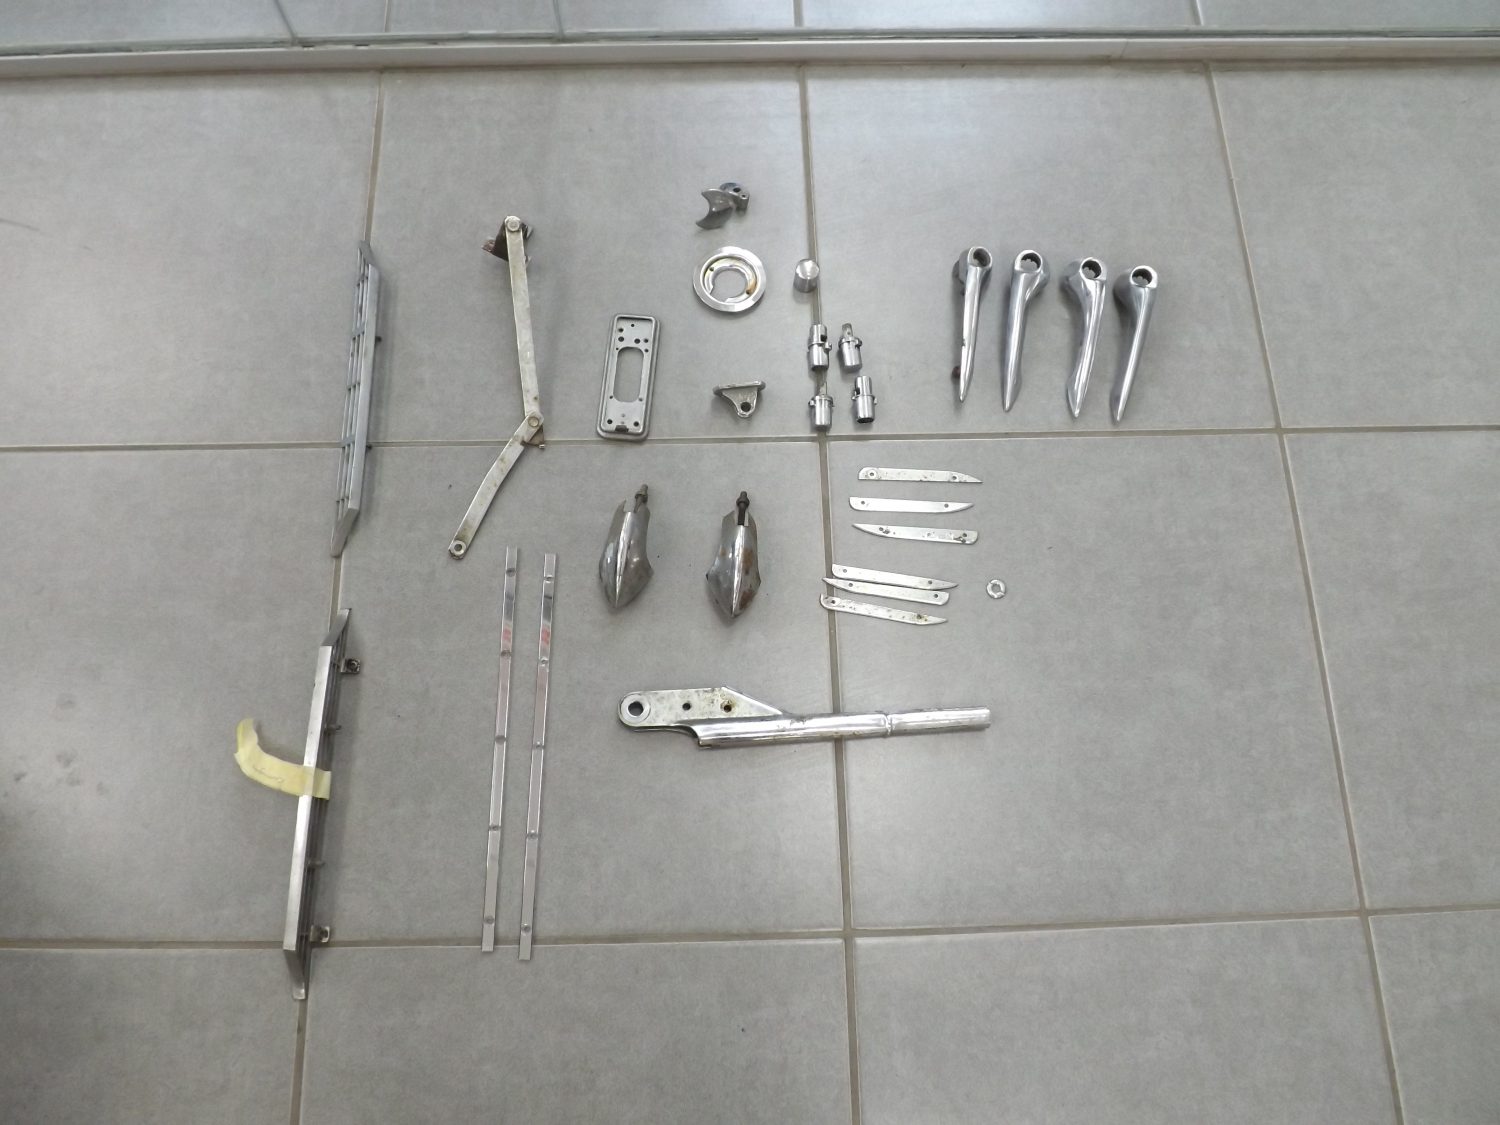
Some additional pieces of bright-work have been added to the collection over at Wyatt Polishing. No major repair work is required so this collection will
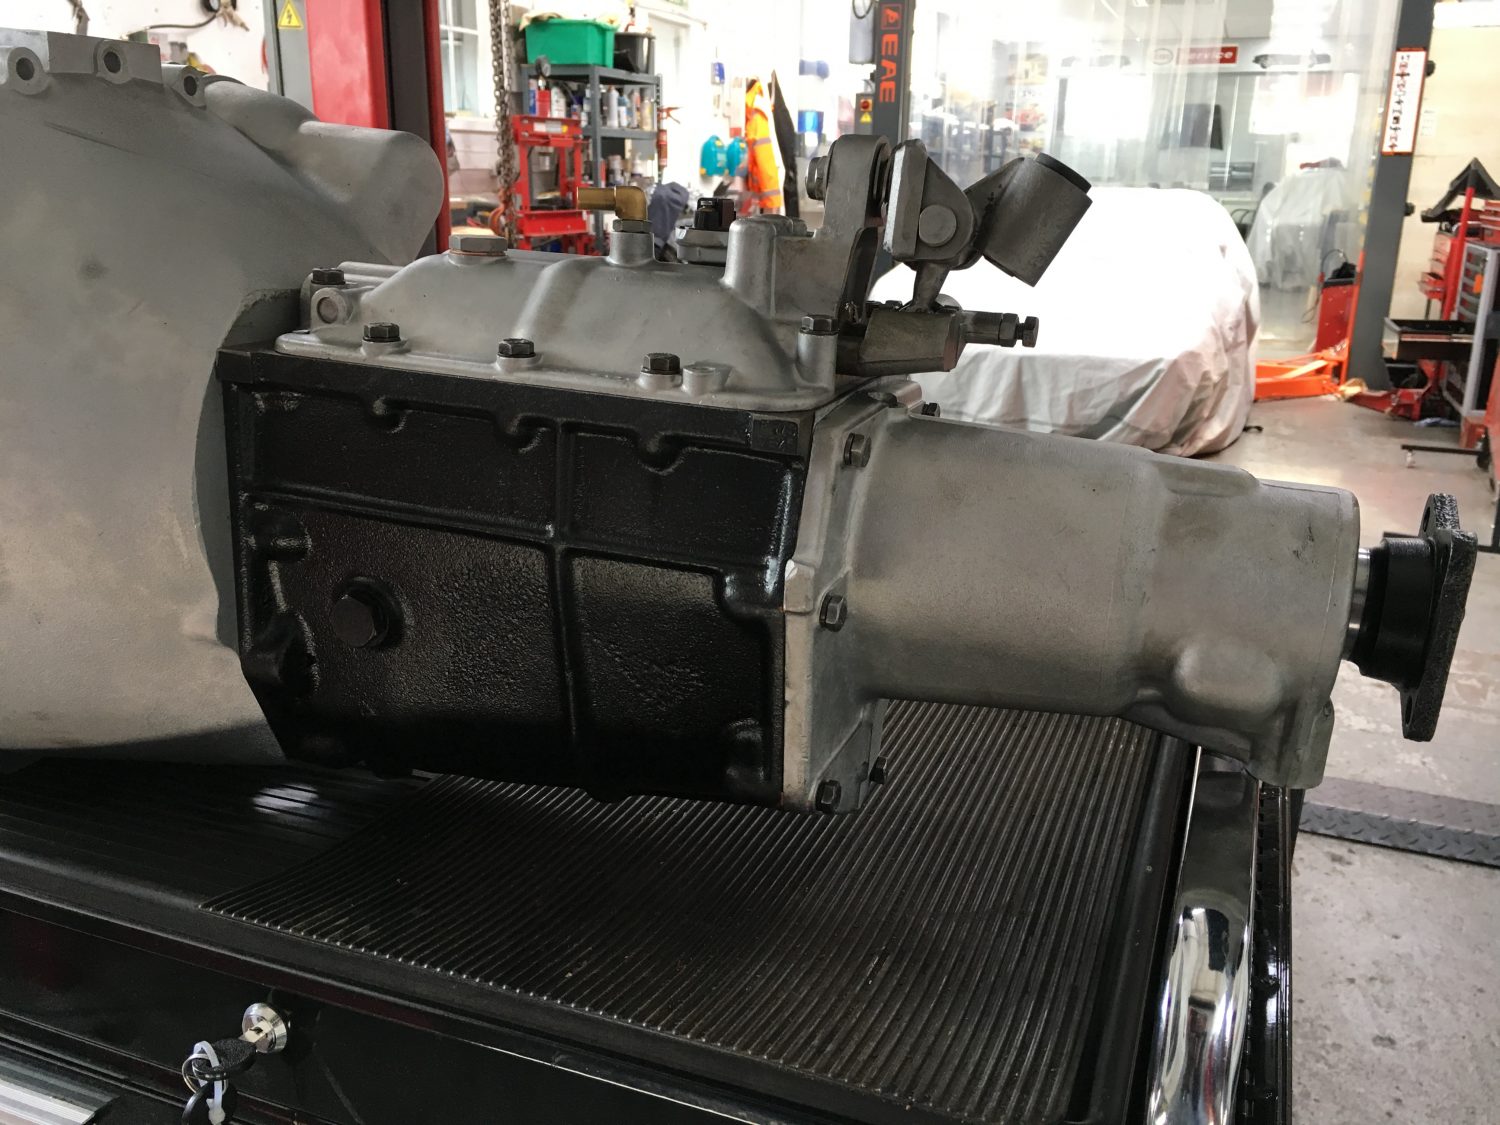
Tommy has now completed the task of refurbishing and re-painting our 1967 Jaguar E-Type gearbox tunnel. With the engine and gearbox now fitted into the
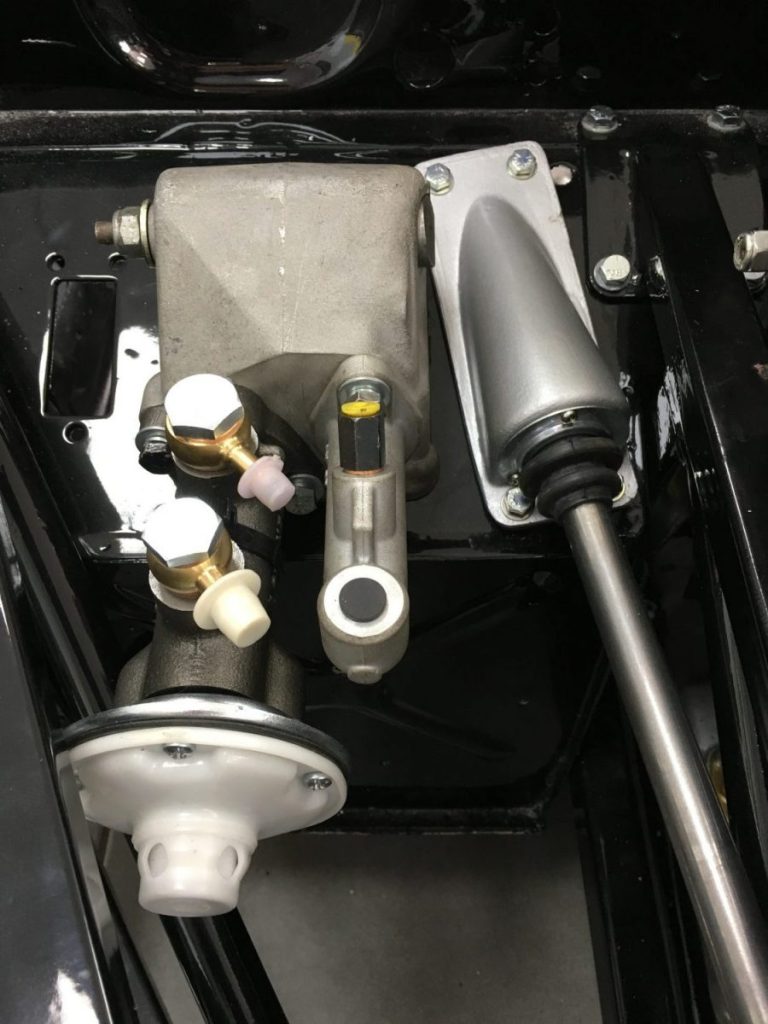
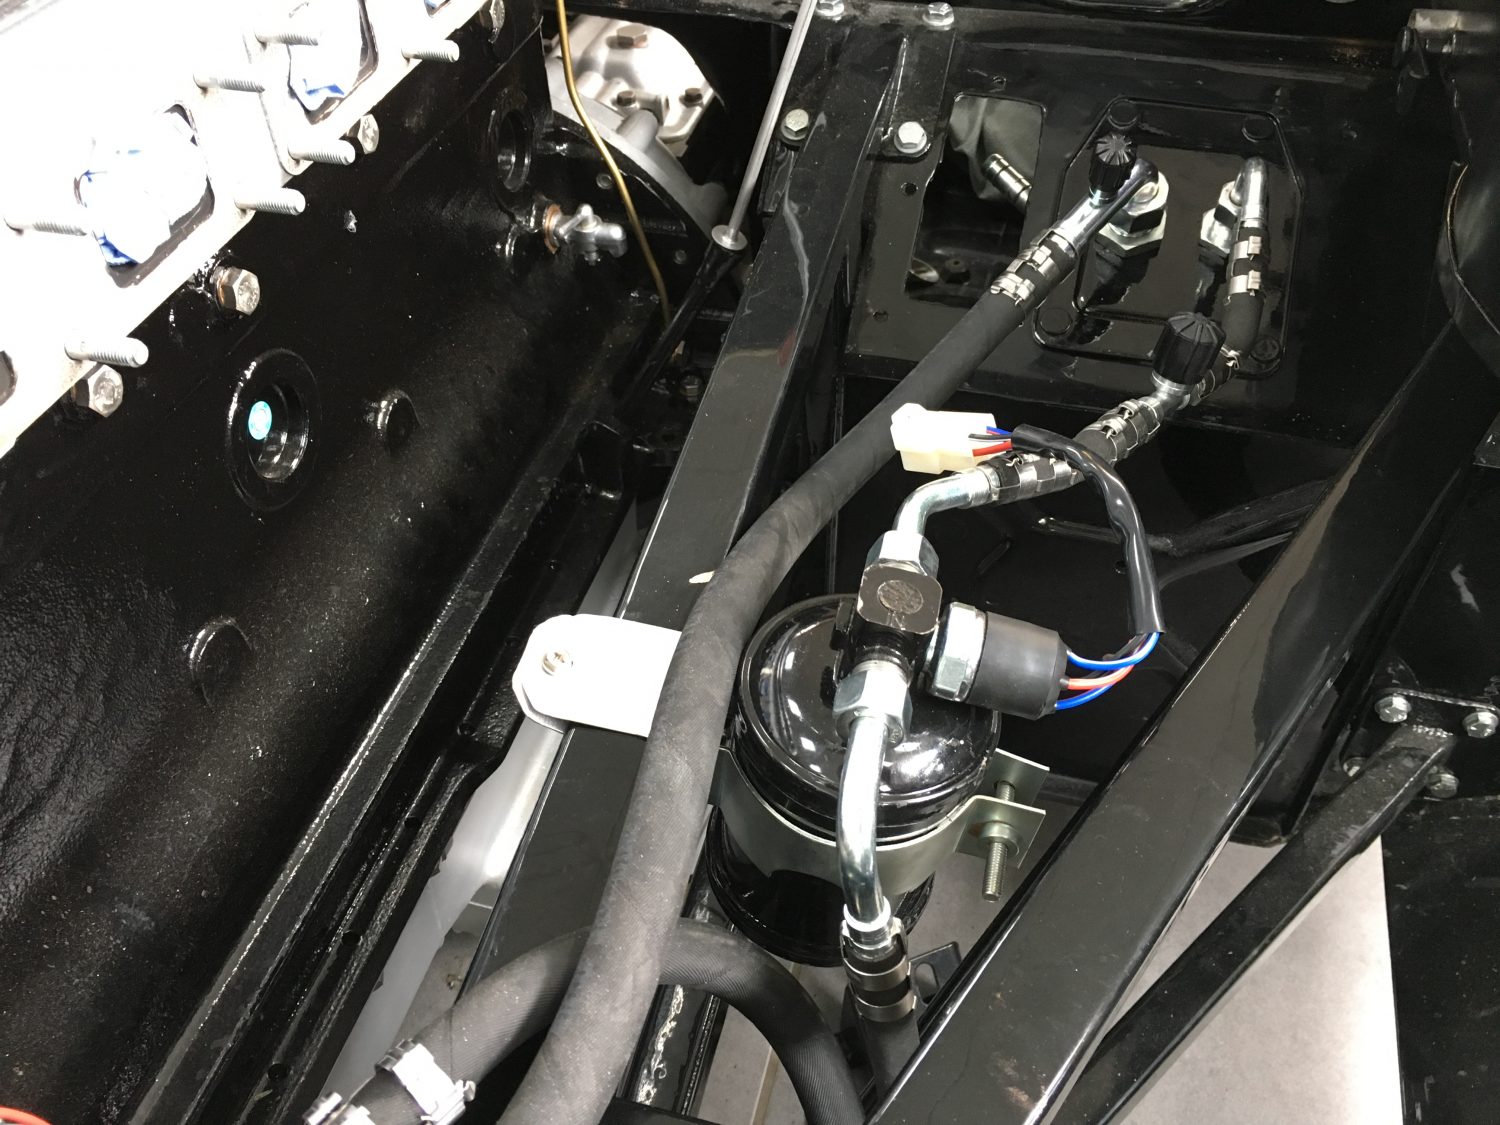
The new master cylinder has now been fitted up… …along with the new heater hose pipes.

The time has come for our 1967 Jaguar E-Type to, once again, return to the floor. It’s been a long time, sitting up high on

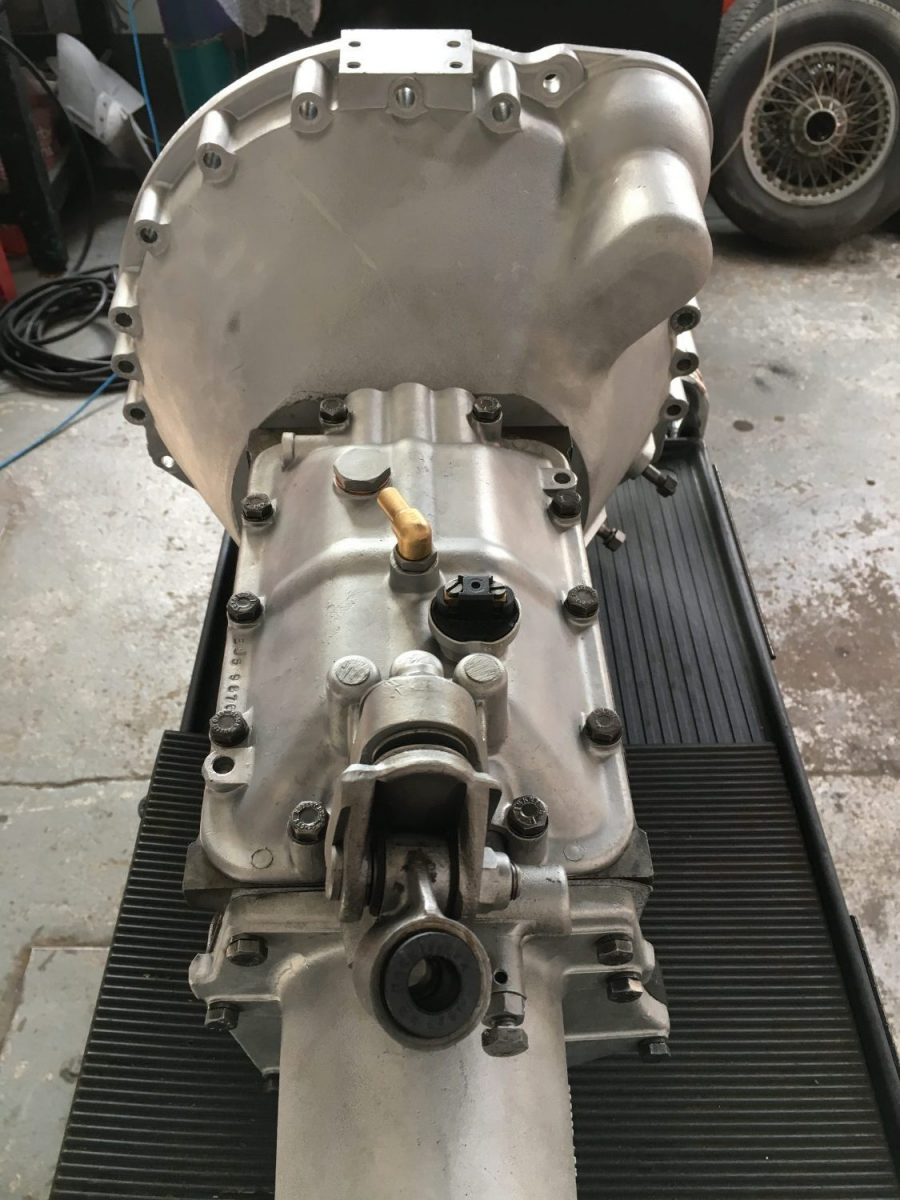
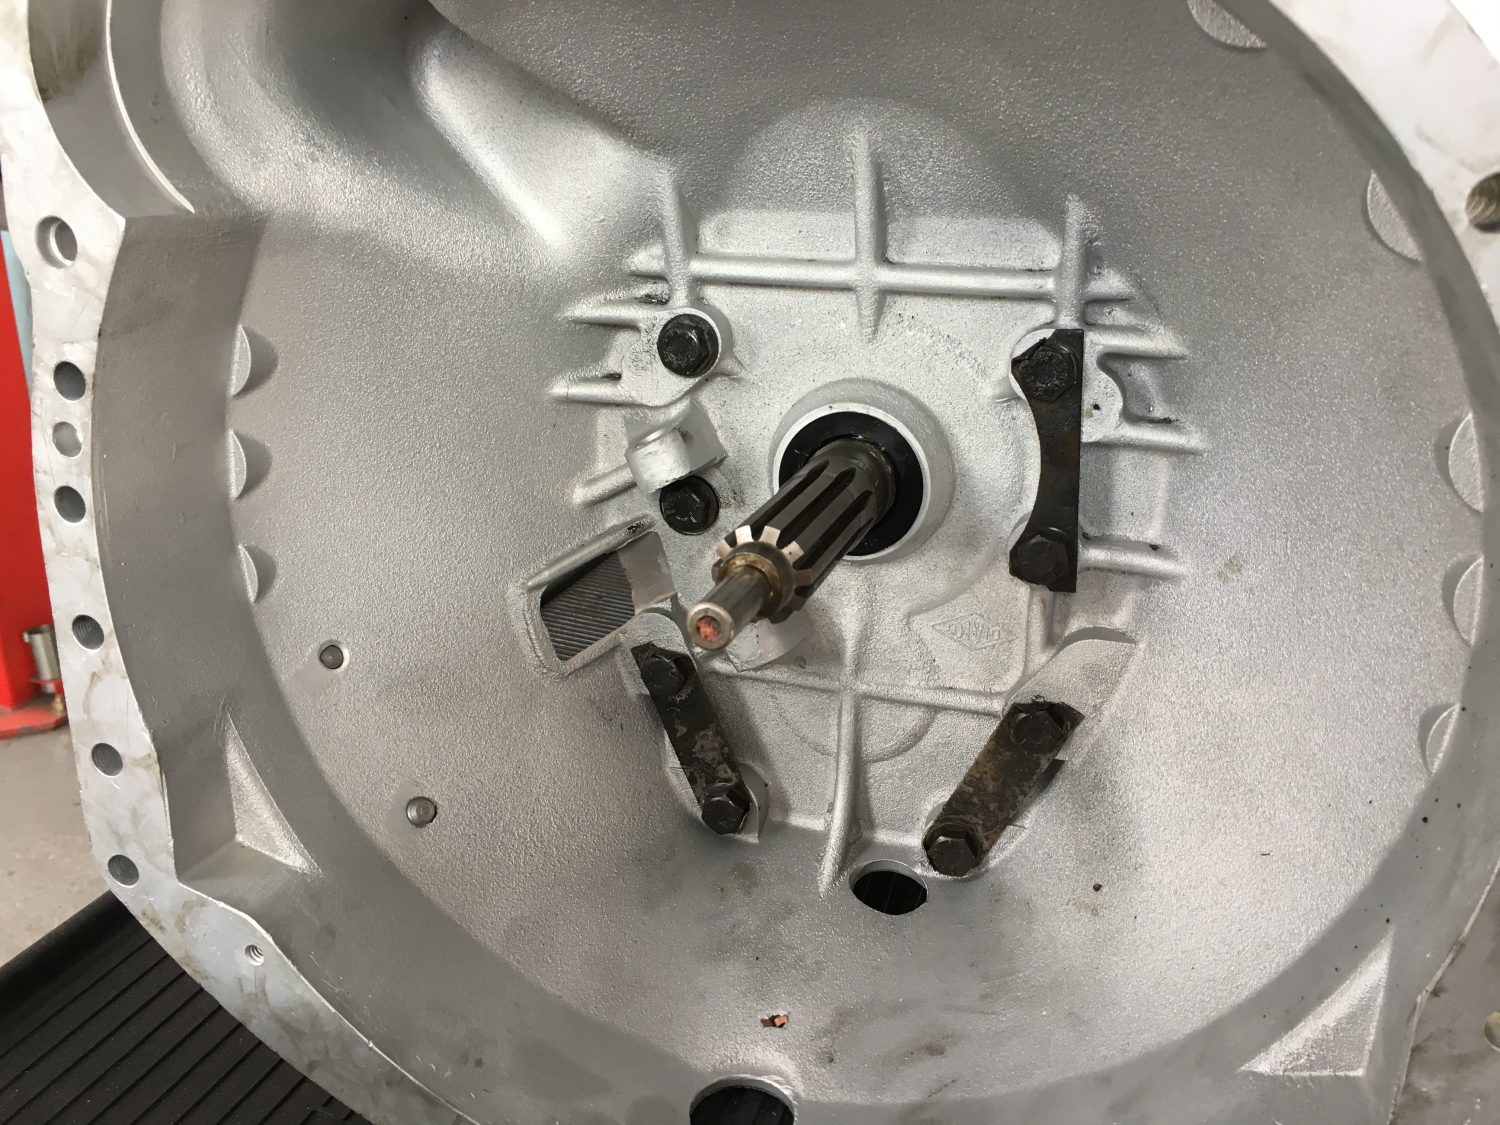
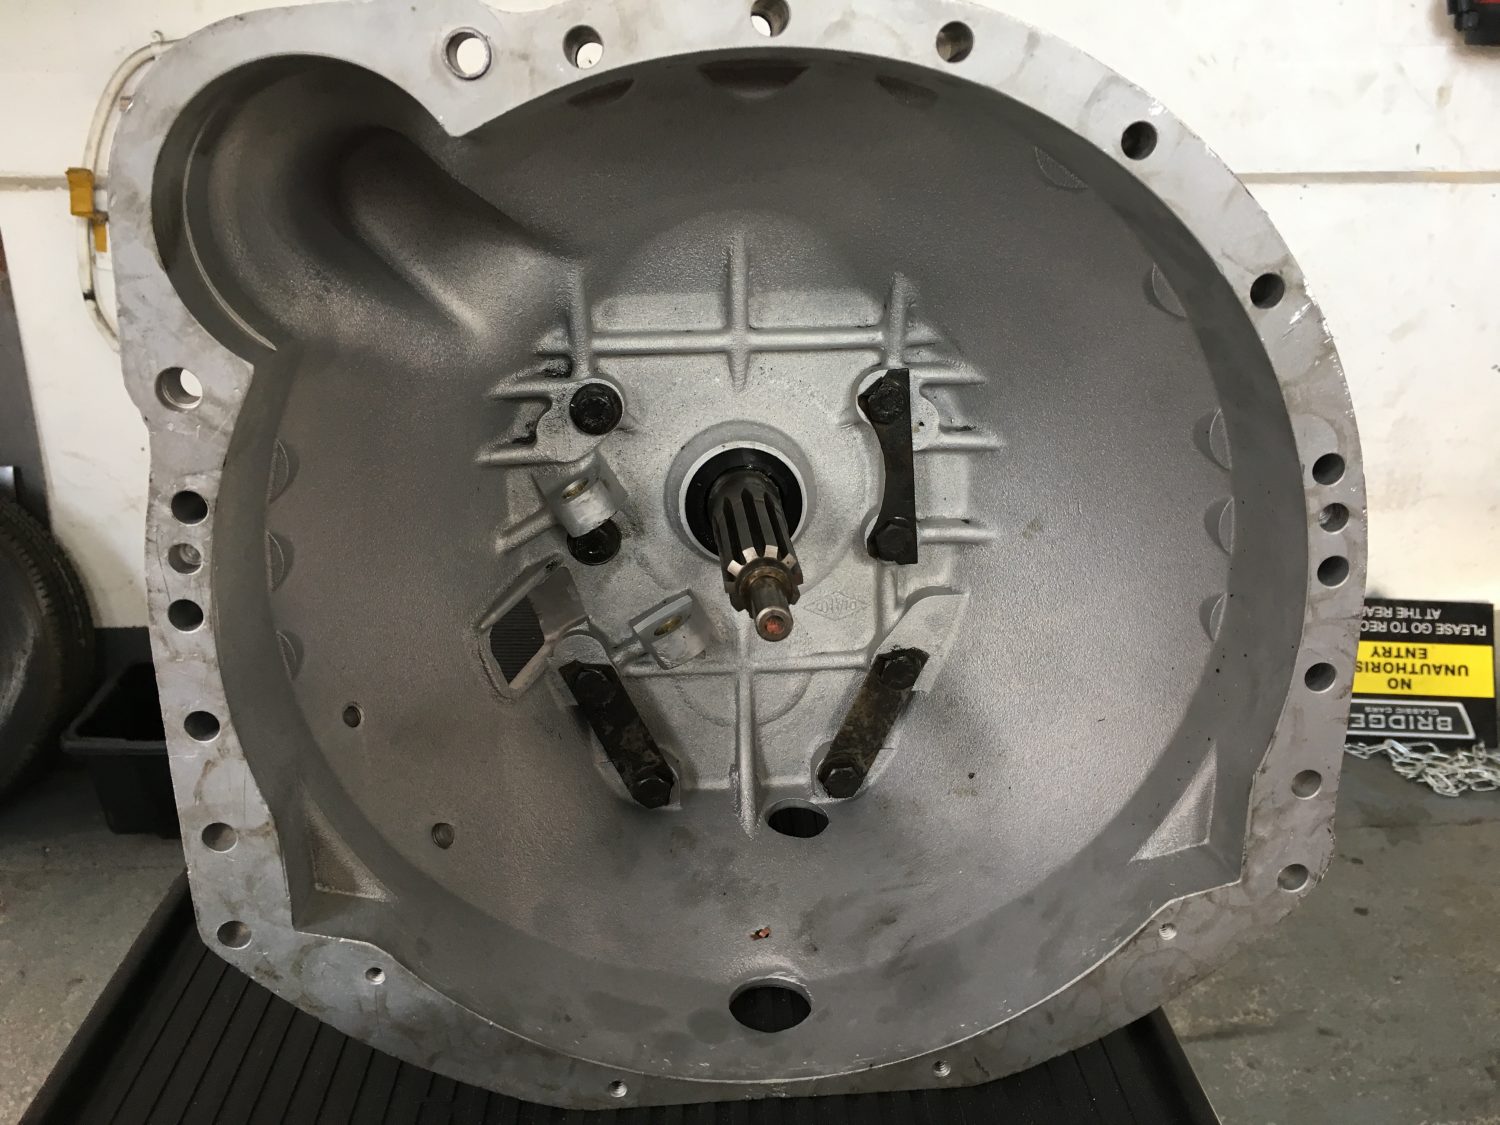
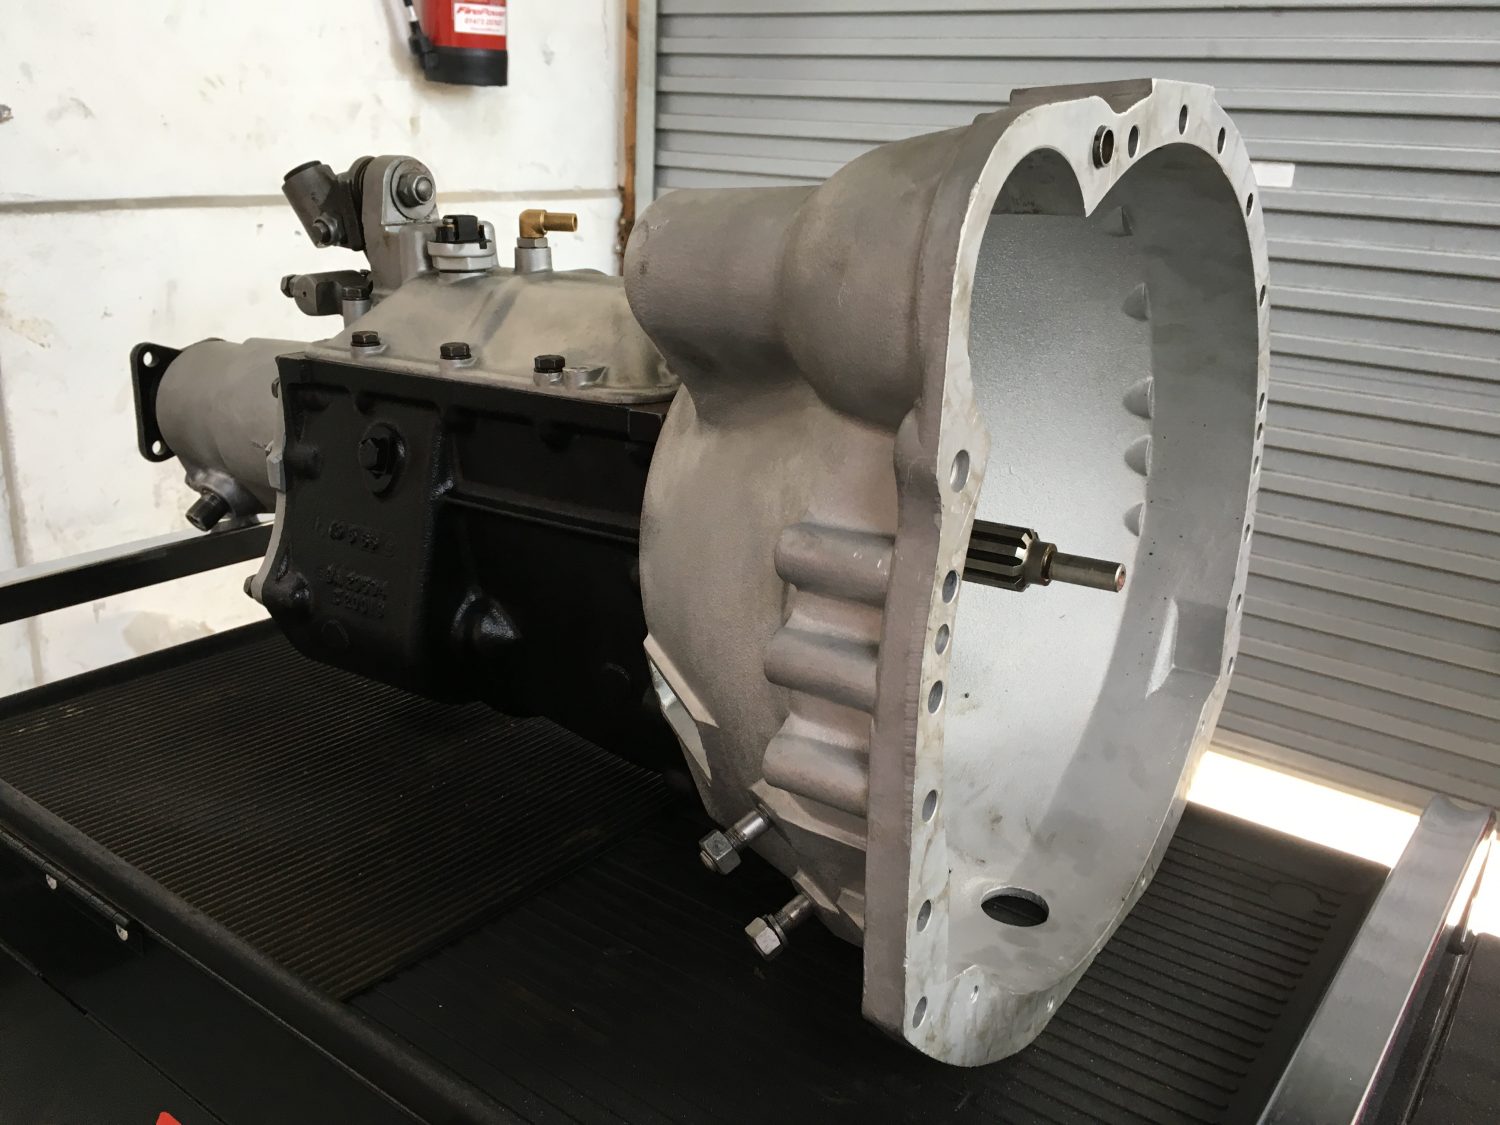
With the 4 speed gearbox and bell housing fully stripped, cleaned, repaired, powder coated and rebuilt, it is now ready to be married up to
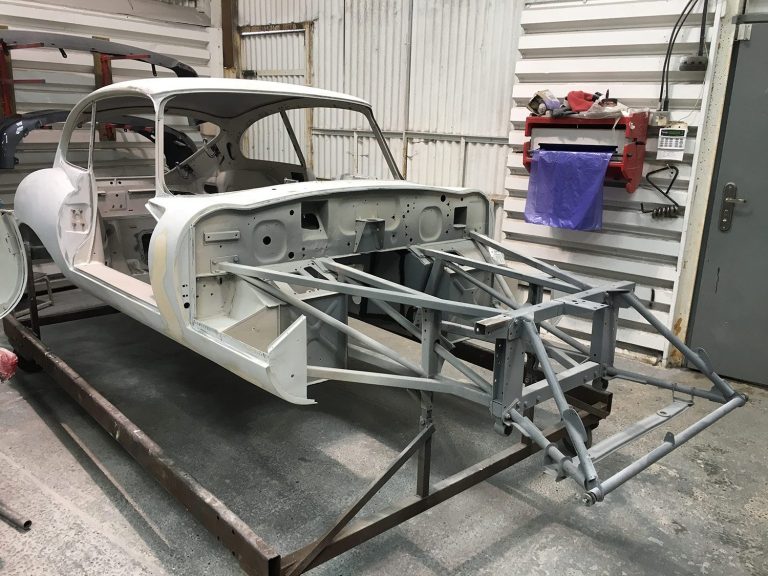
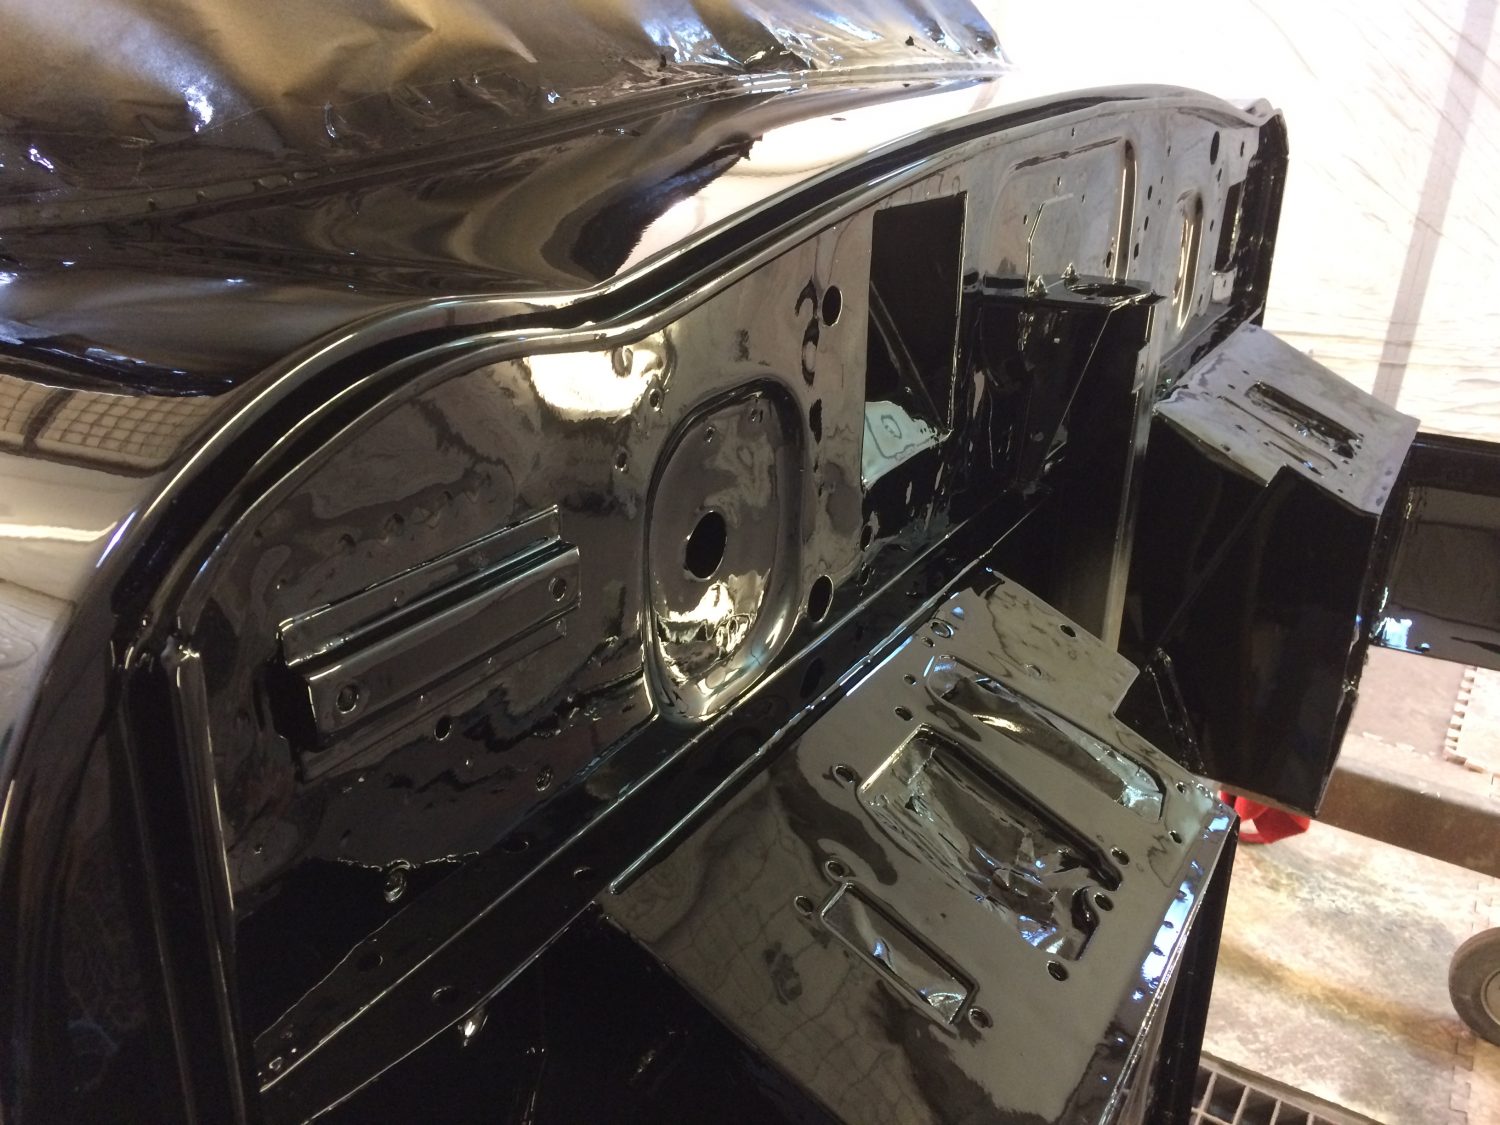
[vc_row][vc_column][vc_column_text]With the freshly painted body shell back with us it is time for Tommy to refit the newly refurbished components. Here we have the back
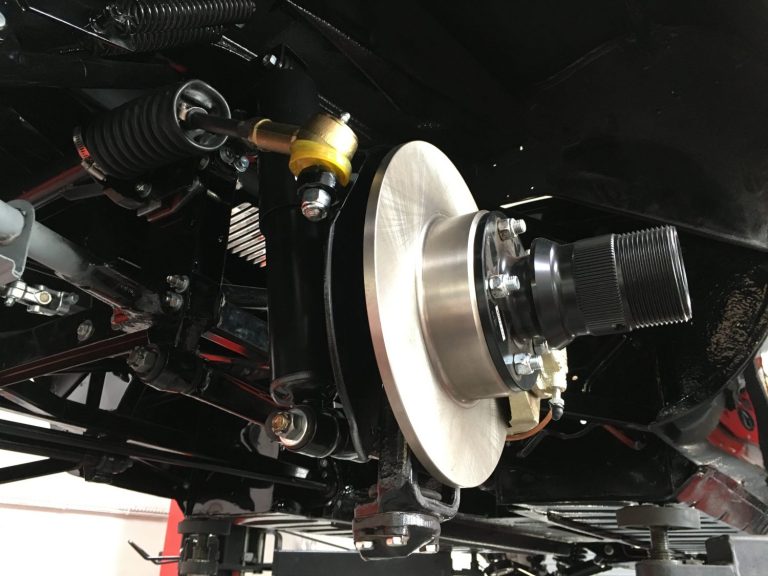
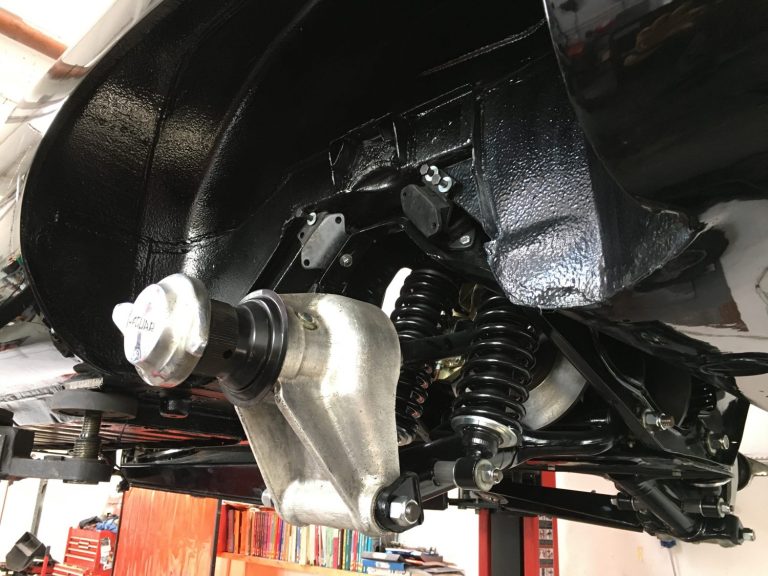
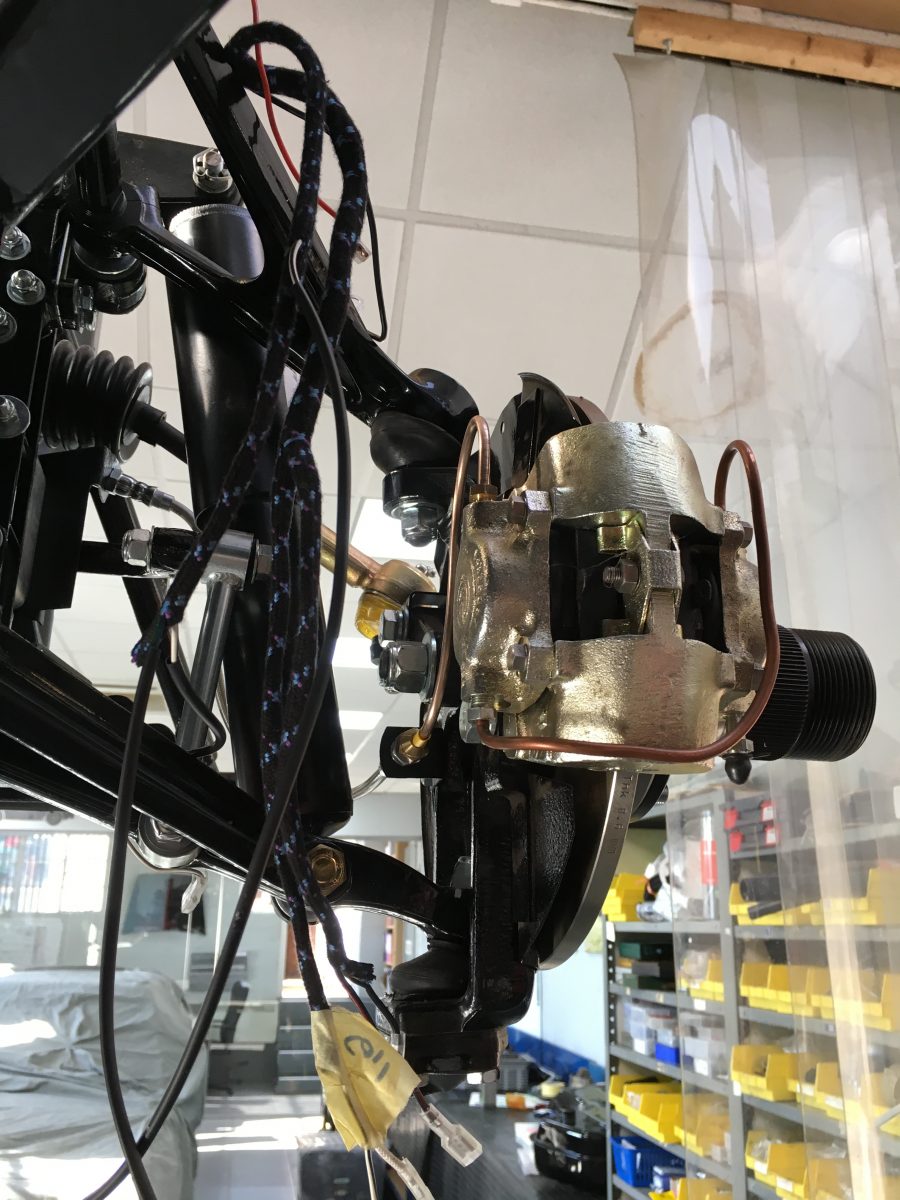
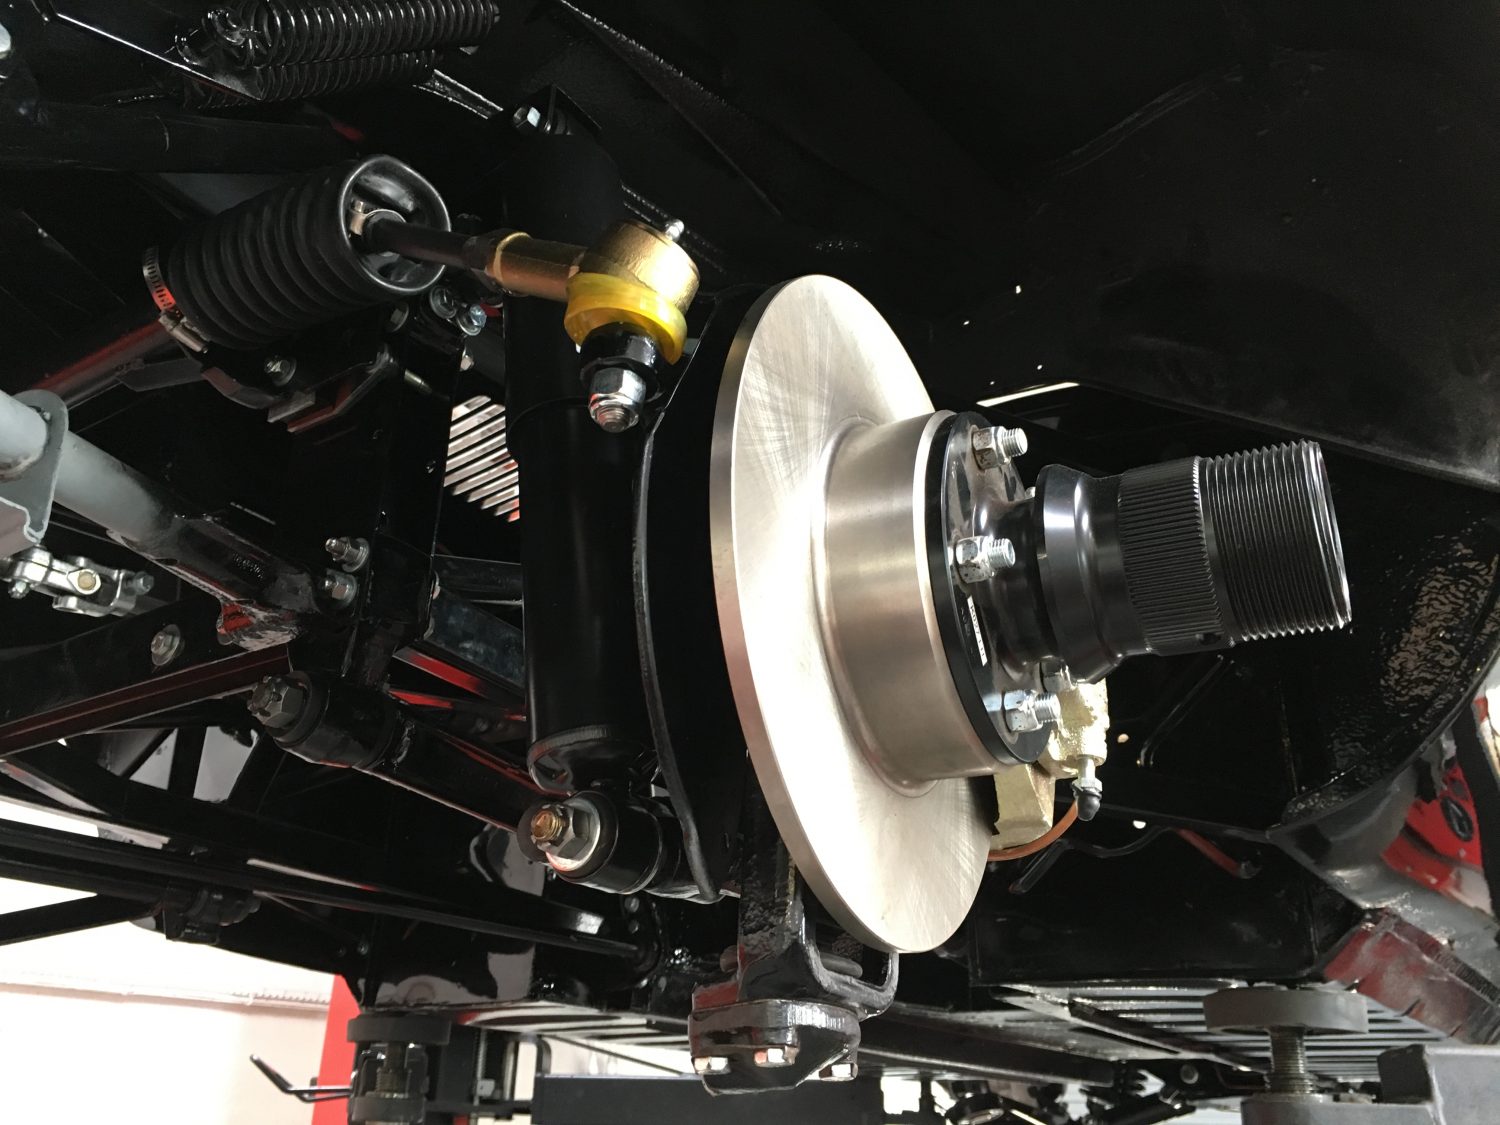
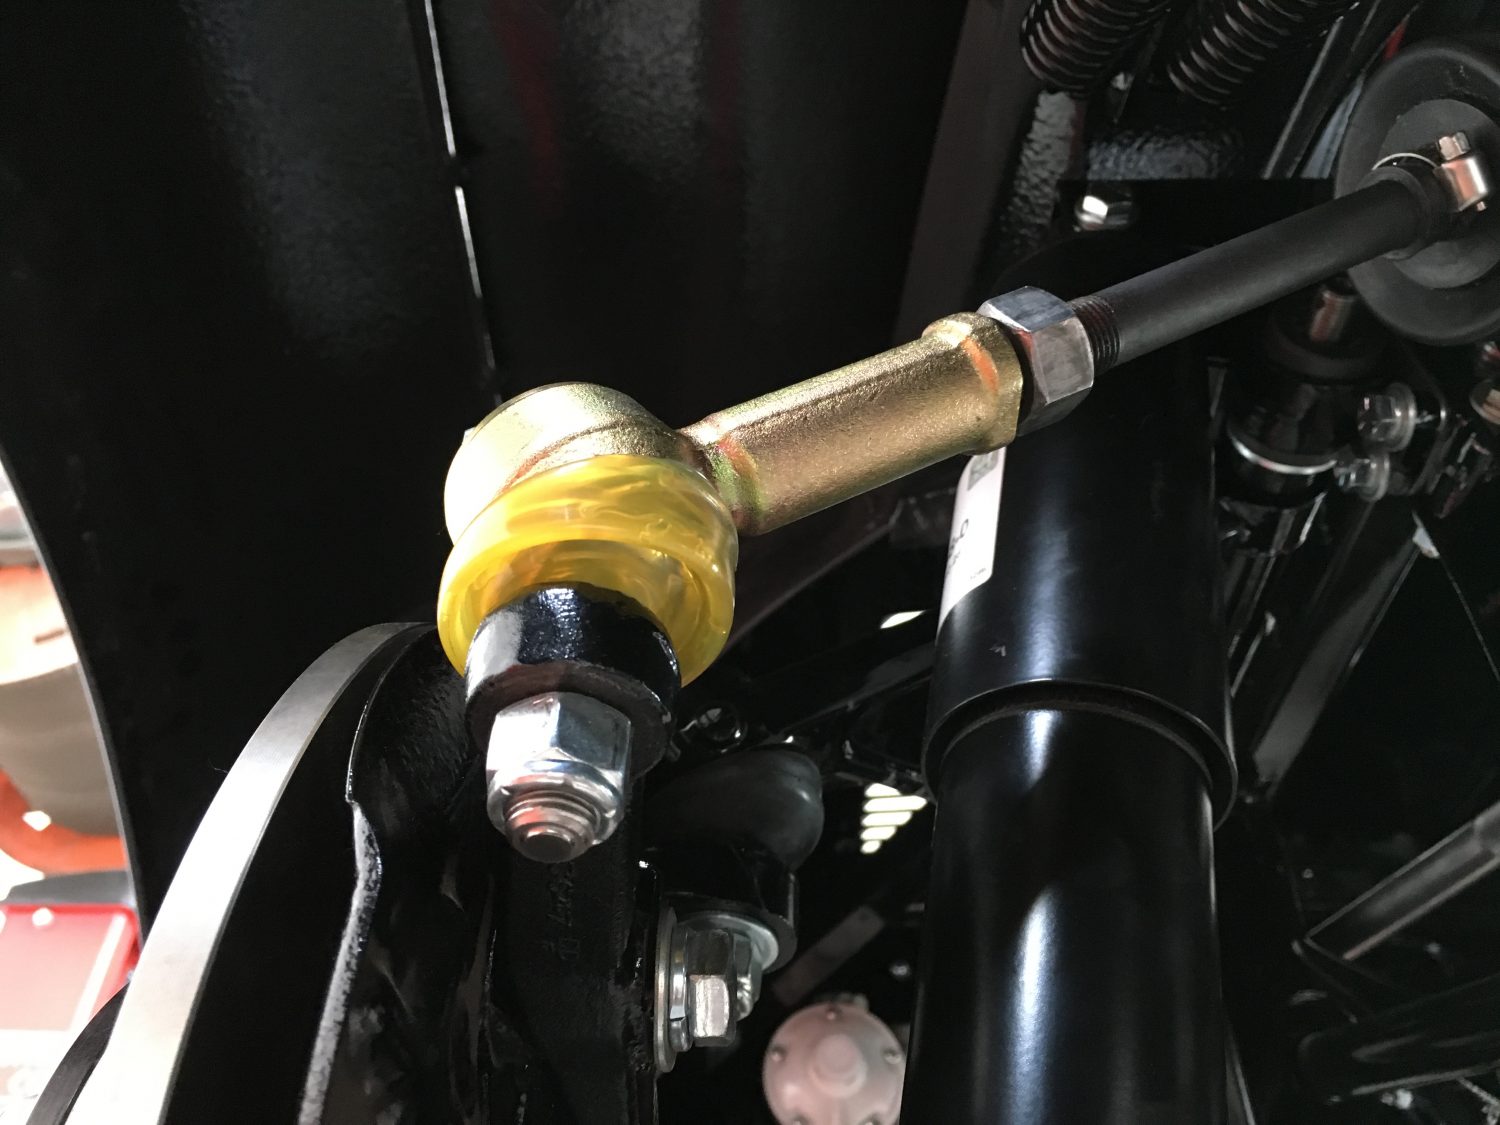
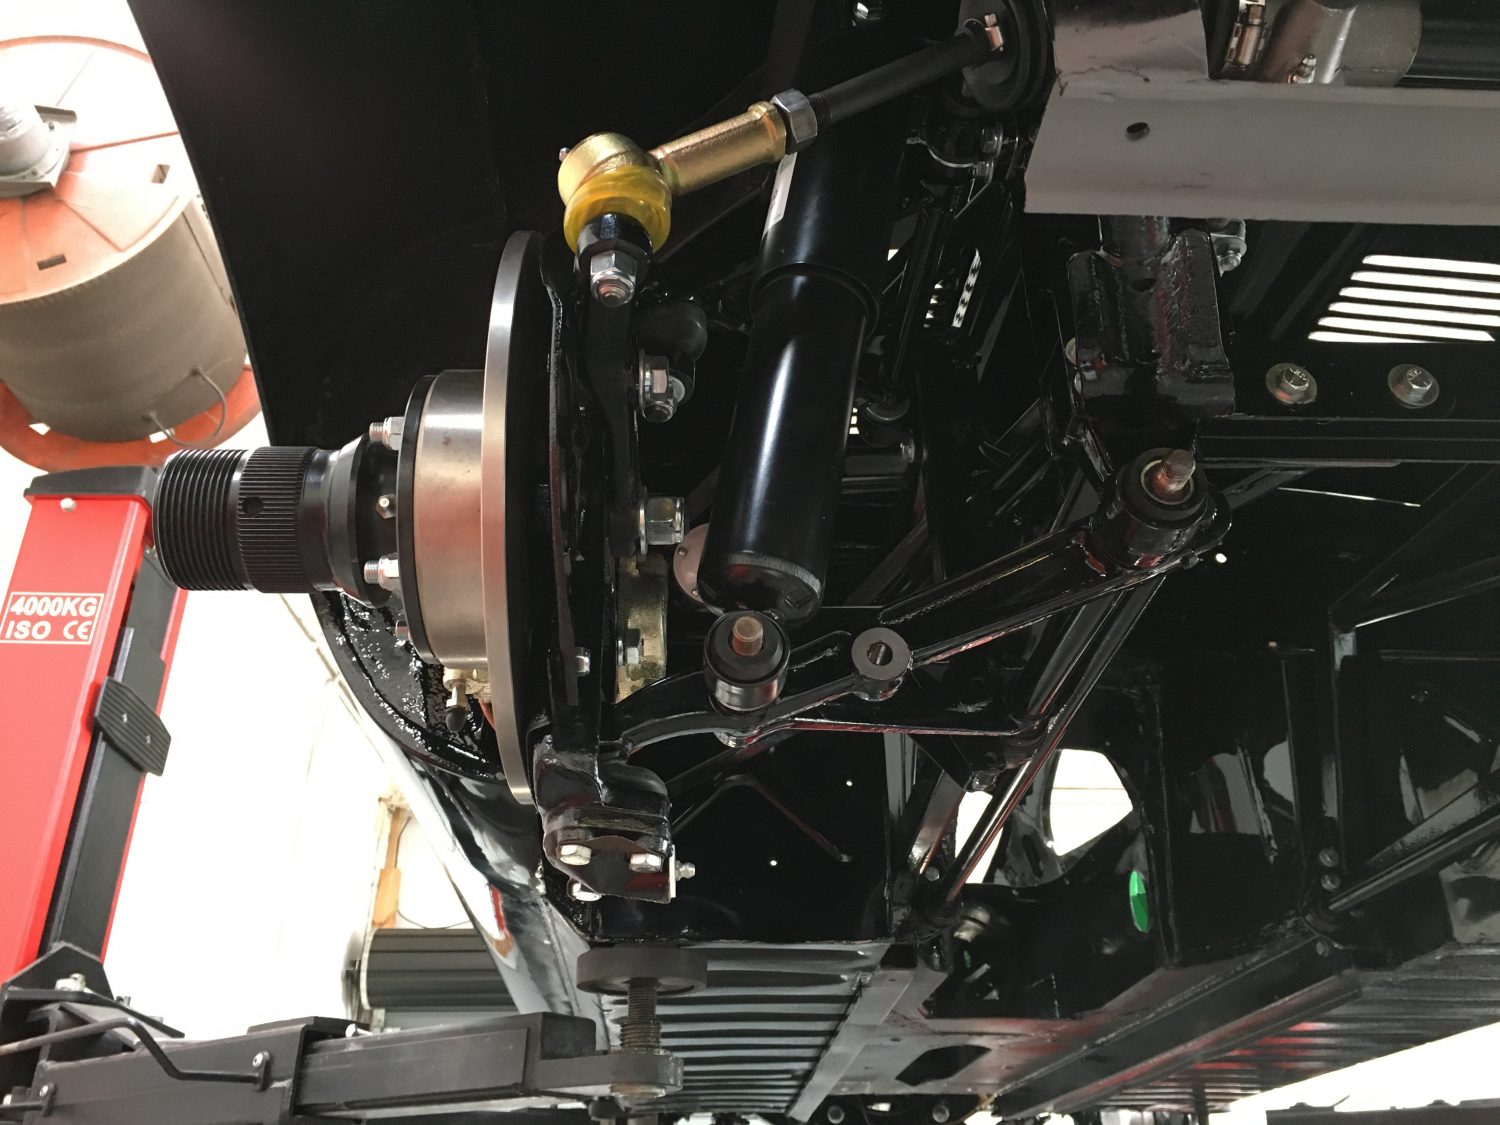
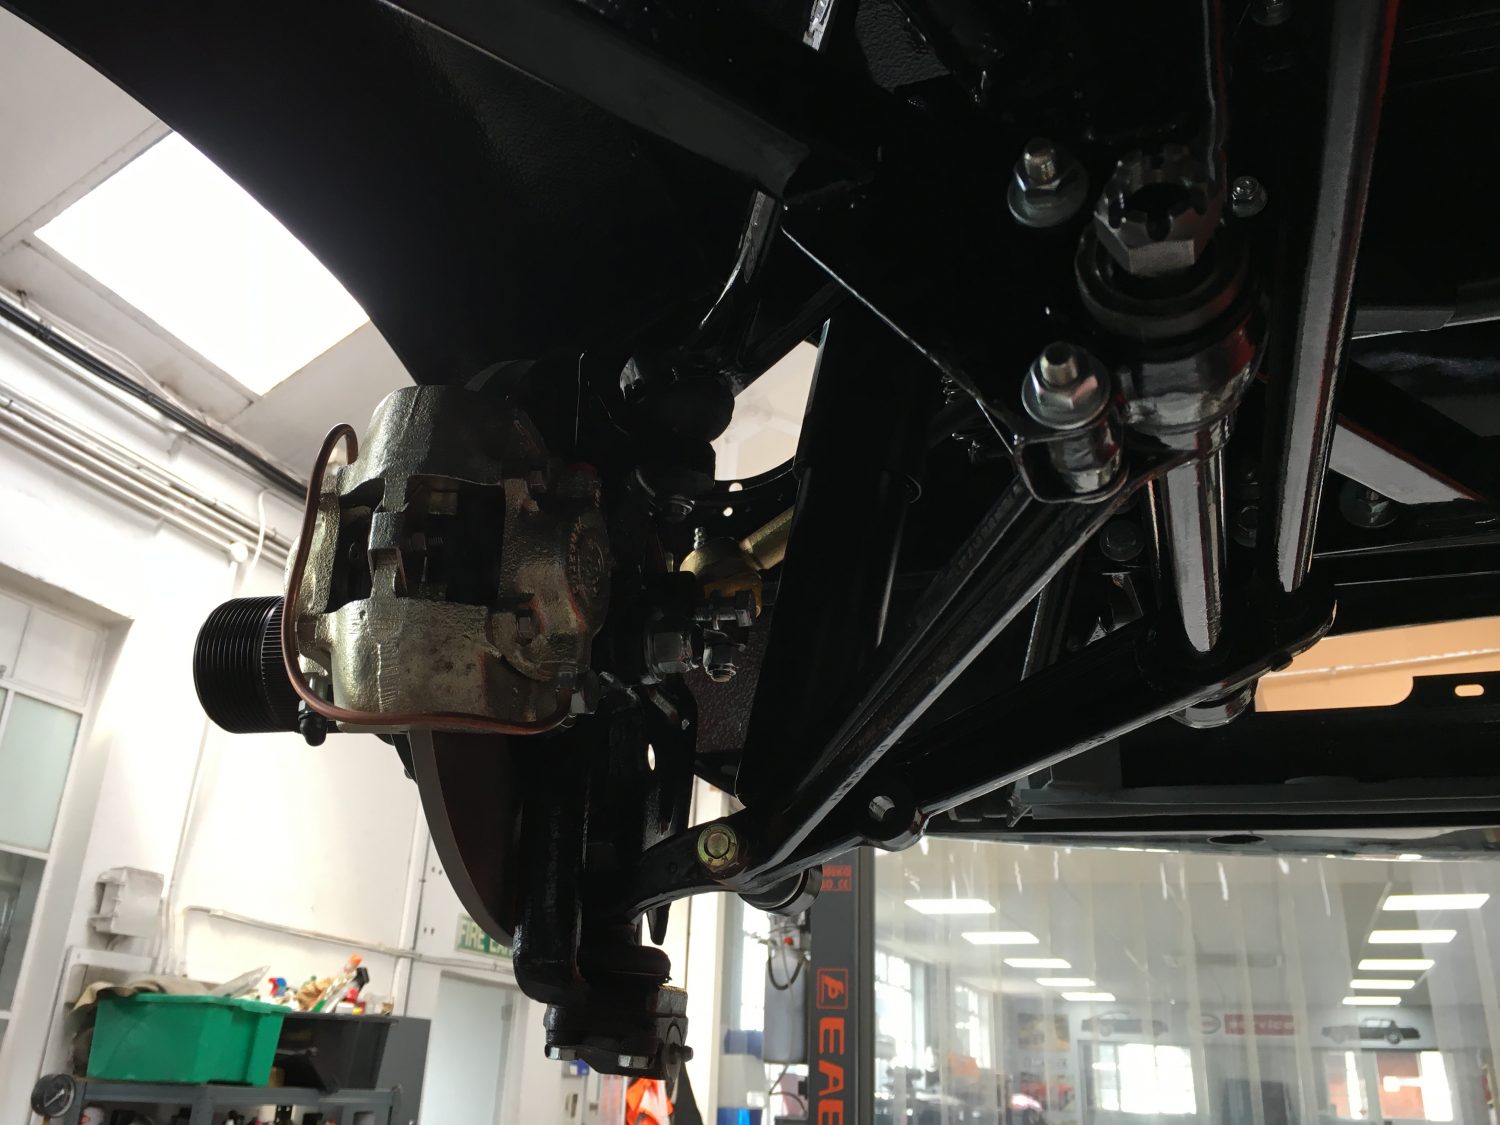
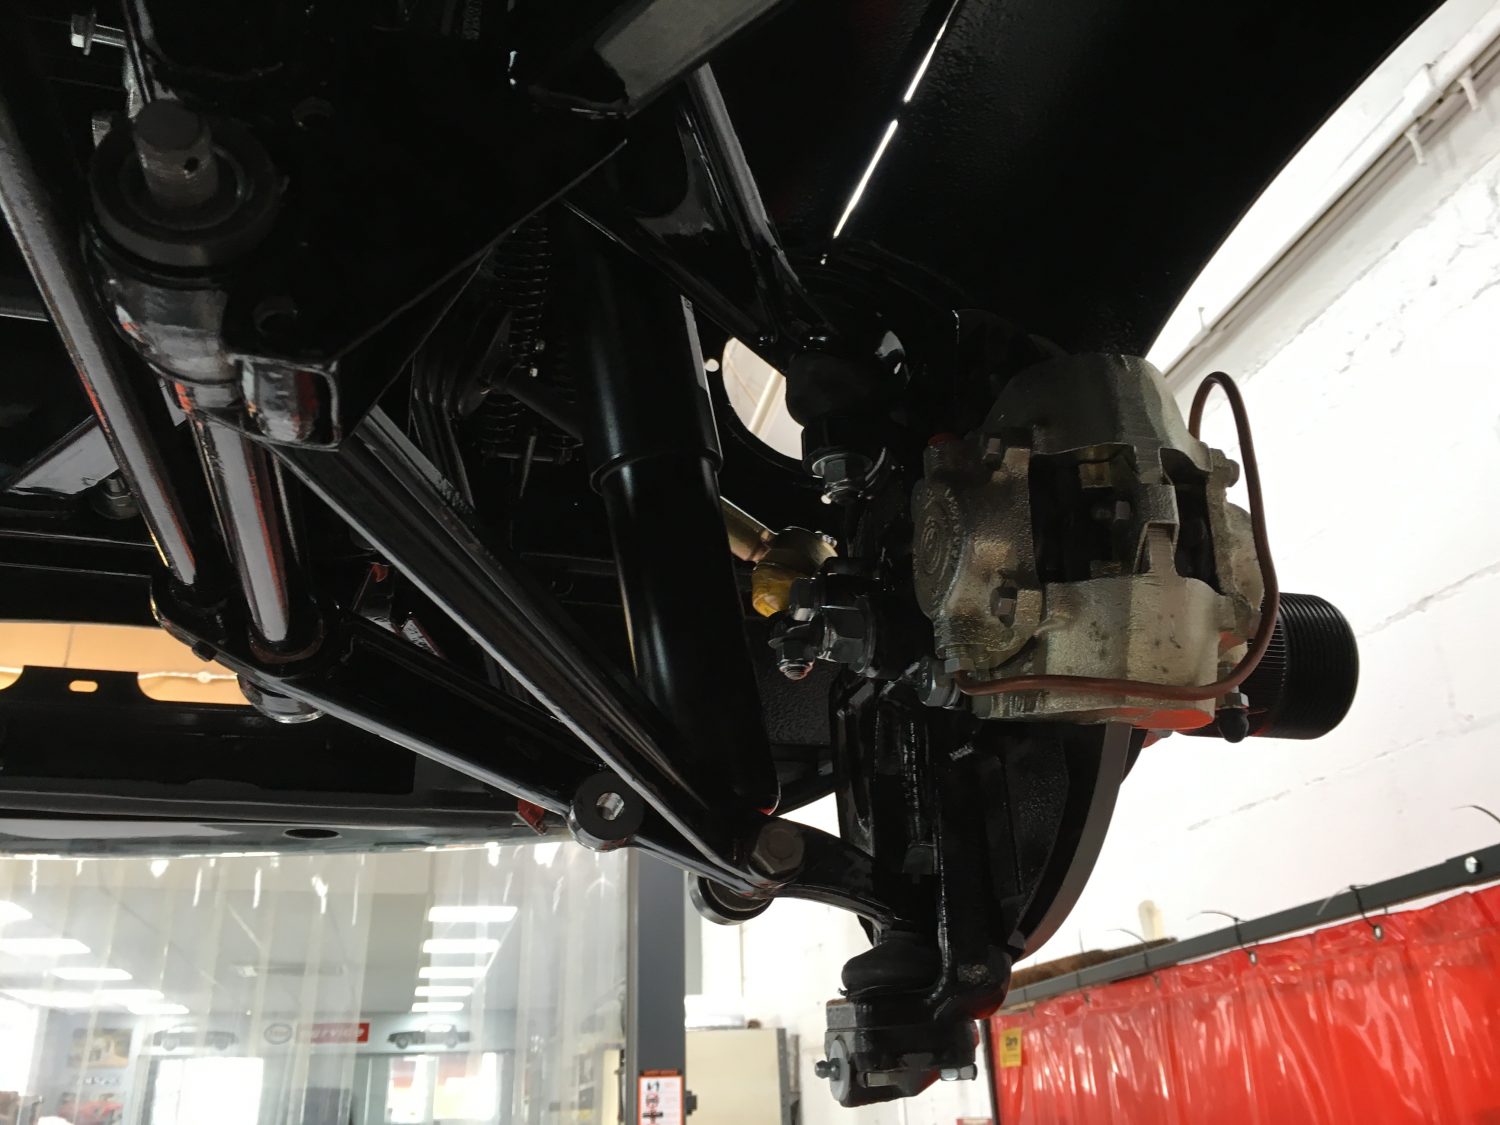
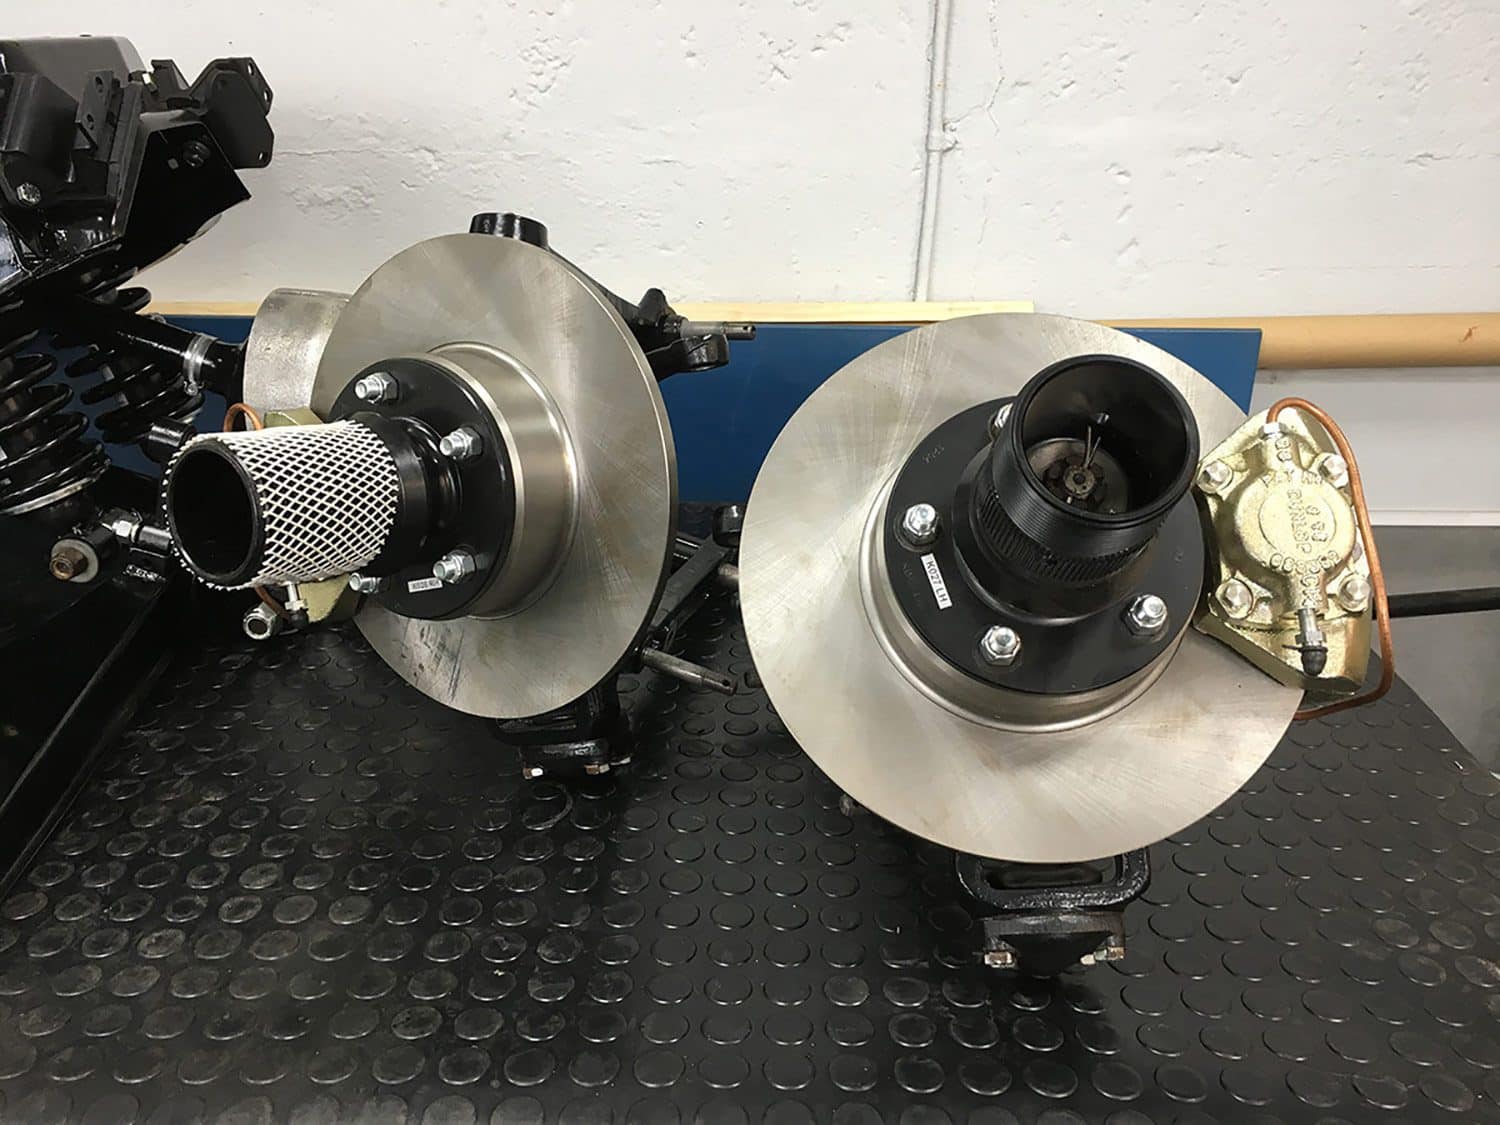
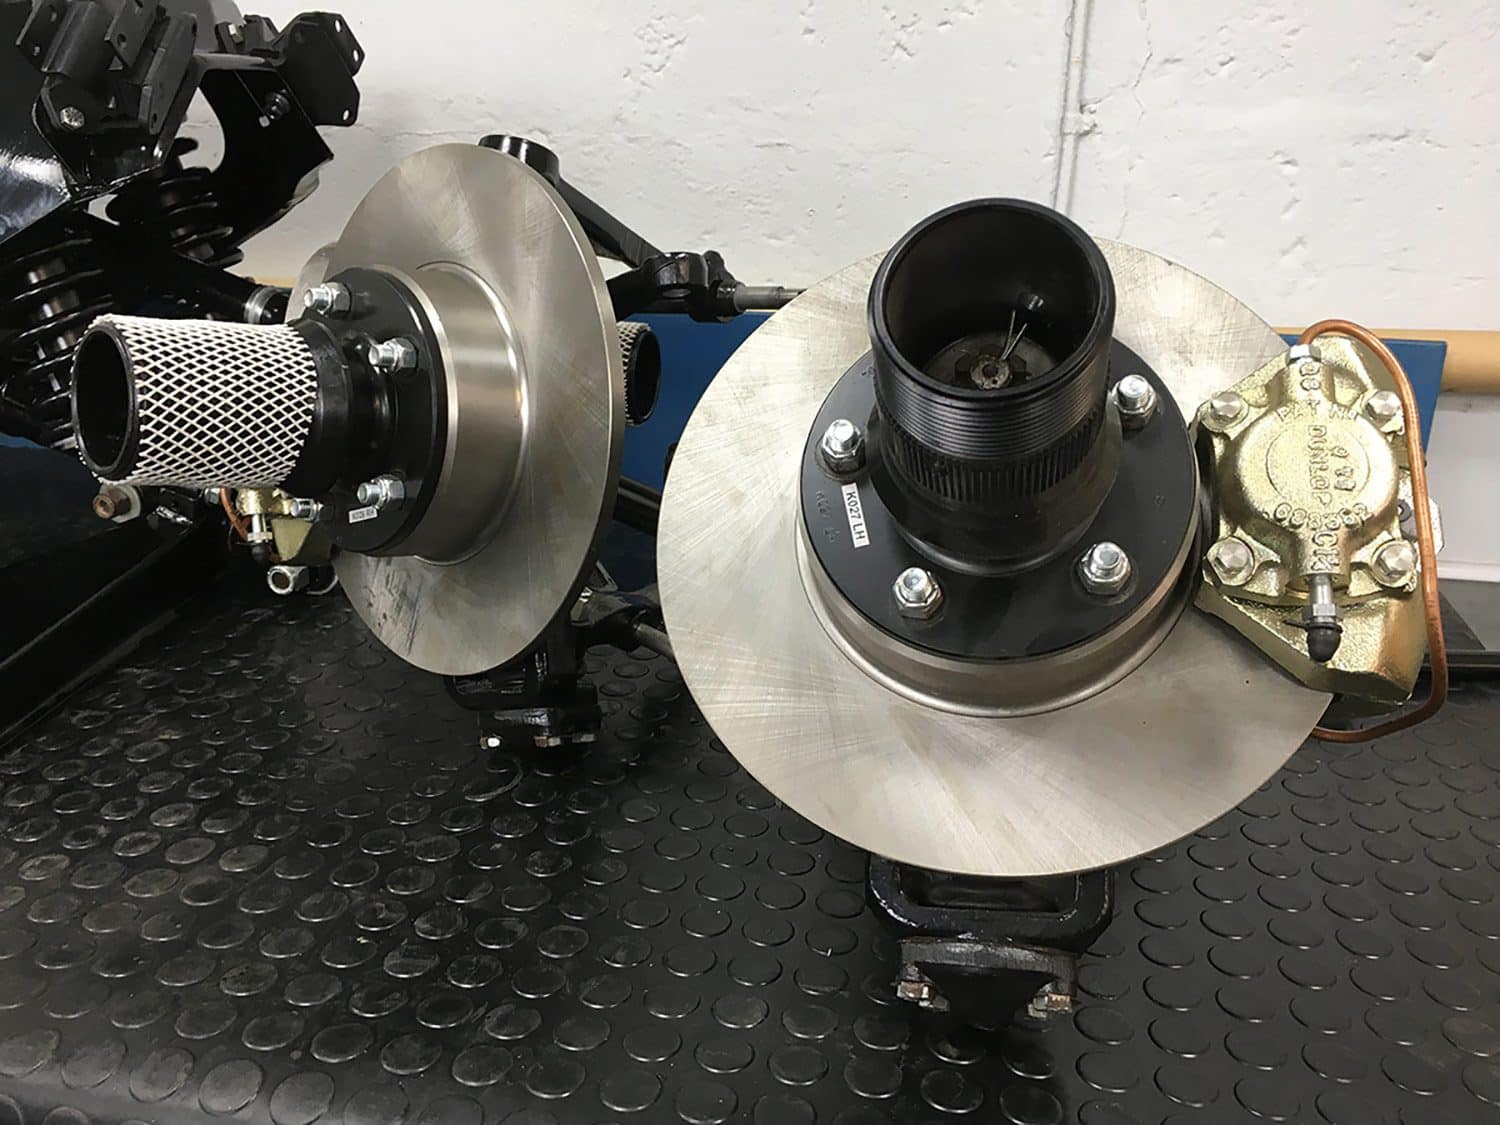
The front assembly of our 1967 Jaguar E-Type is really starting to take shape with the wishbones, calipers and discs all now fitted.
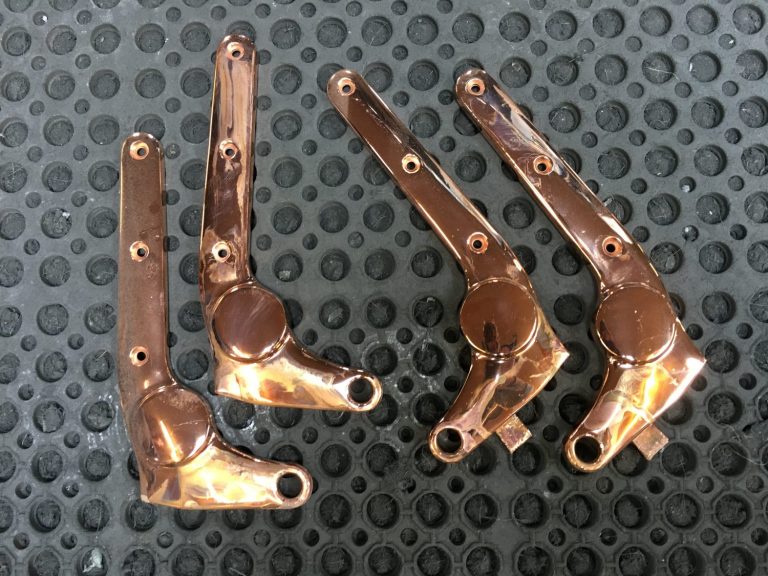
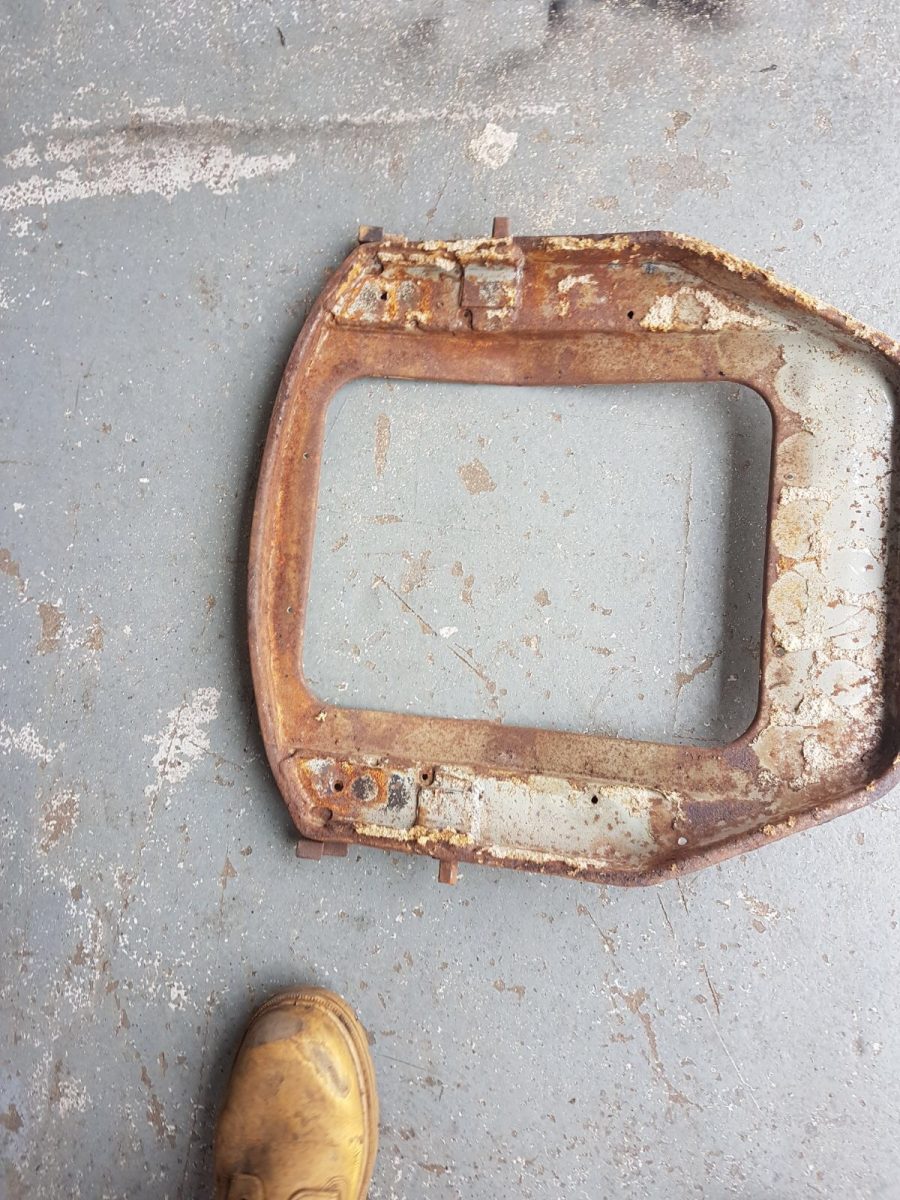
Extensive work was needed on our Jaguar E-Type seat brackets, so much so that a triple coating process was needed to be carried out to
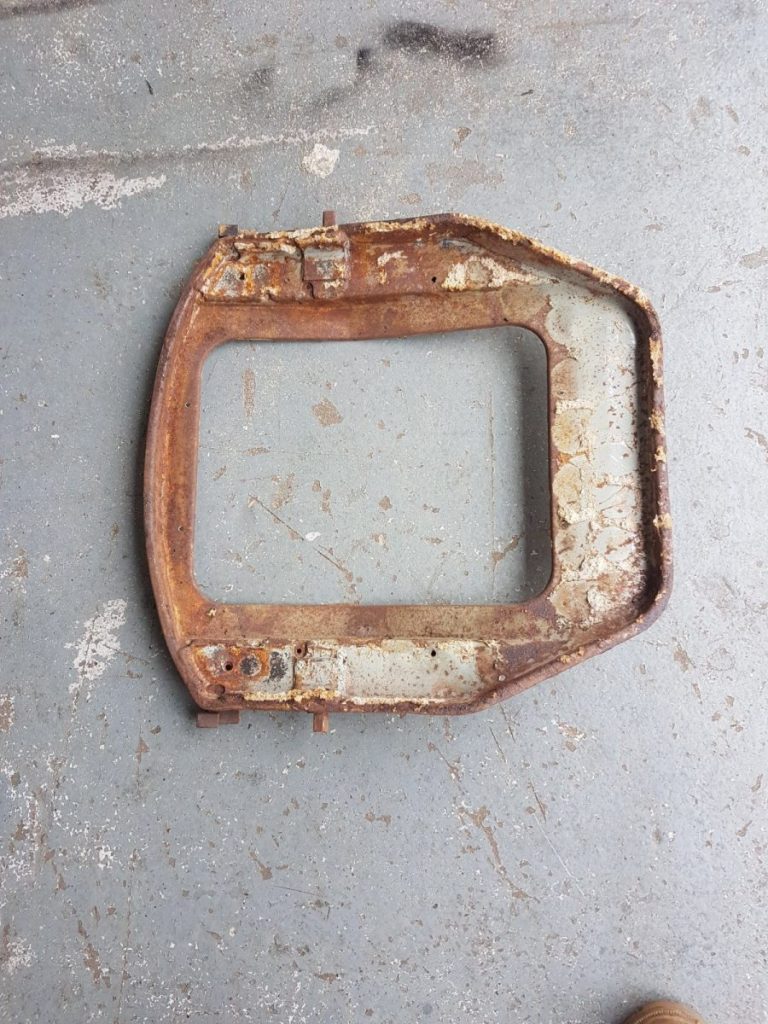
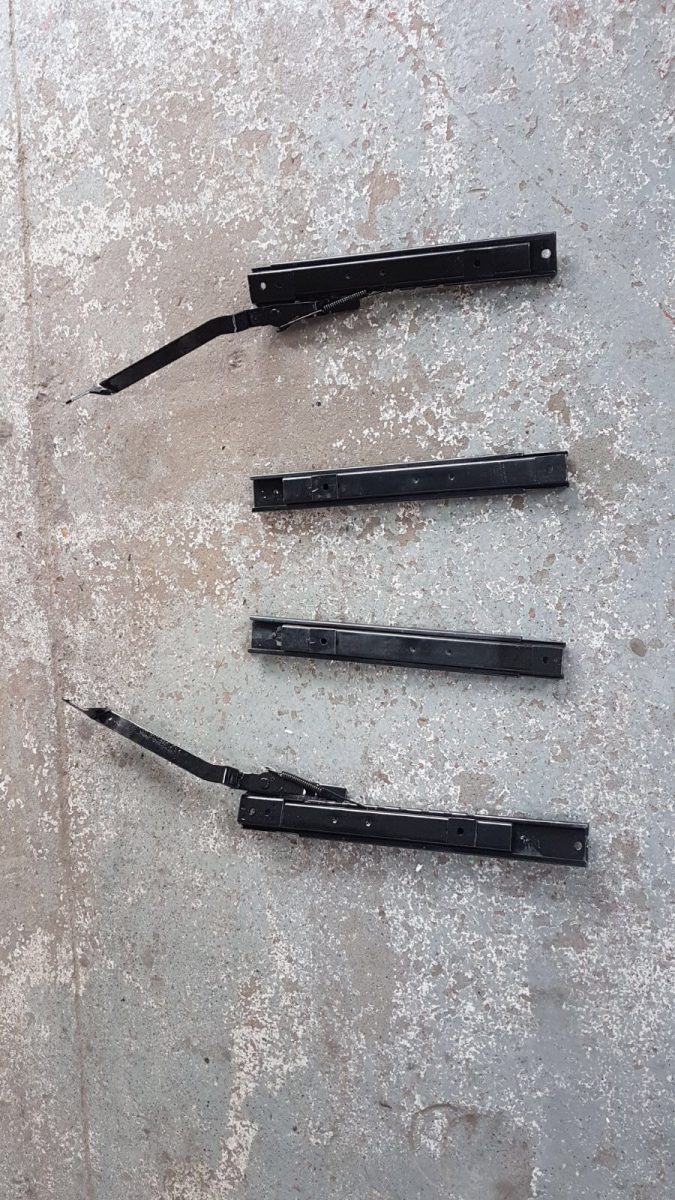
We have now started blasting the original Jaguar E-Type seat frames. The seat runners were particularly challenging. With years and years of crud (technical term)

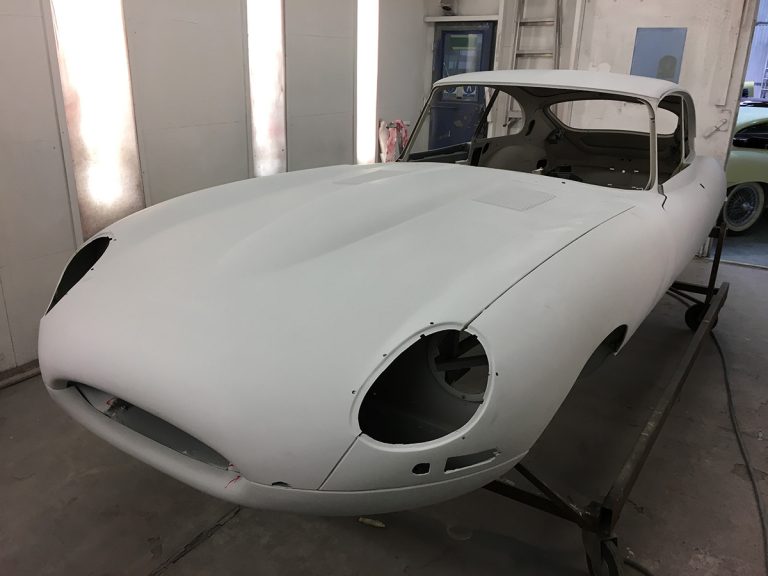
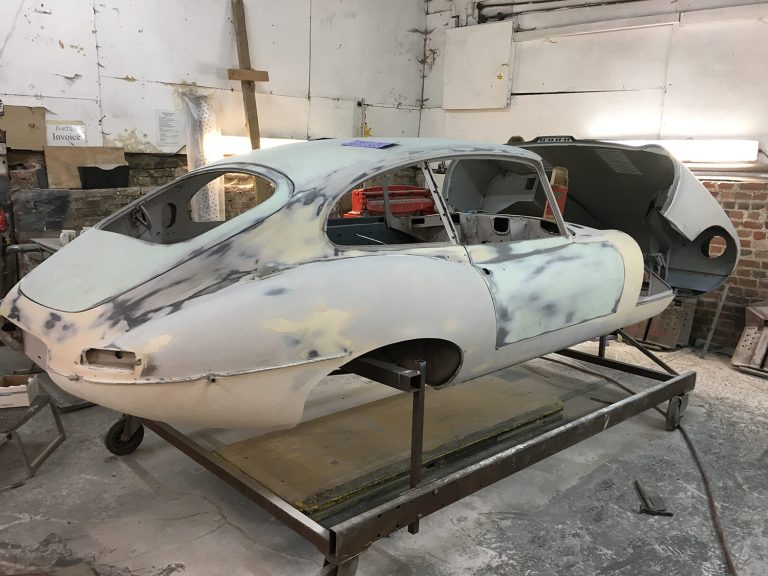
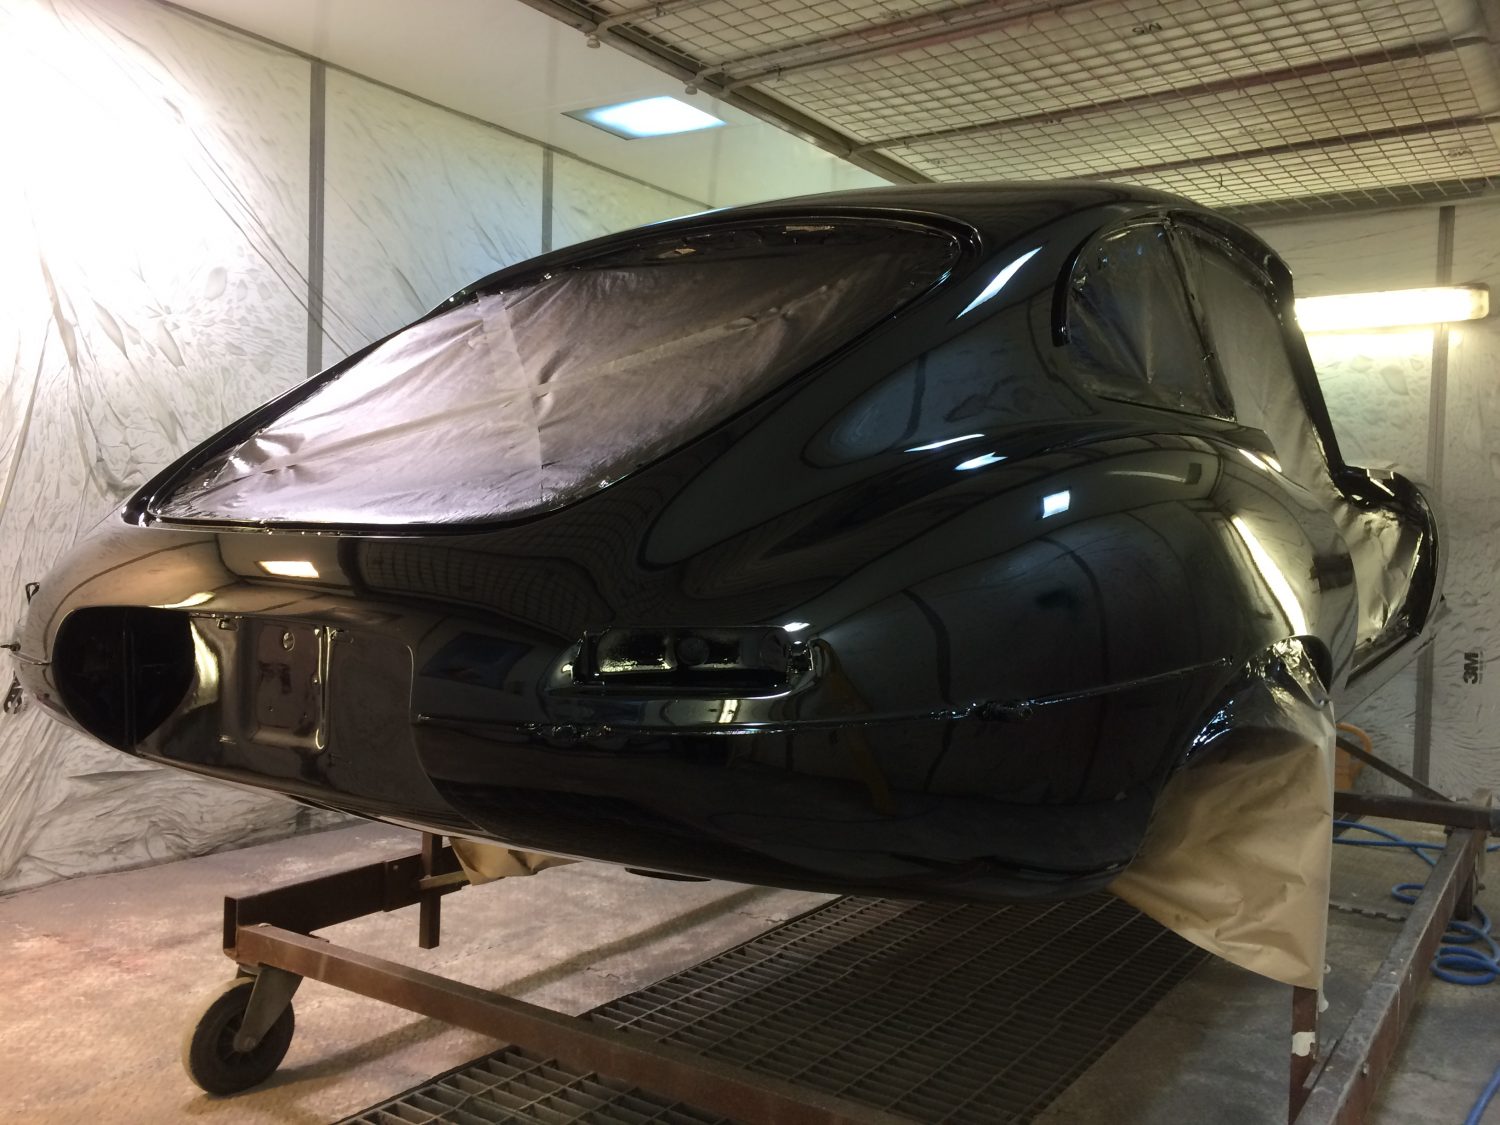
It is always very rewarding, after months of preparation to see our car go into paint. We can now embark on the reassembly of all
[vc_row][vc_column][vc_column_text]With the return of our painted Jaguar E-Type body imminent, Tommy has been working through some of the final pieces that require his attention. Today,

The pictures show the first stages of paint. Smooth stone chip has been applied to the inner wings, high gloss black to the centre of
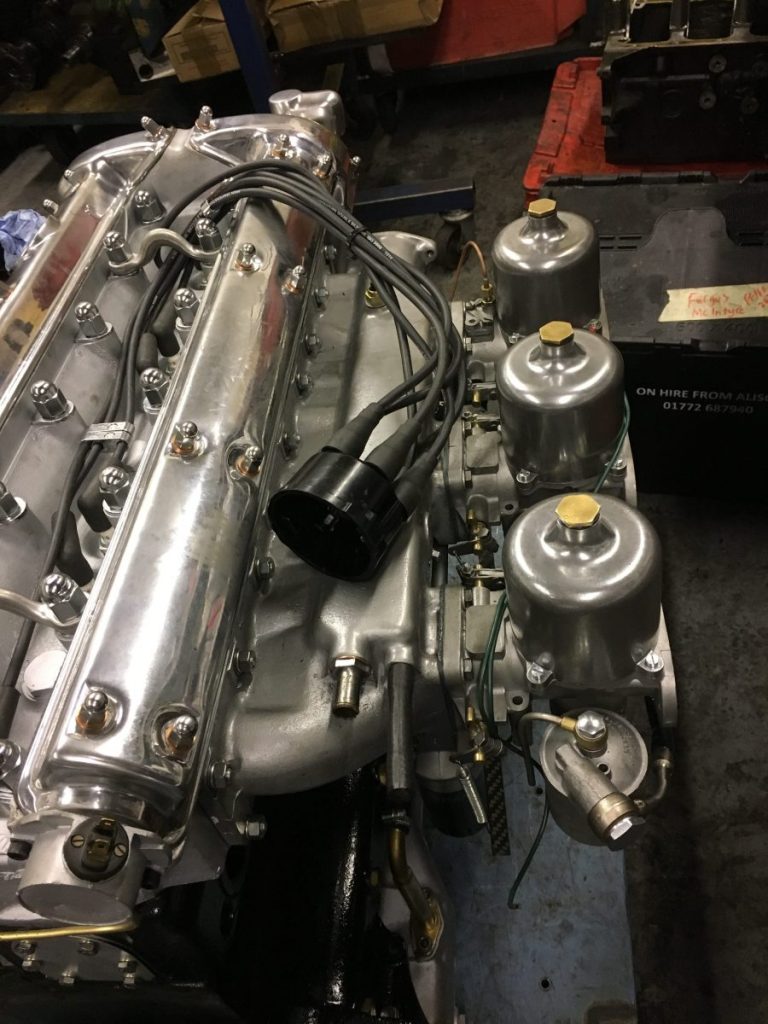
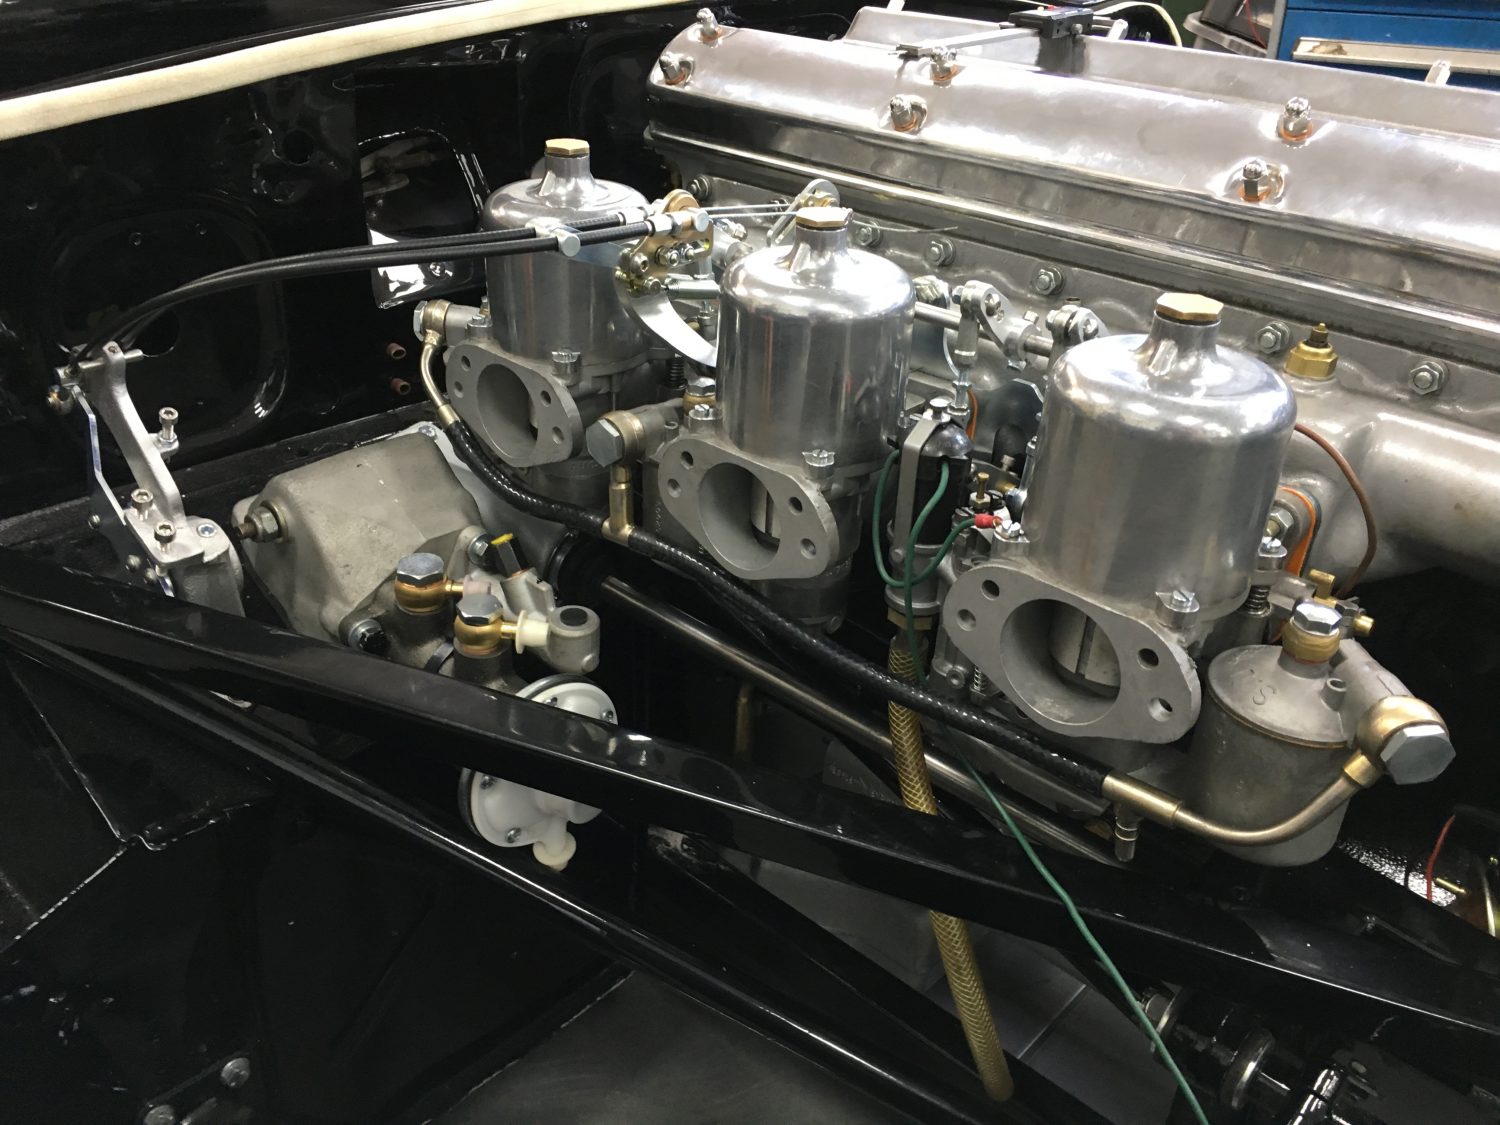
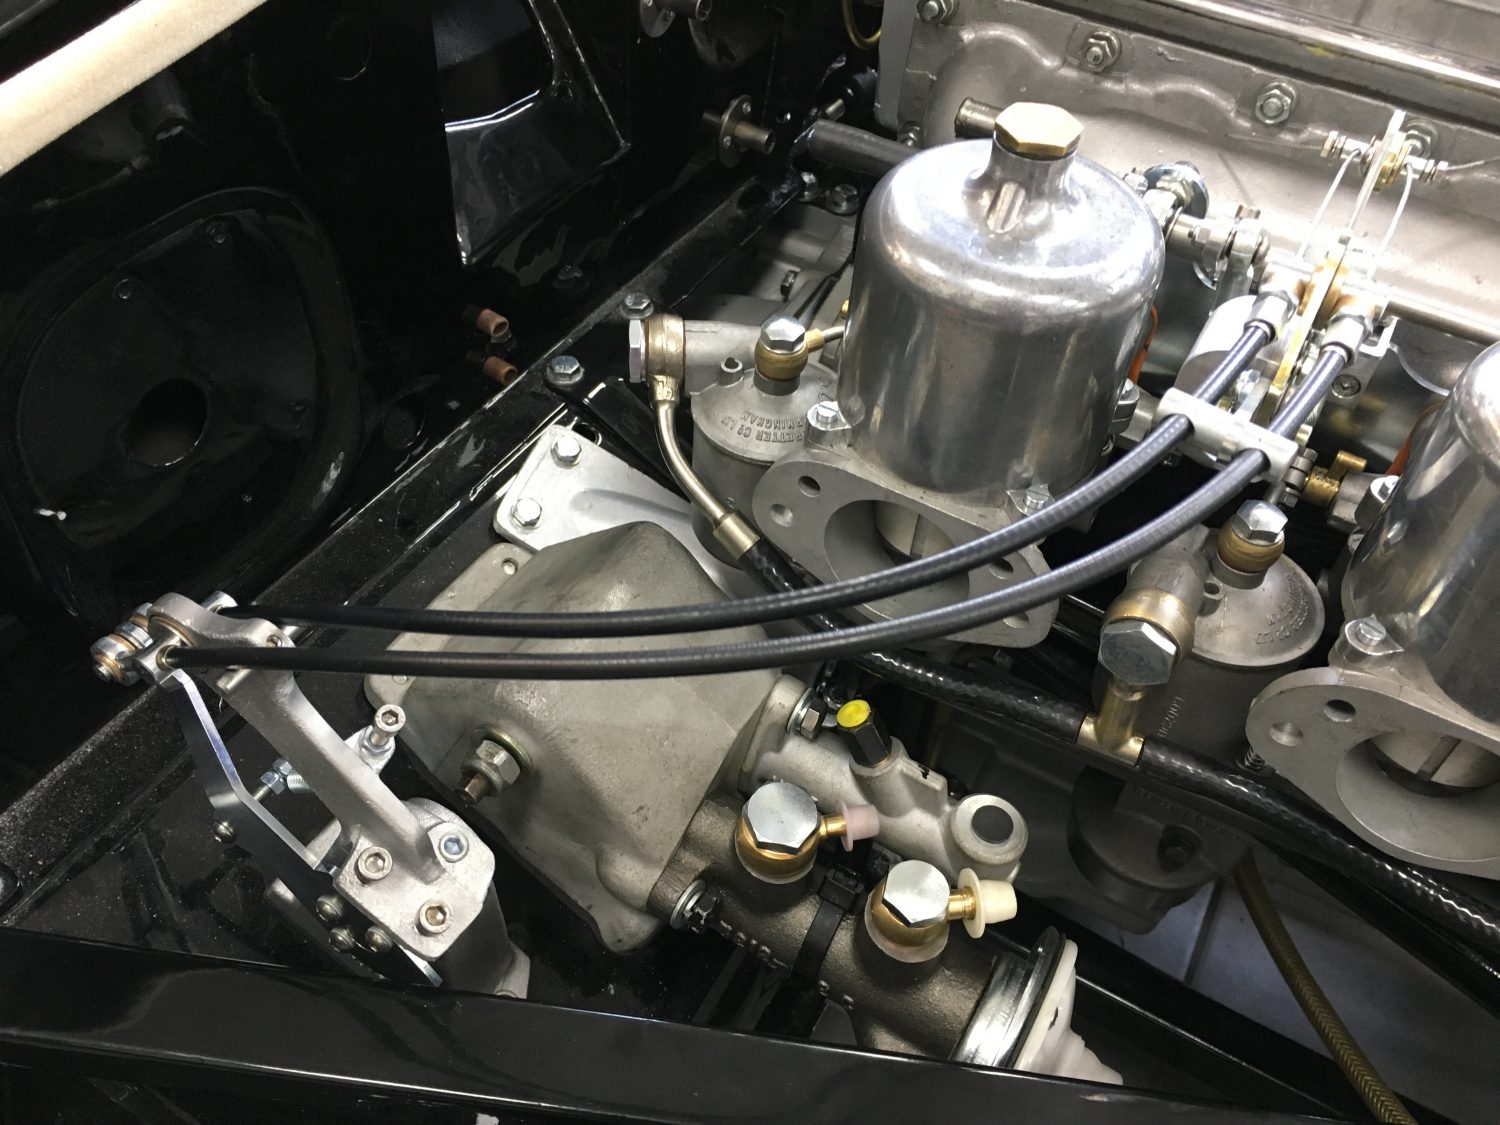
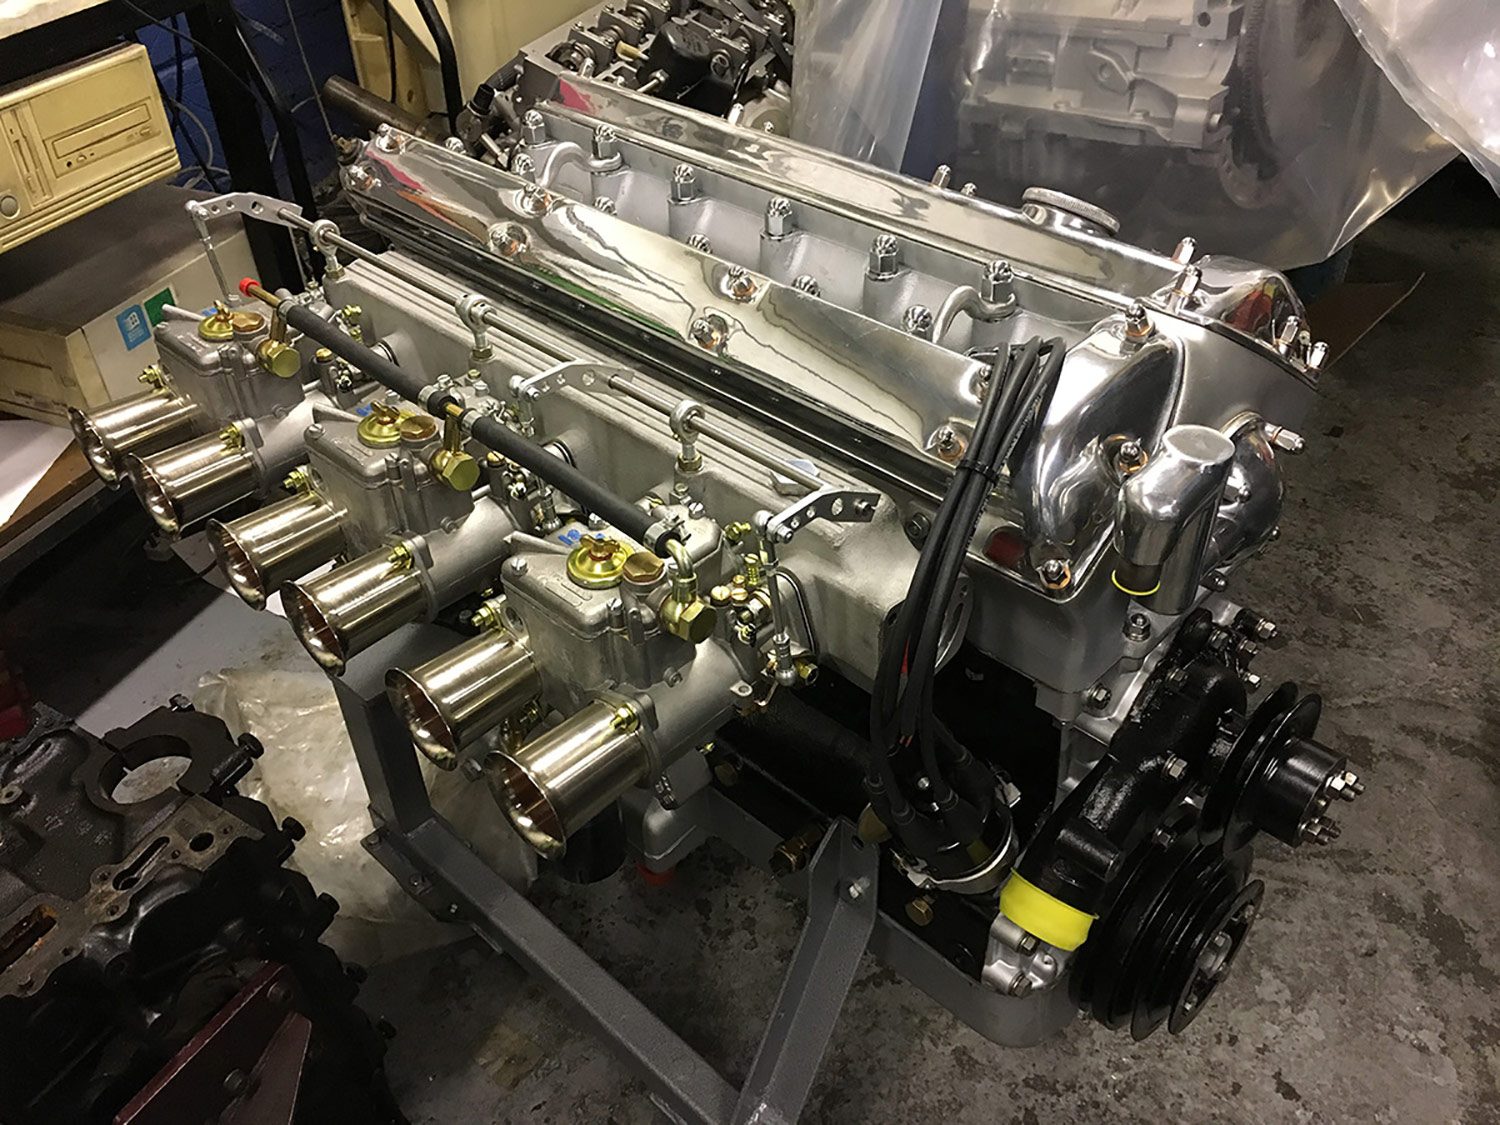
We’ve now fitted the triple SU carburetors to our E-Type engine and Ady has carried out the first few test runs.
[vc_row][vc_column][vc_column_text]We are now working on the last few areas that needed our attention before the second stage of primer will be applied.[/vc_column_text][/vc_column][/vc_row][vc_row][vc_column][vc_gallery type=”image_grid” images=”10852,10853,10854,10855,10856,10857,10858,10859,10860,10861″][/vc_column][/vc_row]

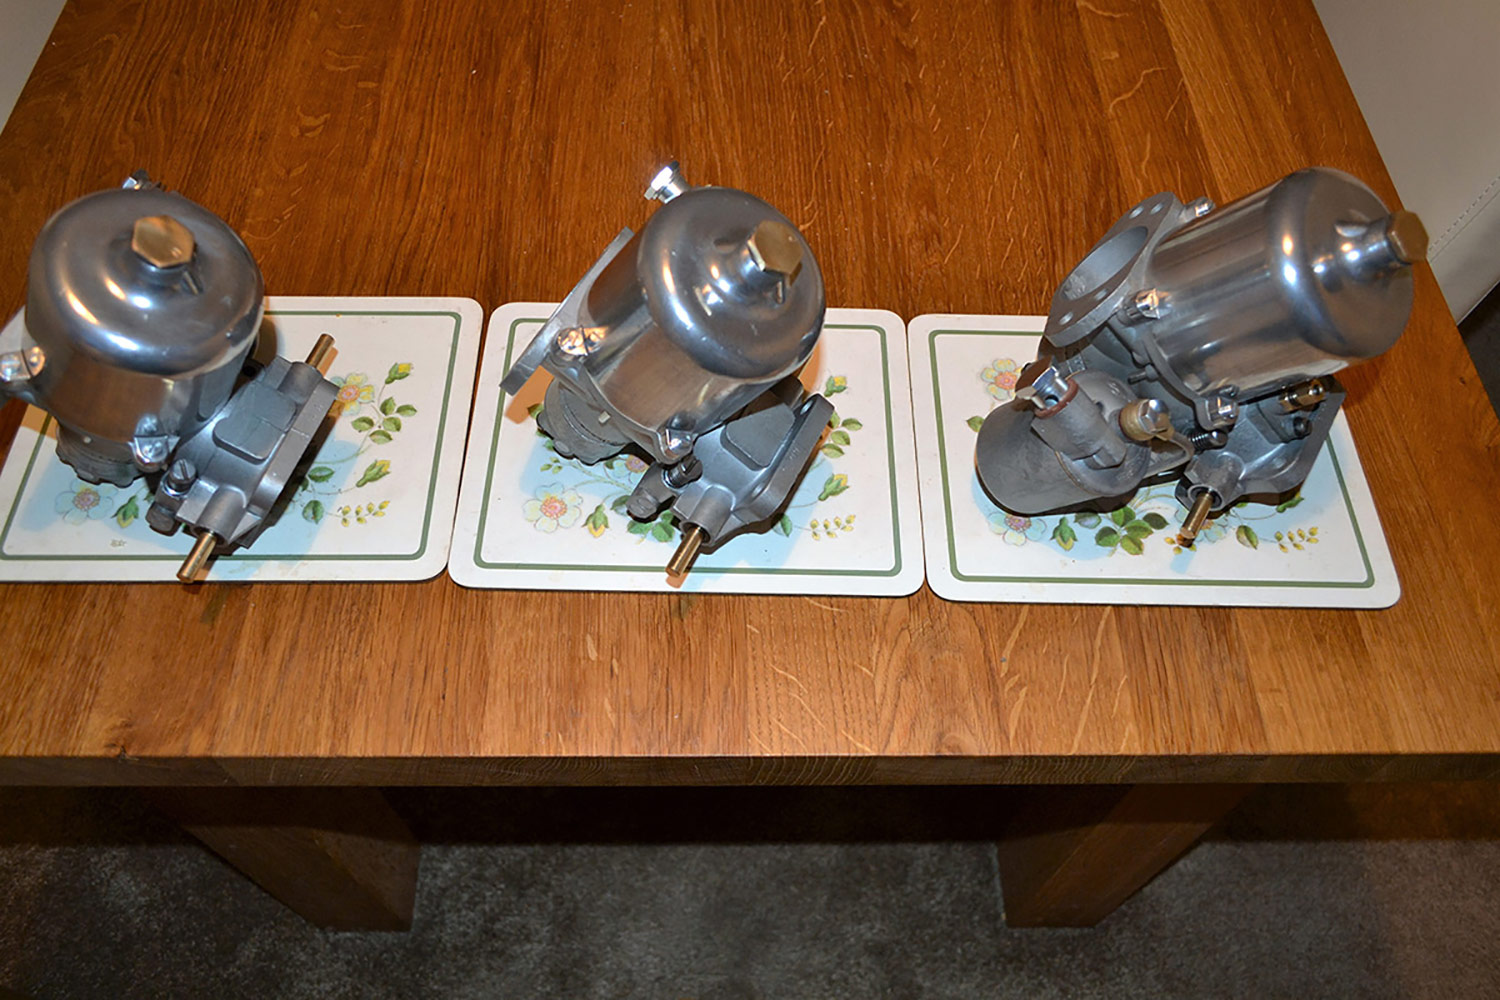
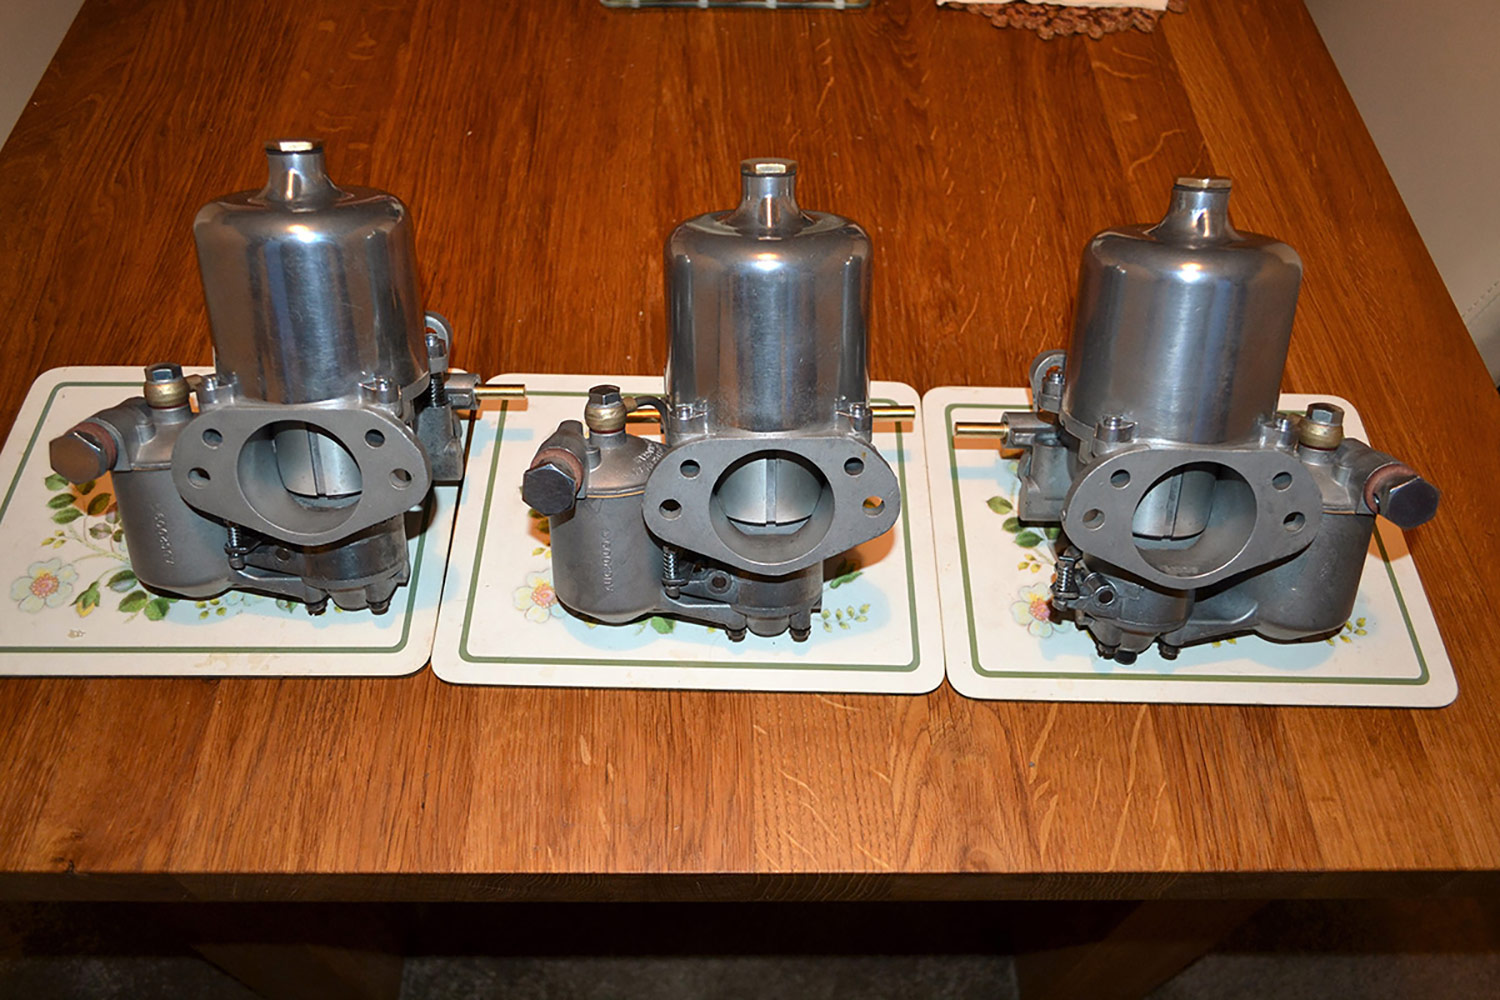
Our triple SU carburetors are now complete. Our renowned race engine builder Don Warman has carried out a fantastic job on restoring these tired looking Jaguar carbs

[vc_row][vc_column][vc_column_text]If you visited The London Classic Car Show at the Excel in London a few weeks back you may have seen our beautiful engine on display.
[vc_row][vc_column][vc_column_text]Here we have our 1967 Jaguar E-Type having been put through the first stages of primer. The first primer stage gives us a good visual to
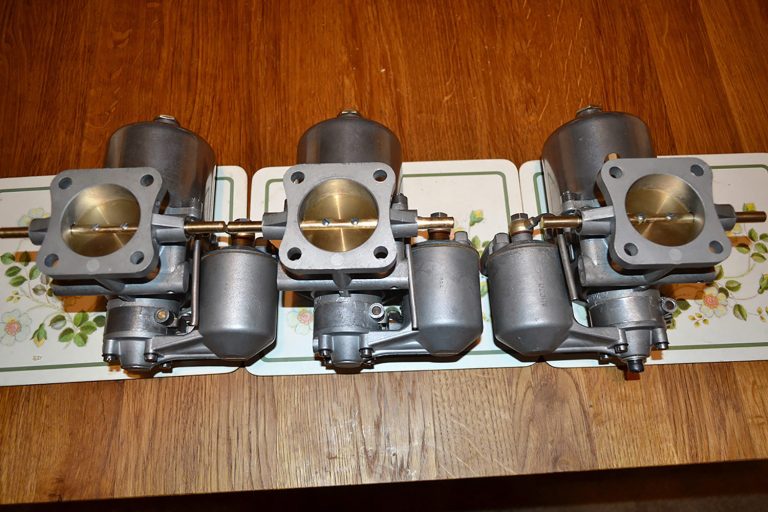
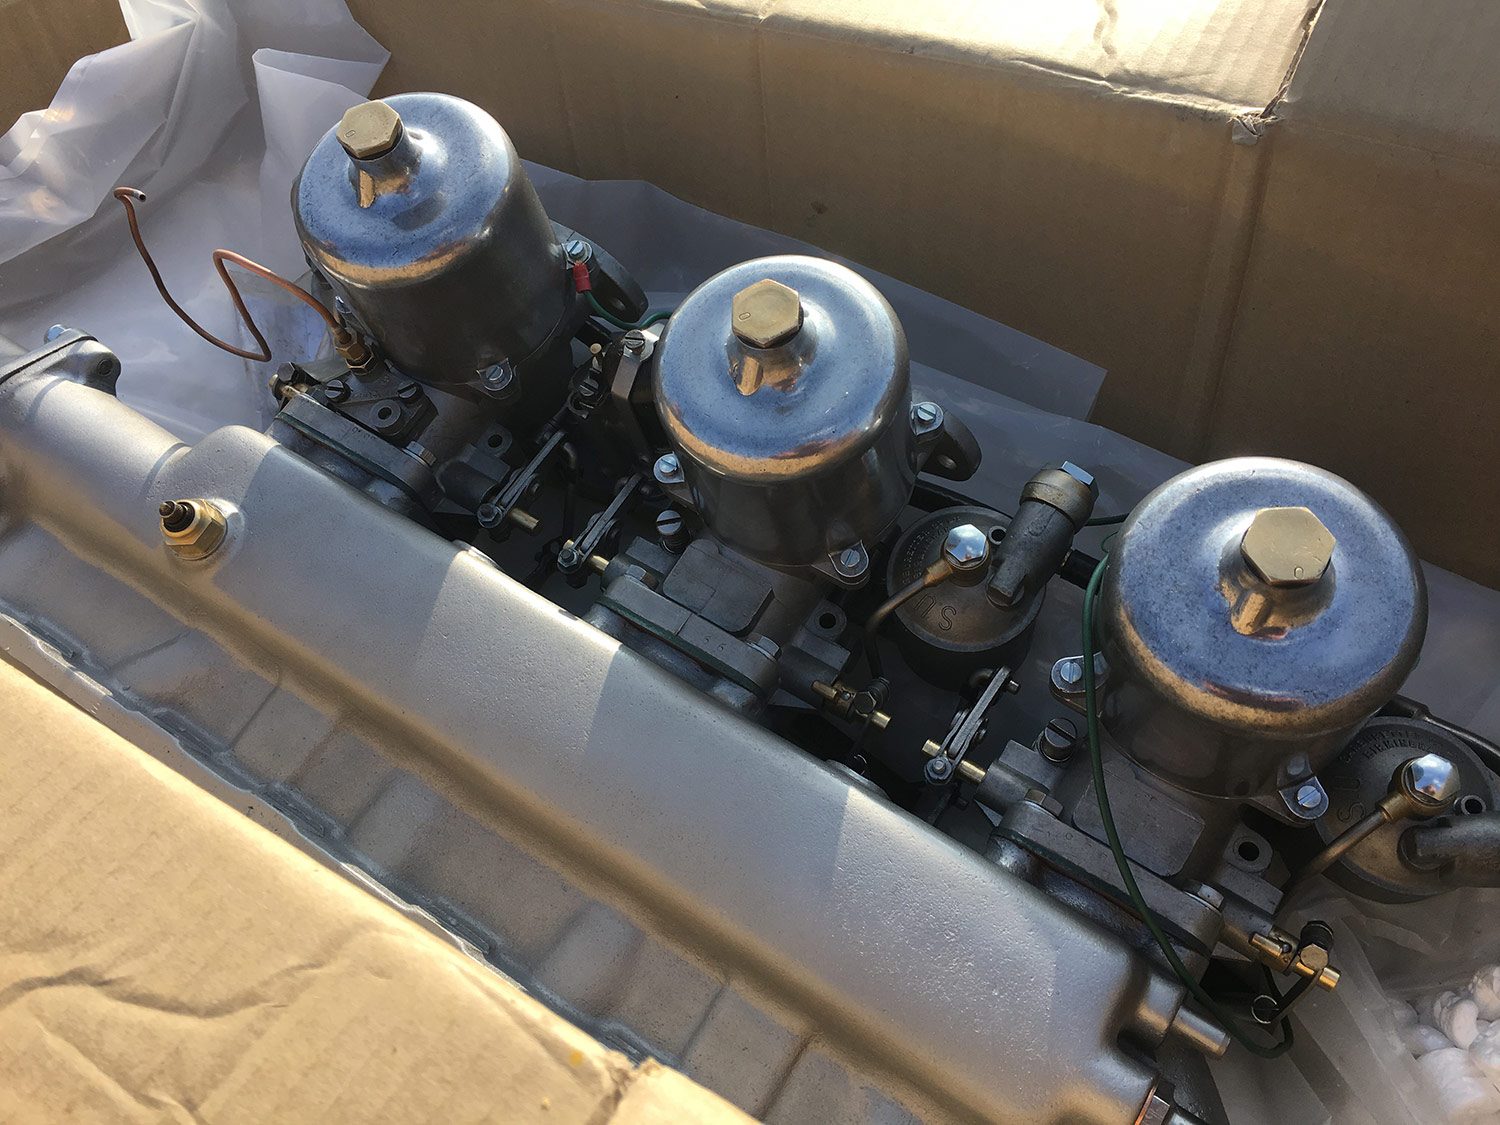
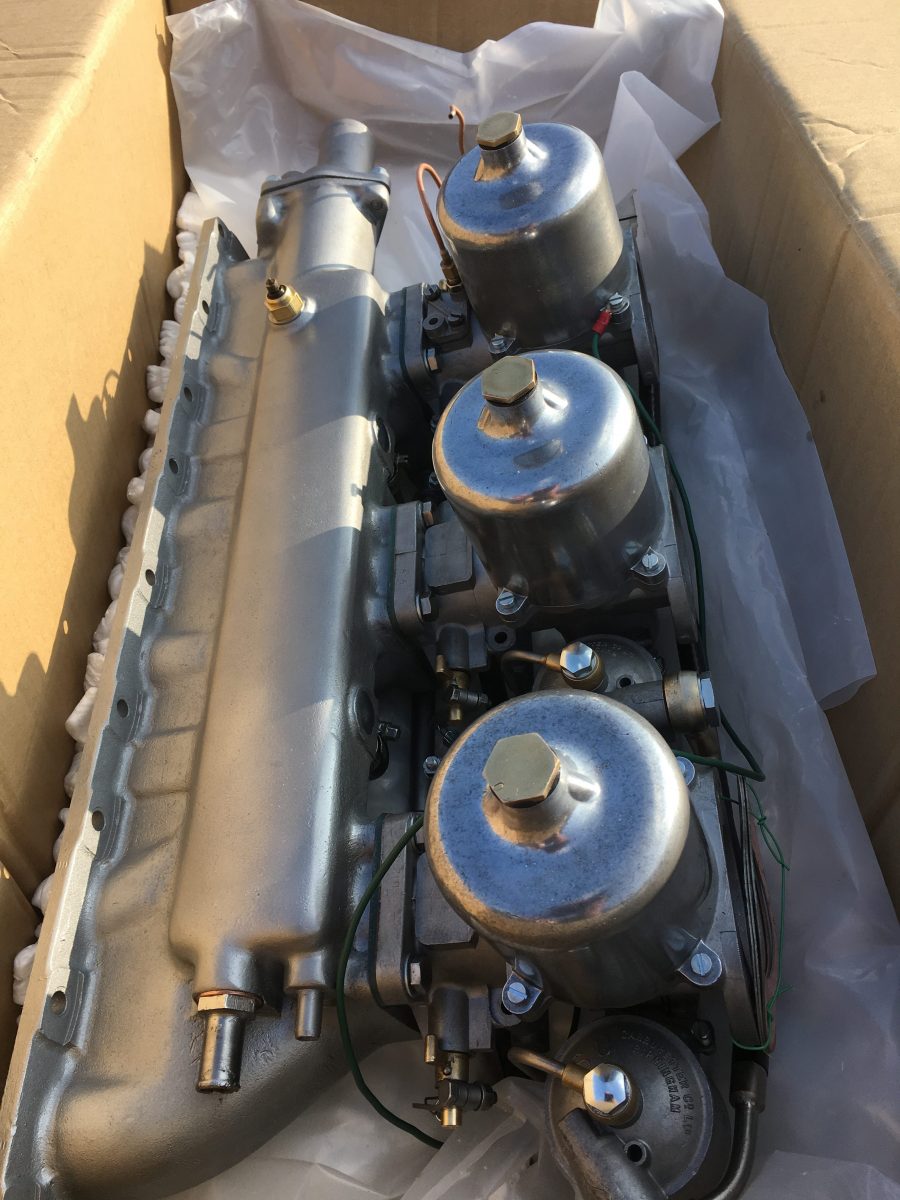
The triple carbs are now completely refurbished and awaiting completion of the restoration of the manifold to allow the final fitting to the engine.
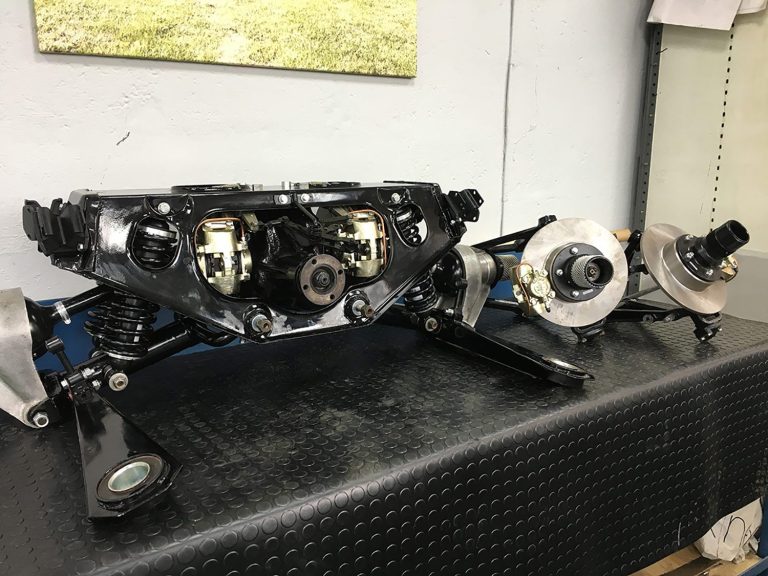
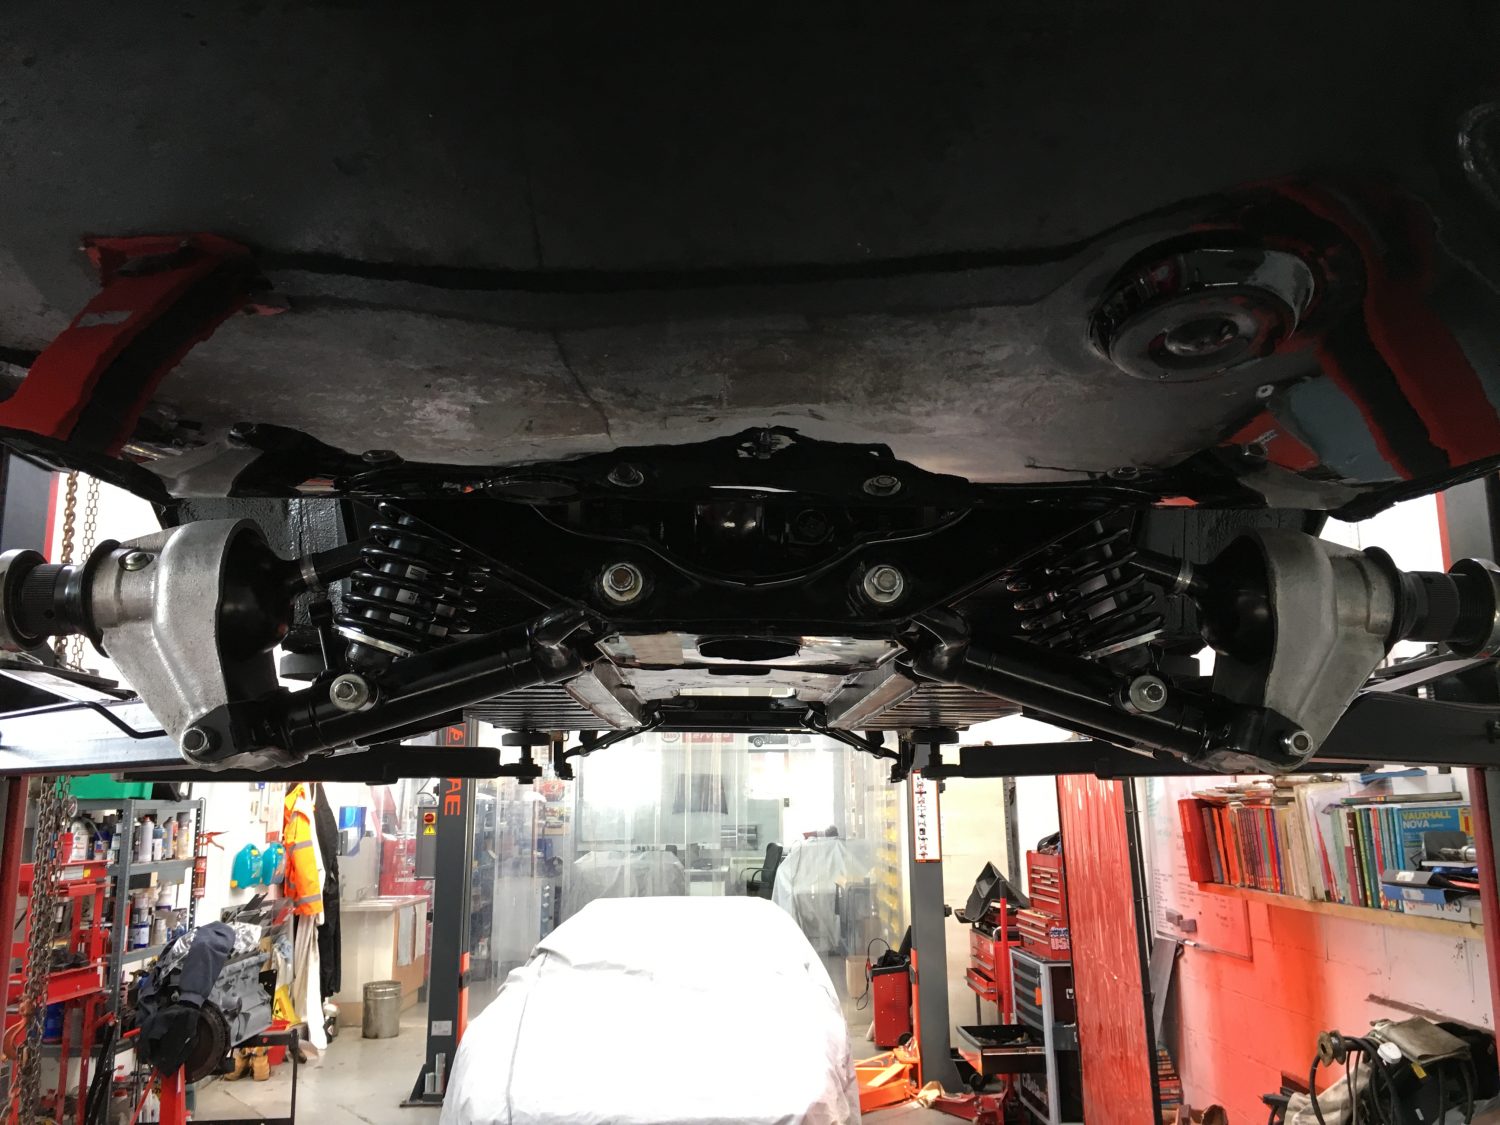
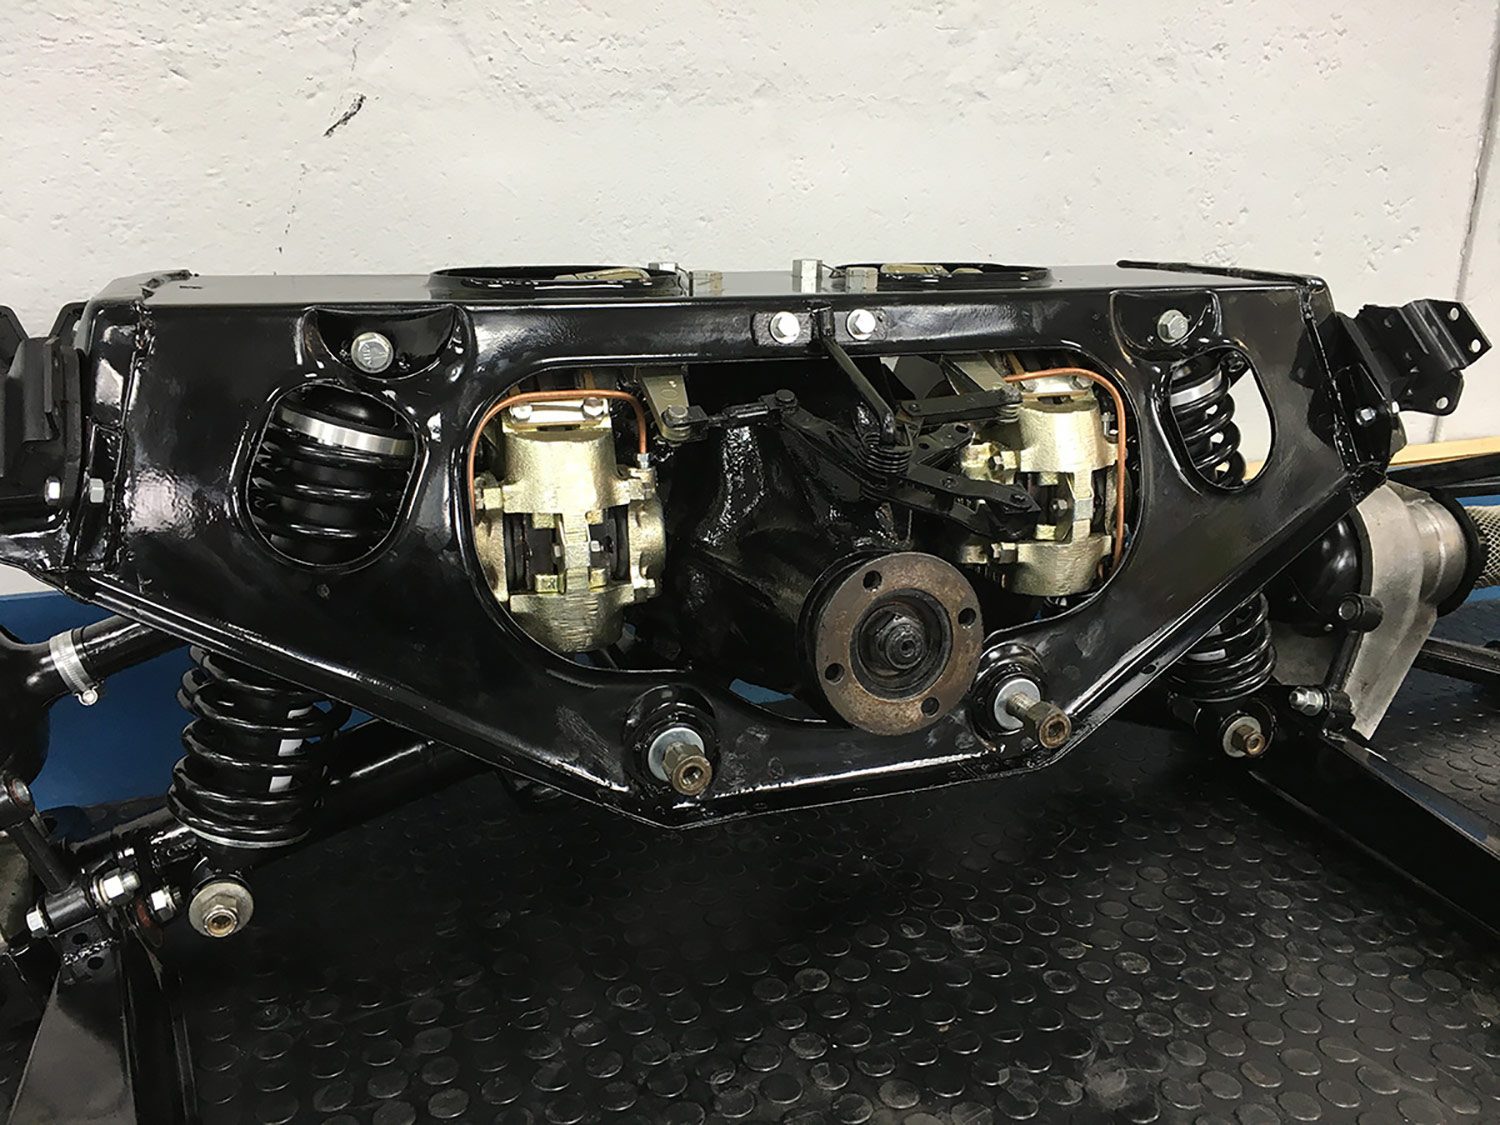
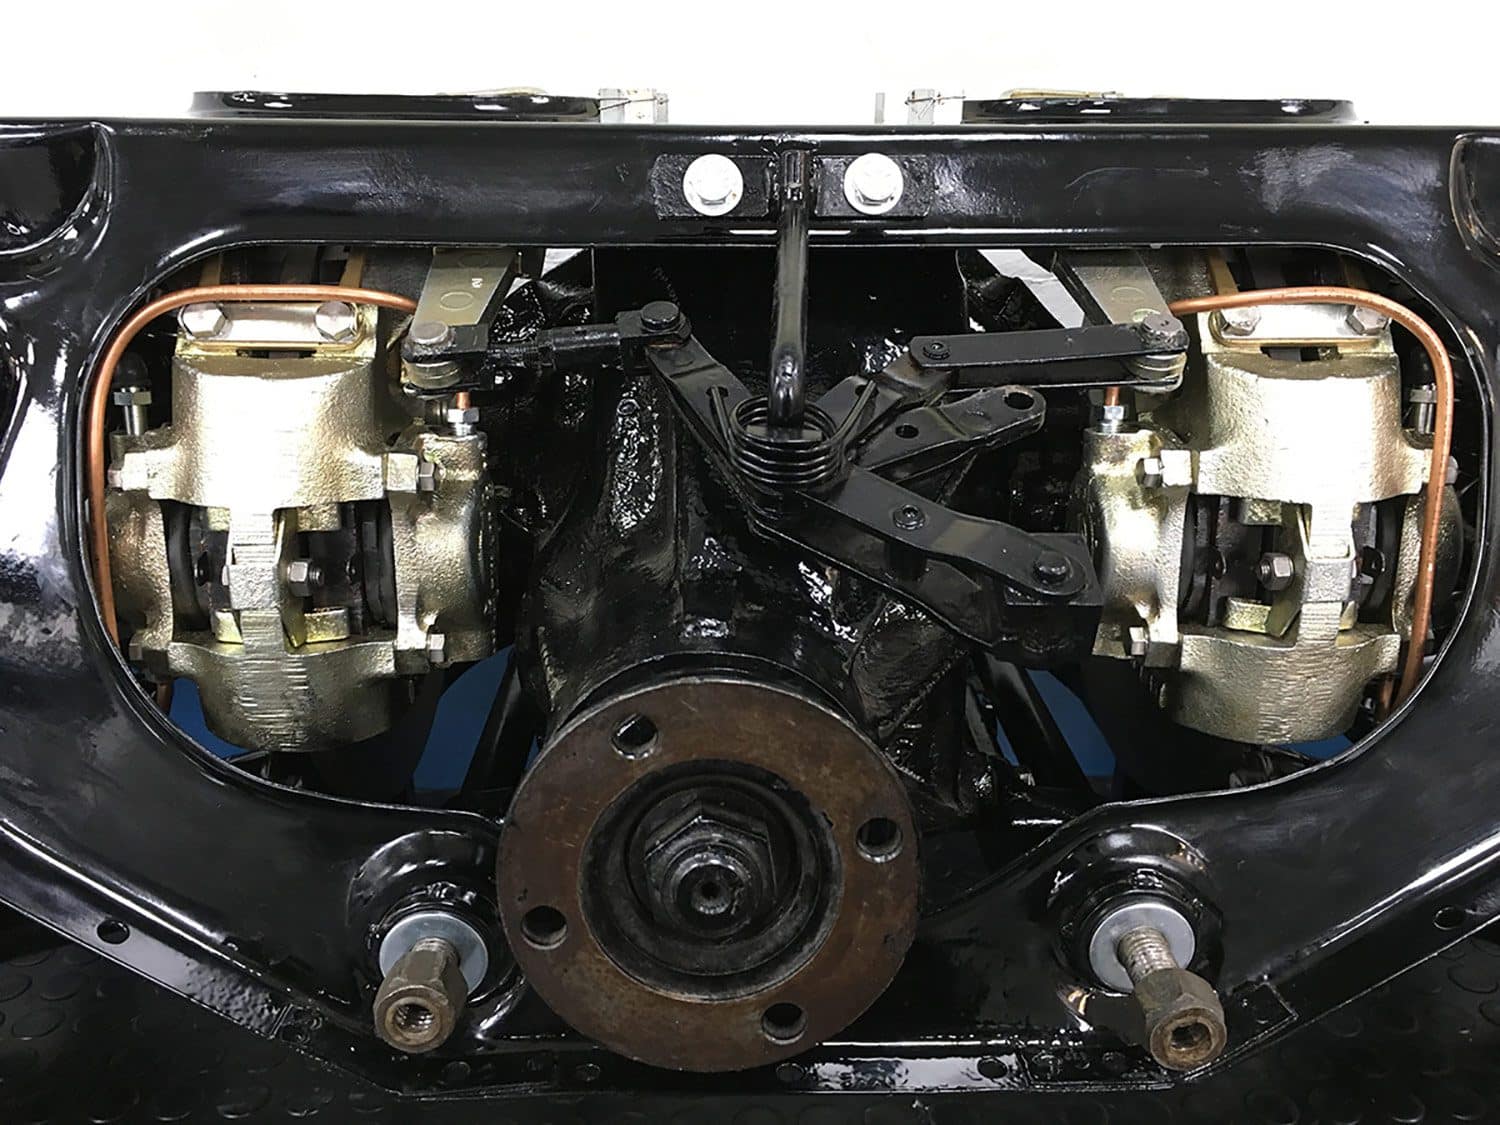
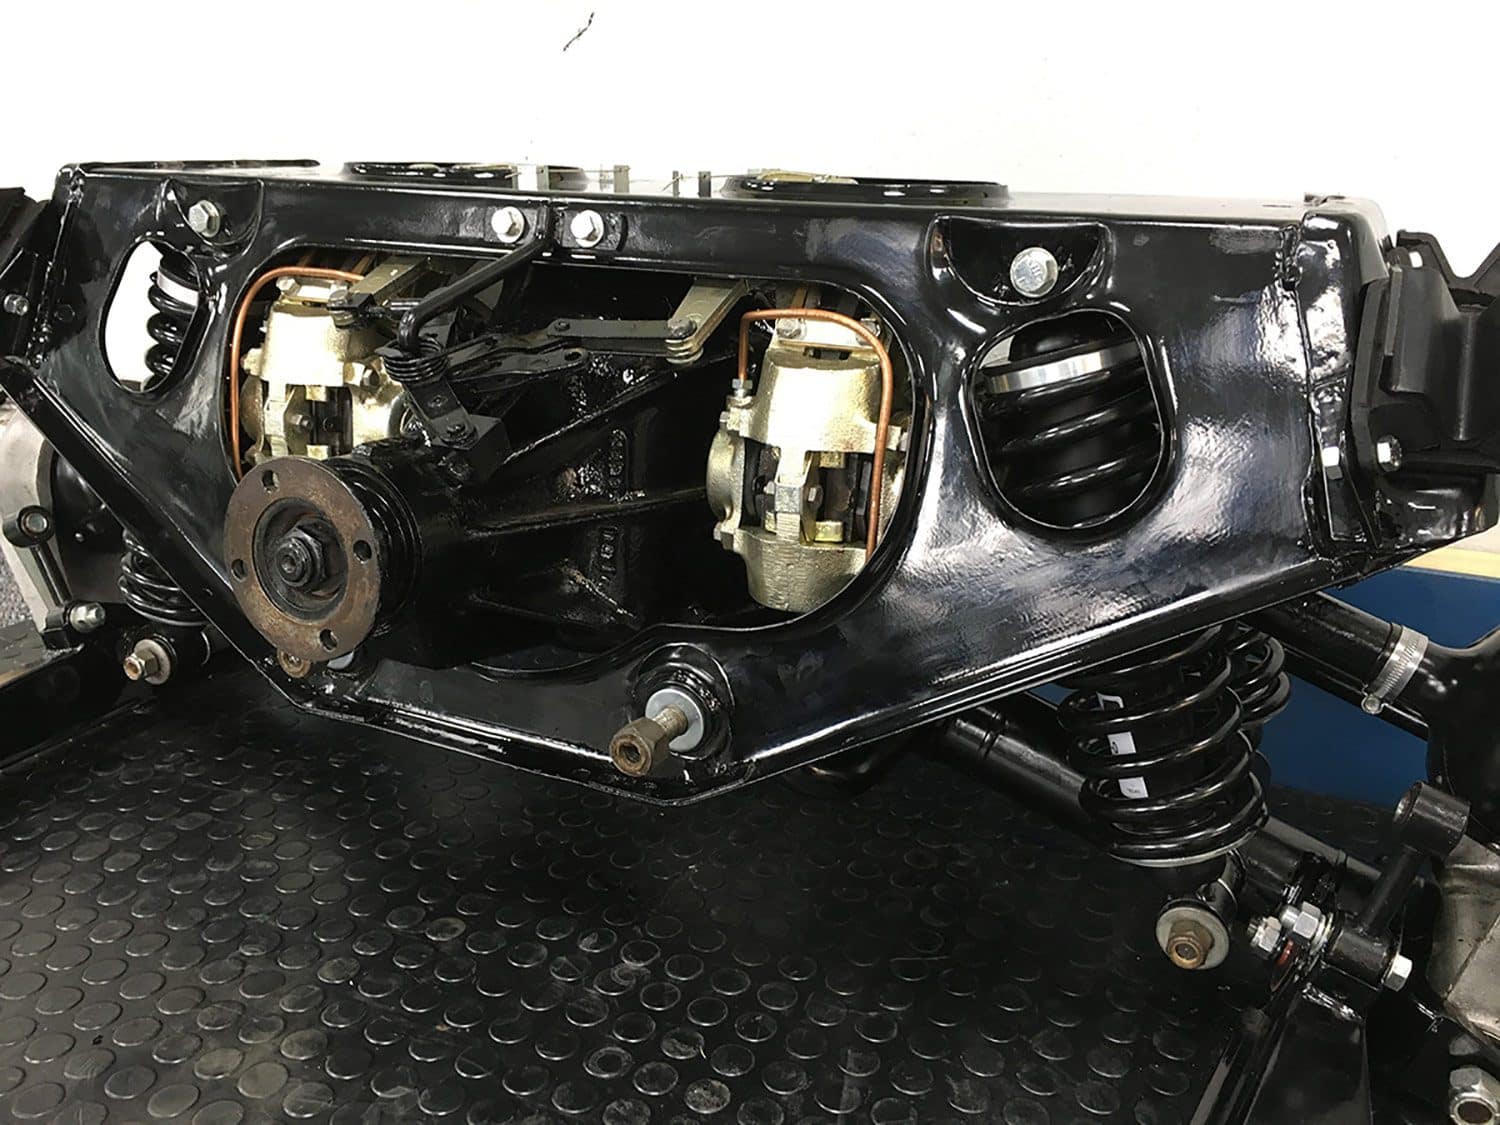
Our 1967 Jaguar E-Type back axle cradle which houses the refurbished “Limited Slip Diff”, new discs, calipers and stub axles. As you can see, the

[vc_row][vc_column][vc_column_text]It’s the last day of preparation as our 1967 Jaguar E-Type is scheduled to be primed on Monday morning. Just two more small areas that
Here we have Carl and Ryan working on the final few areas of the body of our 1967 Jaguar E-Type 2+2. The next stage will
Here we have the new air conditioning vents covered in the black leather to match the brand new interior soon to be fitted to our 1967 Jaguar E-Type.

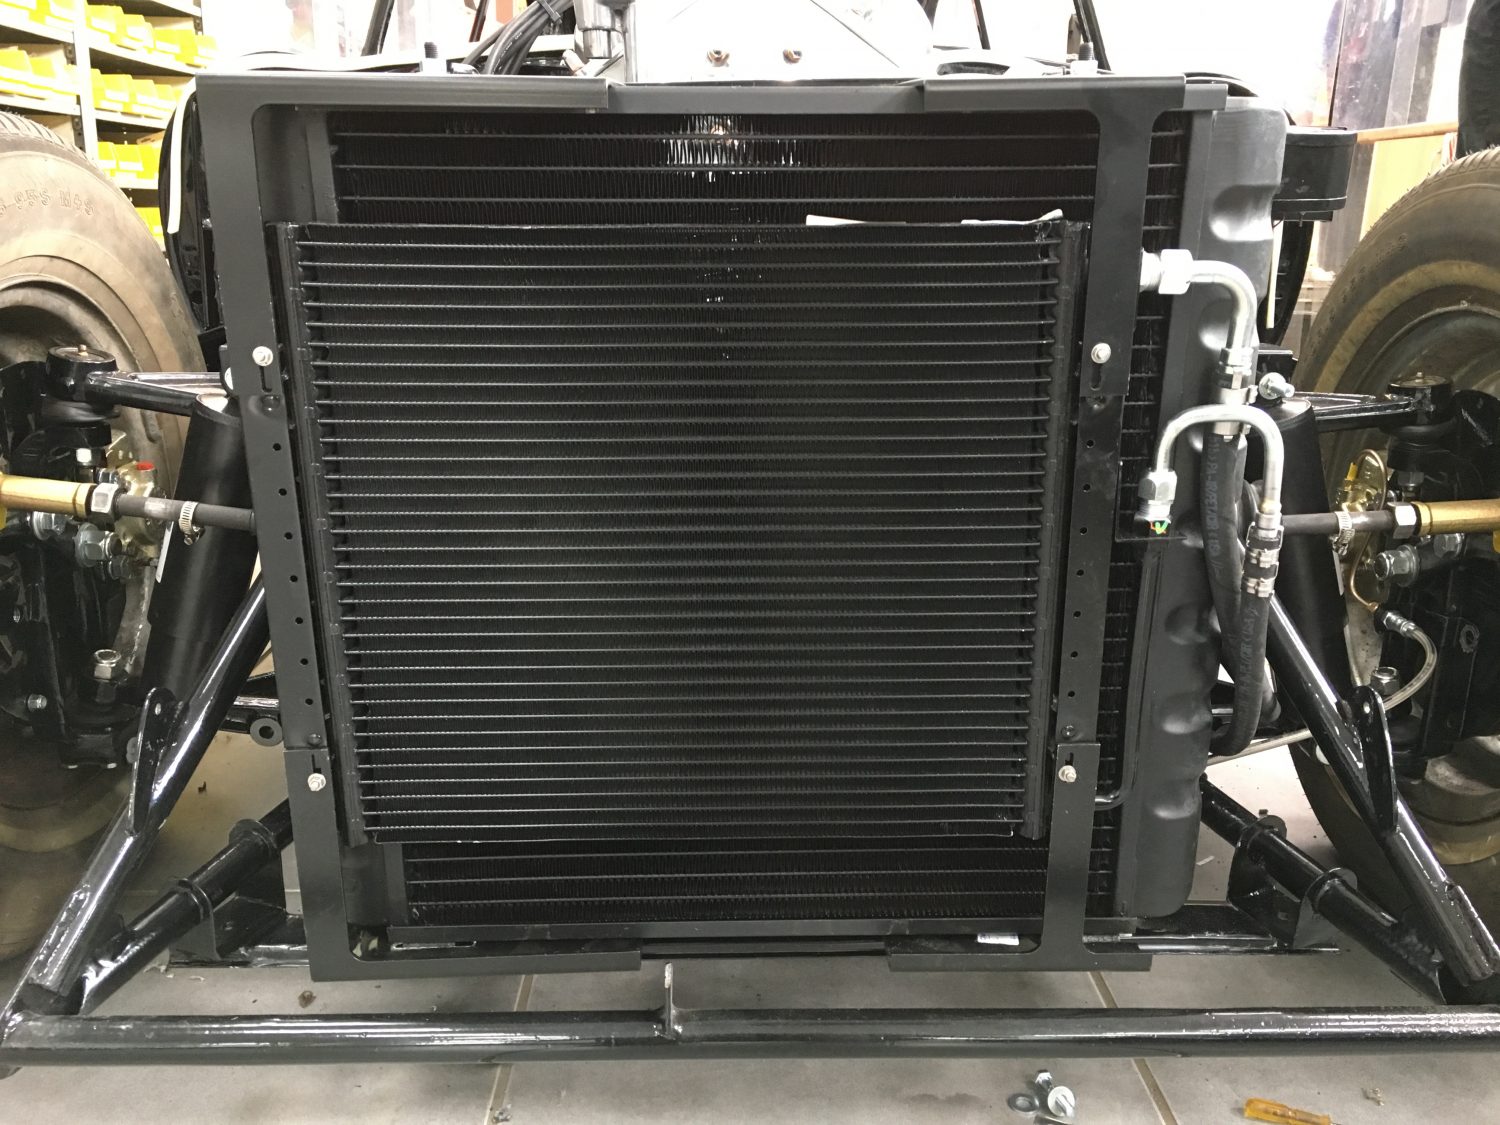
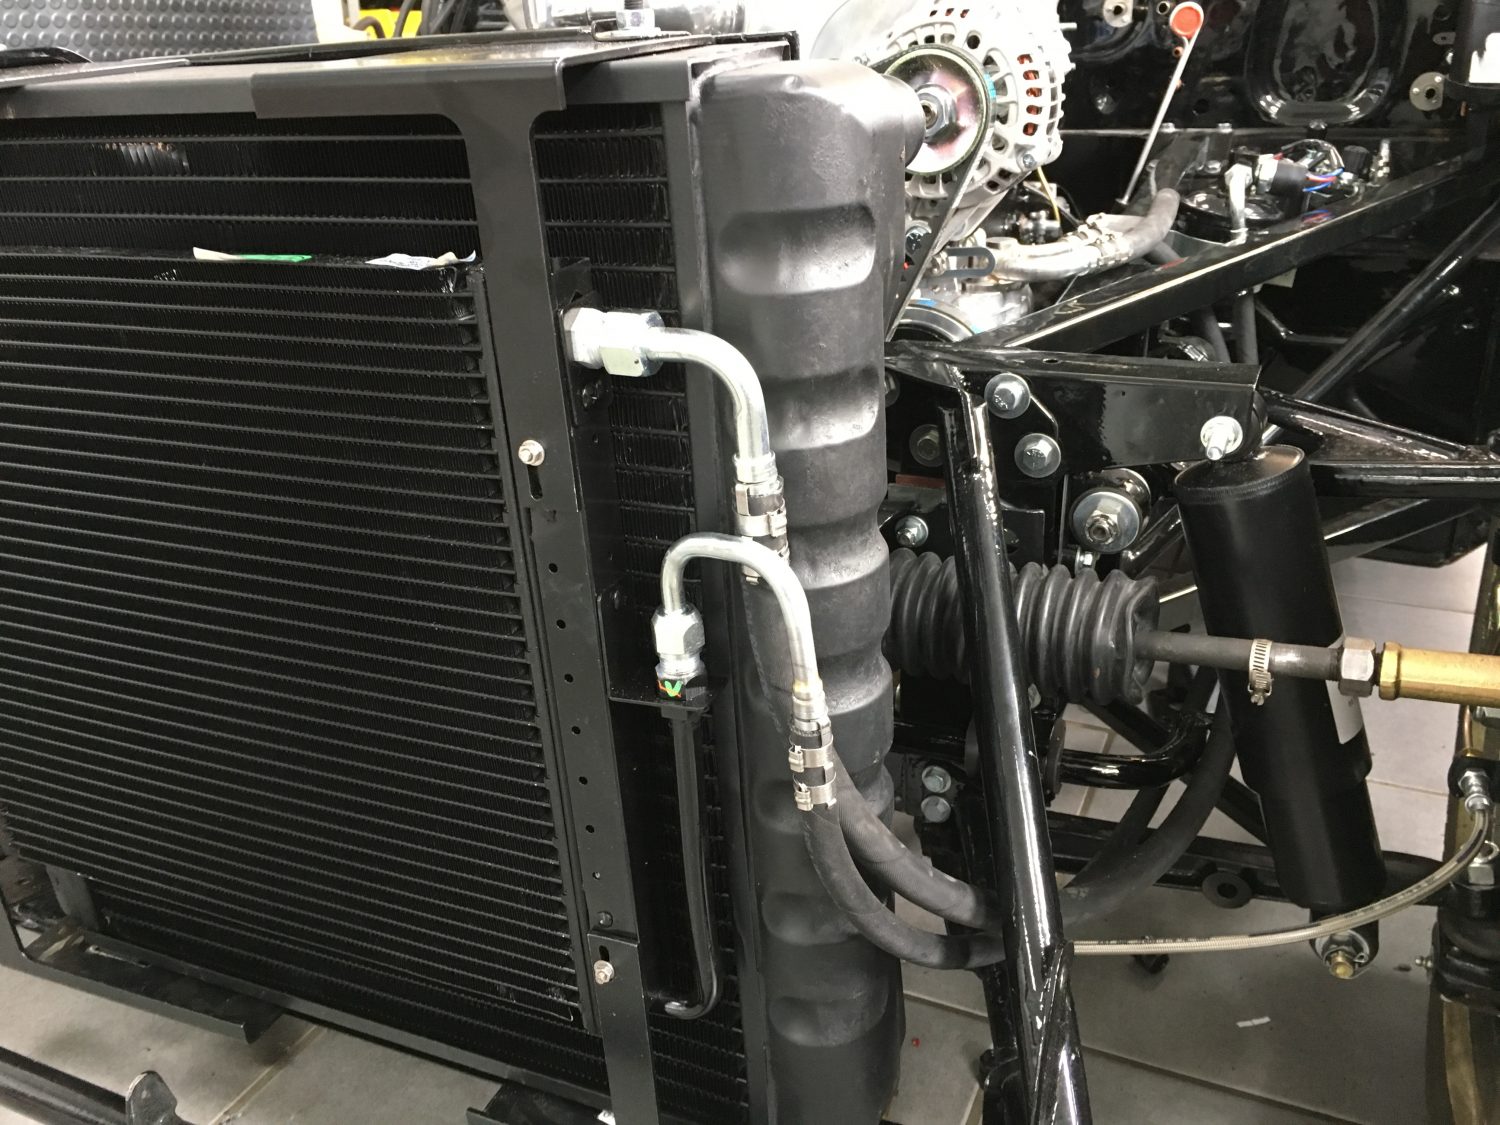
The polished aluminium radiator and header tank has now been fitted up and looking fantastic.


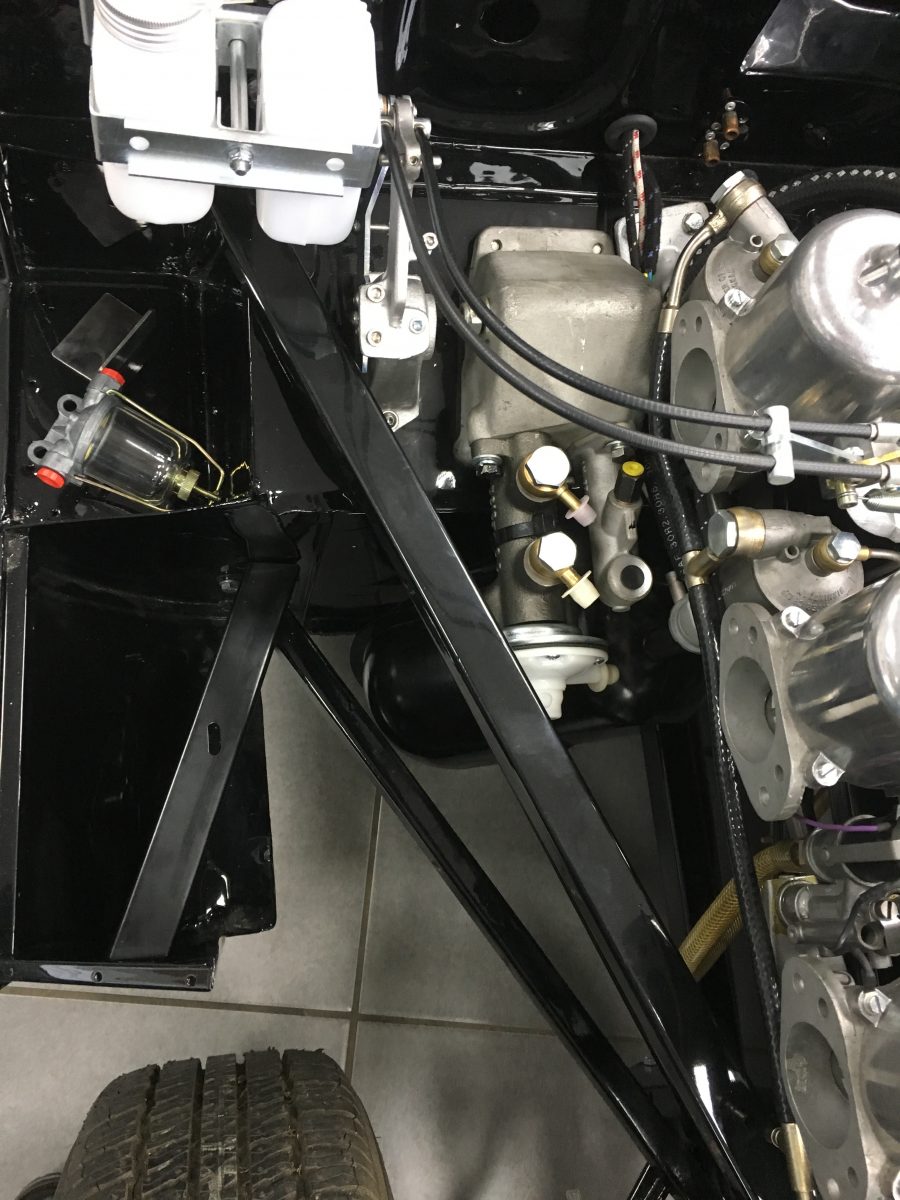
Tommy is now away sailing the Suffolk coast for a couple of days but before he left our workshops yesterday he managed to complete the installation of the new brake pipes. As you can see, the pipes are not yet secured but are in the positions that they need to be.
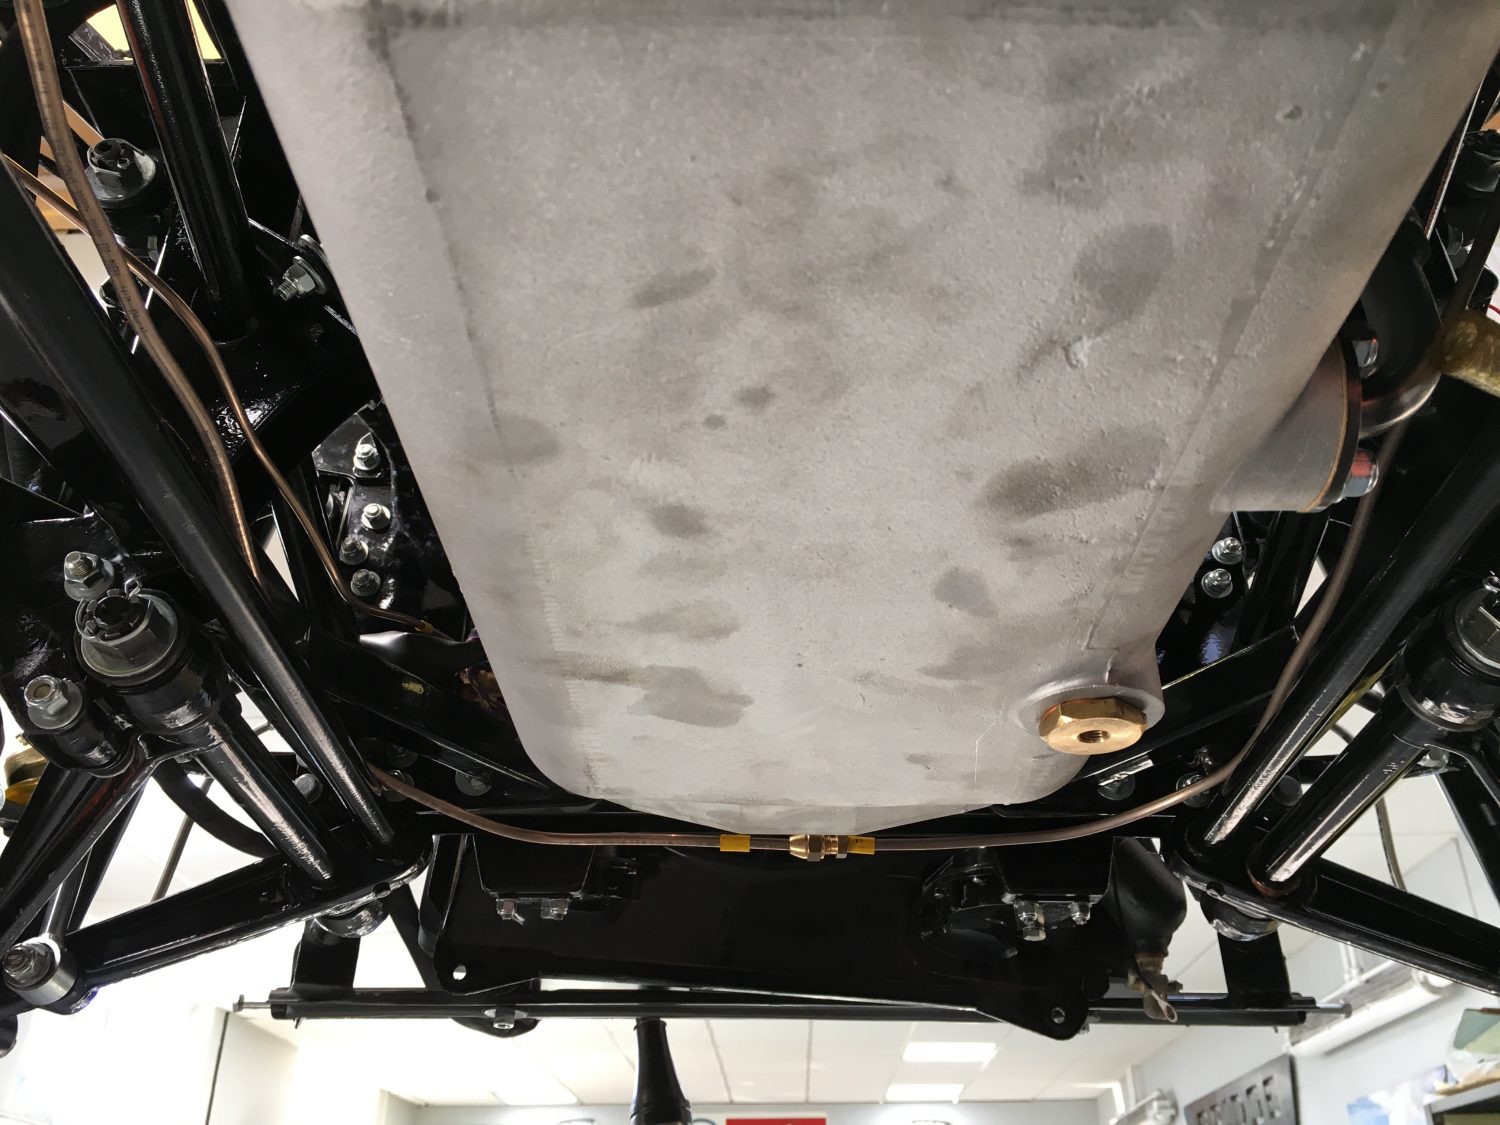
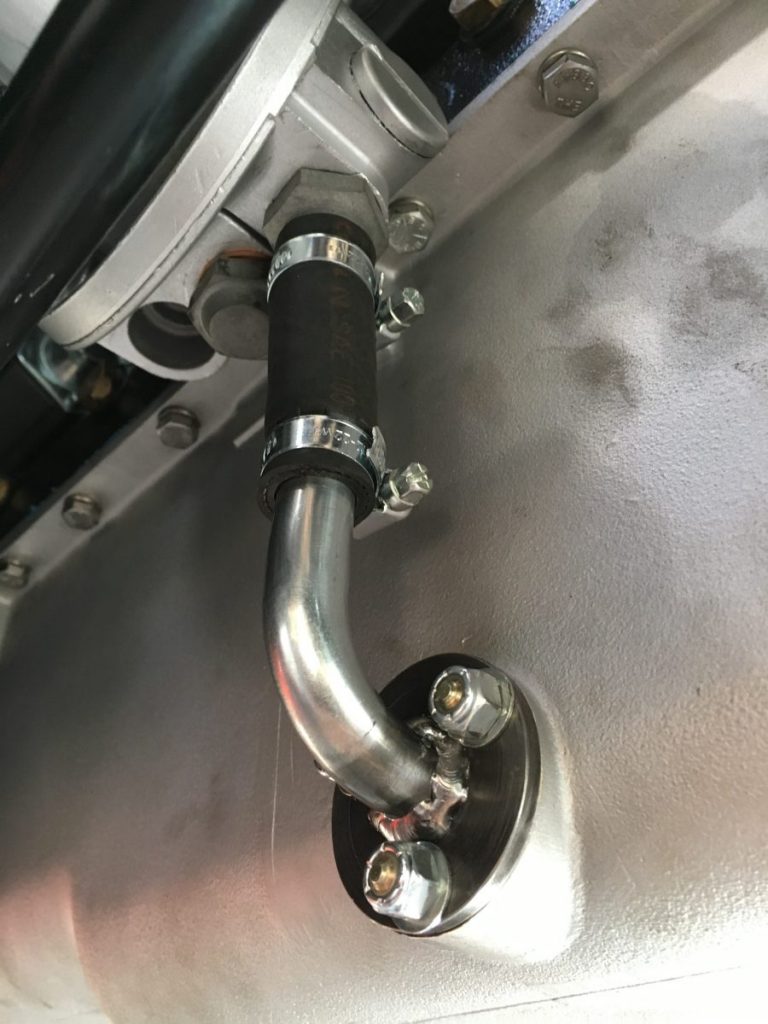
We have also fabricated the brand new over-flow pipe to the sump. This needed to be made up as it is no longer available in the shape we require.


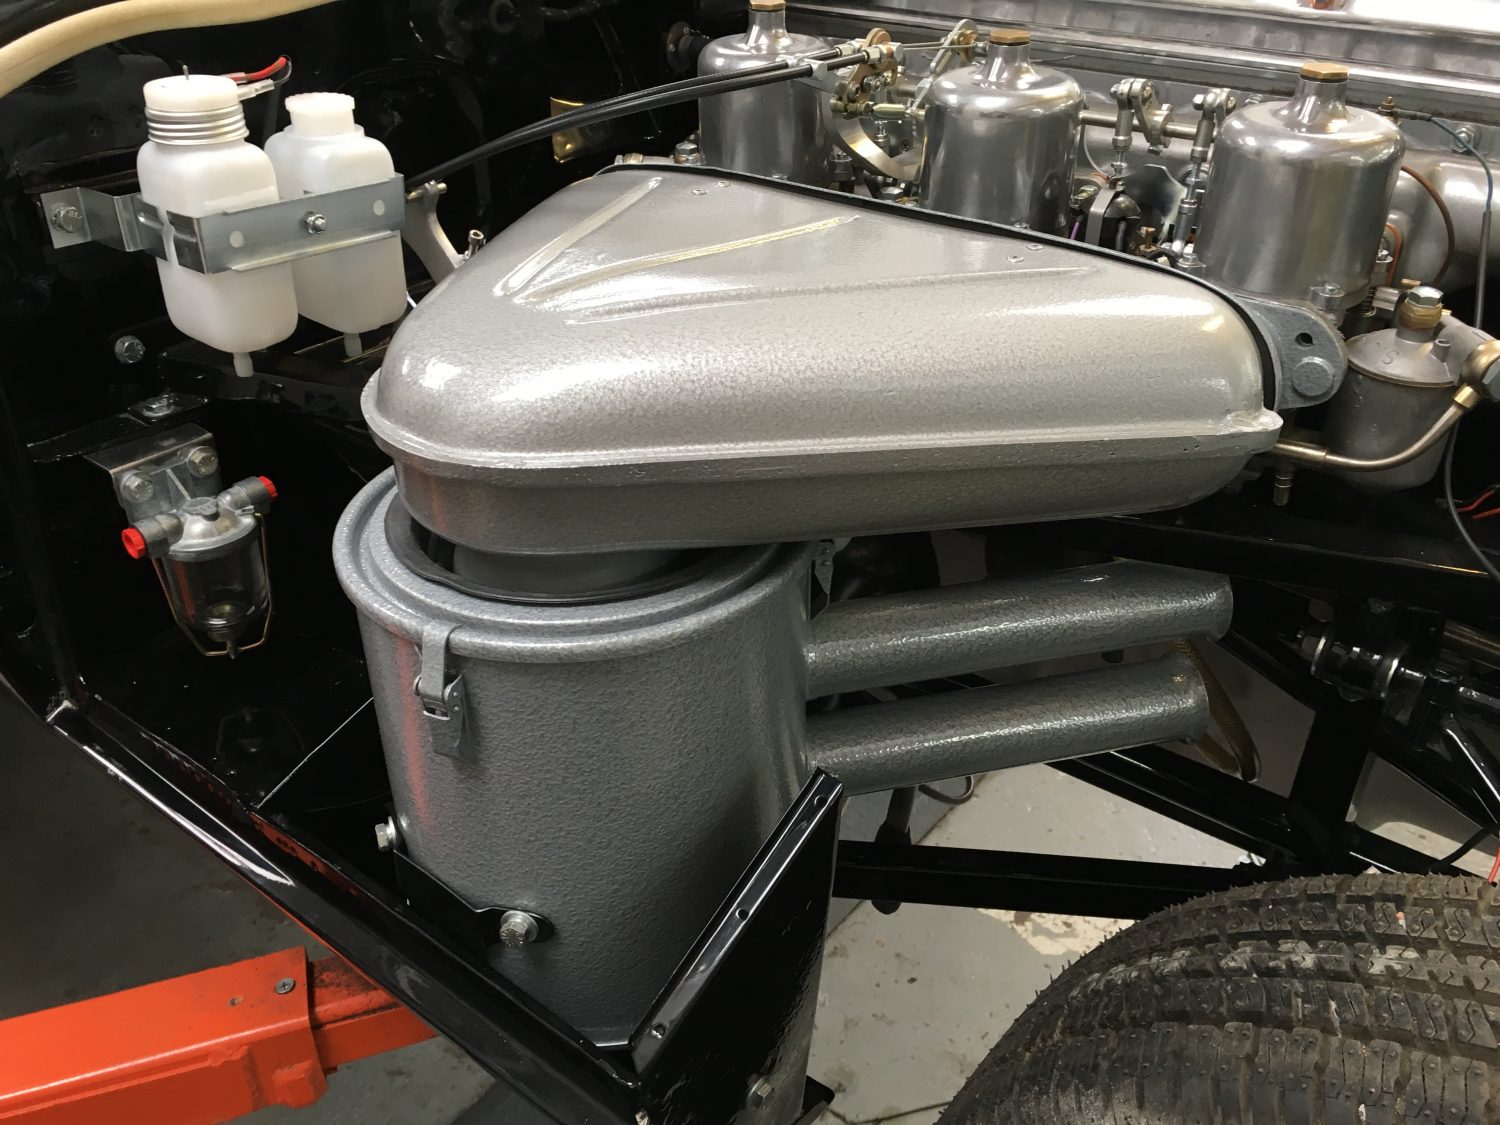
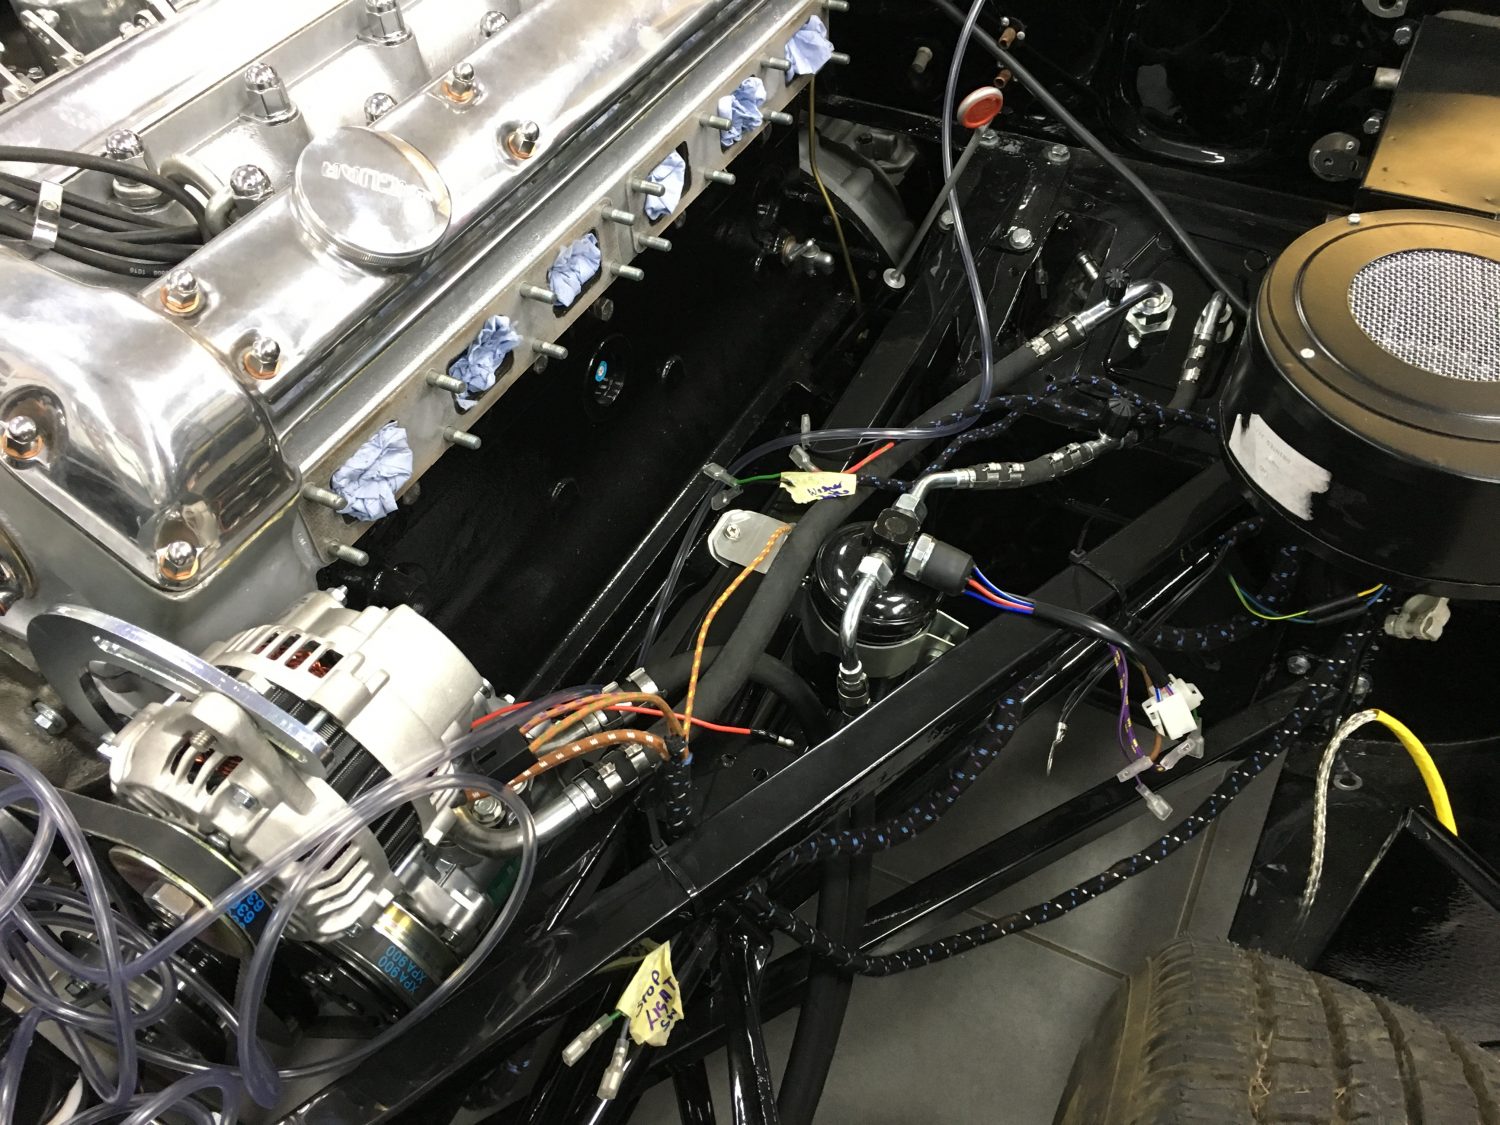
The brand new air filter and housing has now been fitted to our 1967 E-Type.

[vc_row][vc_column][vc_column_text]It’s the end of another day at Bridge Classic Cars and as I’m here on my own (Craig) I thought I’d take some up-to-date pictures of our latest projects.
Here’s the 1967 Jaguar 2+2 E-Type on a set of spare wheels (for ease of wheeling) in our reassembly room ready to be fitted up.[/vc_column_text][/vc_column][/vc_row][vc_row][vc_column][vc_gallery type=”image_grid” images=”14468,14469,14470,14471,14472,14473,14474,14475,14476,14477″][/vc_column][/vc_row]
Work has now commenced on refurbishing the original rear interior panel of our 1967 Jaguar E-Type. Now the brand new interior has arrived from Aldridge Trimming we can now start to build the interior ready for the refit.

As with the majority of our wiring harness’, we deal directly with Autosparks.
Autosparks are the market leaders in manufacturing bespoke harness’. They use British Standard 6862 PVC insulated automotive cable where applicable. This can then be braided to replicate the classic braided cable look with the modern day PVC cable properties. Once the harnesses are laid they can then be bound in either PVC harness tape or a cloth braiding depending on vehicle.
Original Manufacturers colour coding is used where possible; terminals and fittings are supplied where necessary. Autosparks go to great lengths to obtain original-type terminals but on older vehicles some wiring accessories may no longer be manufactured. If terminals and fittings are unobtainable they may omit or substitute for a suitable alternative.
The new harnesses are not labelled but will follow the pattern of an original harness. A good tip is to label the old harness up as you take it off. You can then use this as a guide for the replacement. Wiring diagrams are useful to identifying each branch on the harness and location for the wiring in each vehicle however, be aware there can be a few out there for the same vehicle but will say different things.

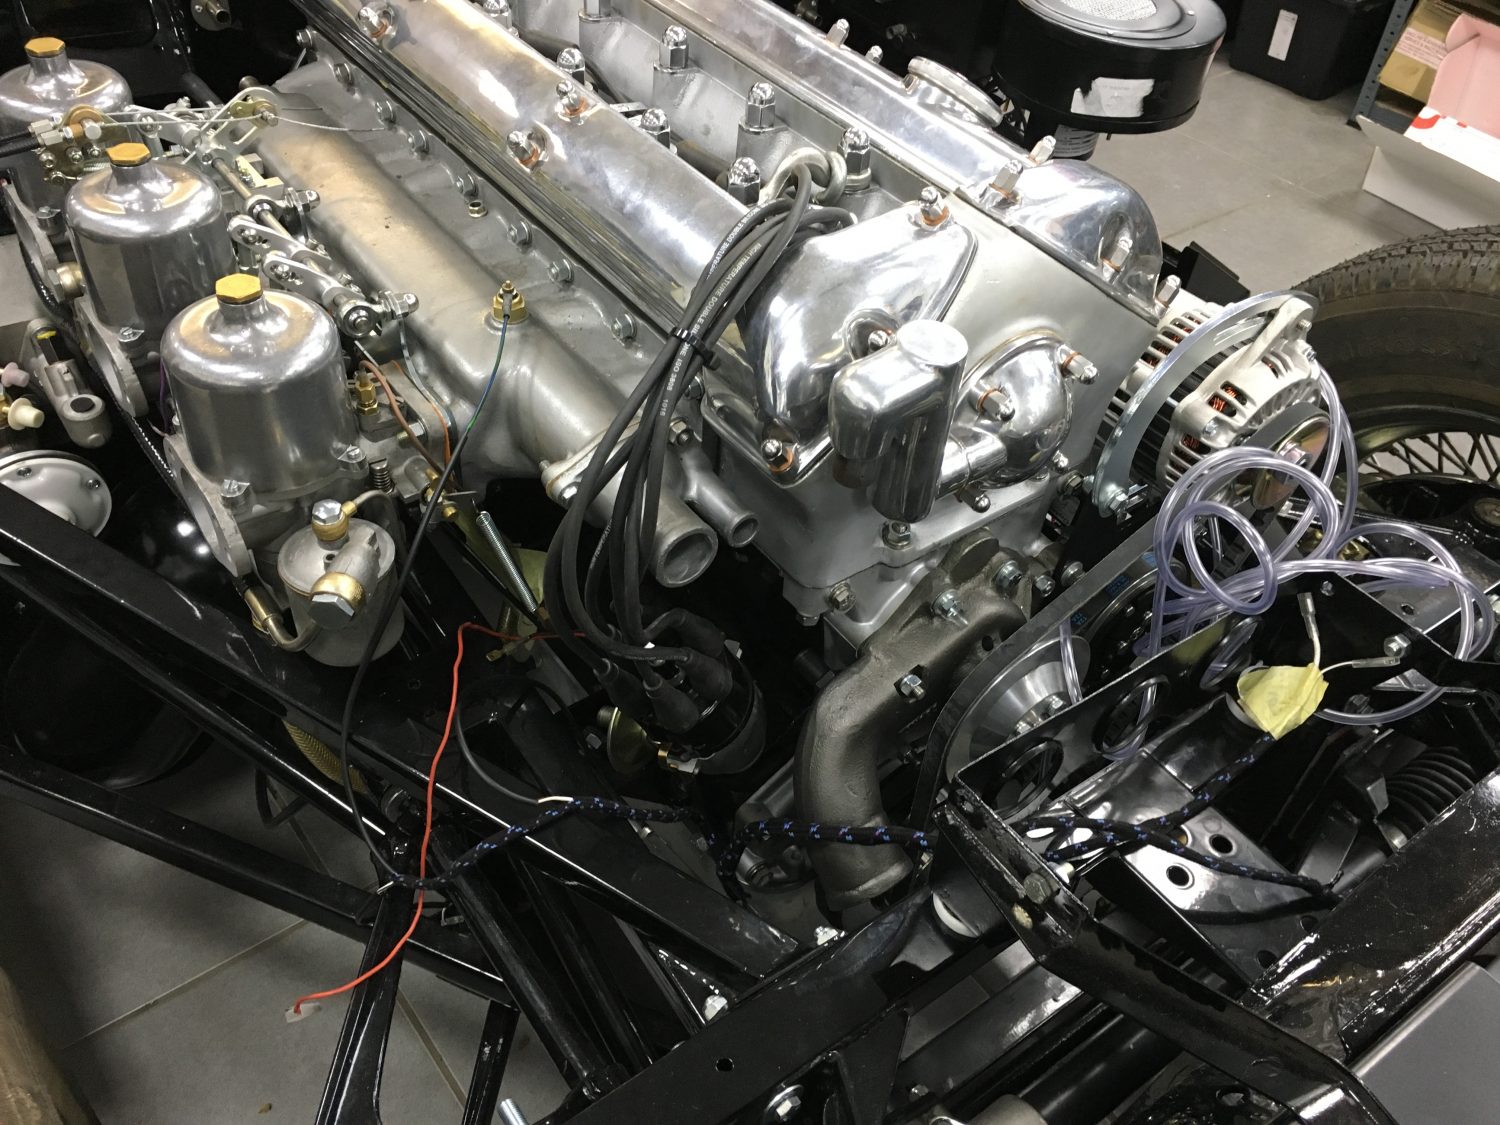
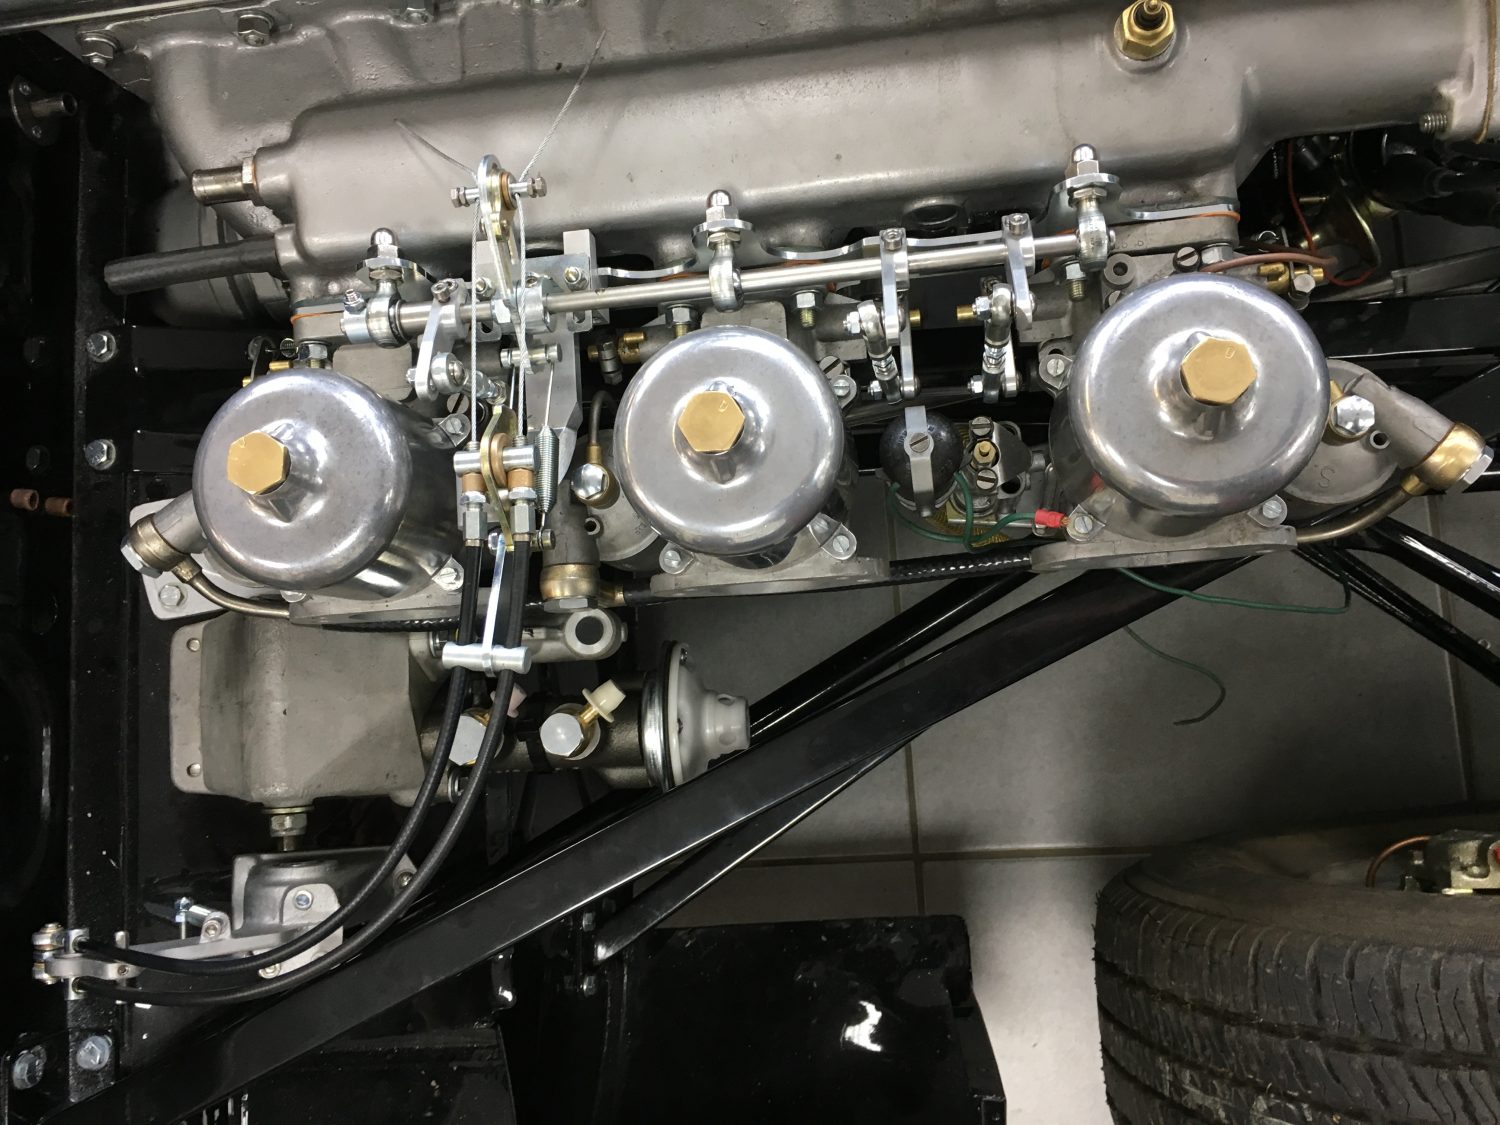
The brand new upgraded throttle linkage has now been fitted to our 1967 Jaguar E-Type.
As you can see, the stunning new set up is far less busy under the bonnet than the regular set up. Not only is aesthetically pleasing but is far more responsive and will prevent any future play. The response is instant.
The high output starter motor is also in position and tomorrow we’ll start to fit thew new loom.

The new heater blower has been temporarily fitted up. Before we make this 100% secure, firstly the engine will need to be fitted up and the air conditioning components installed.


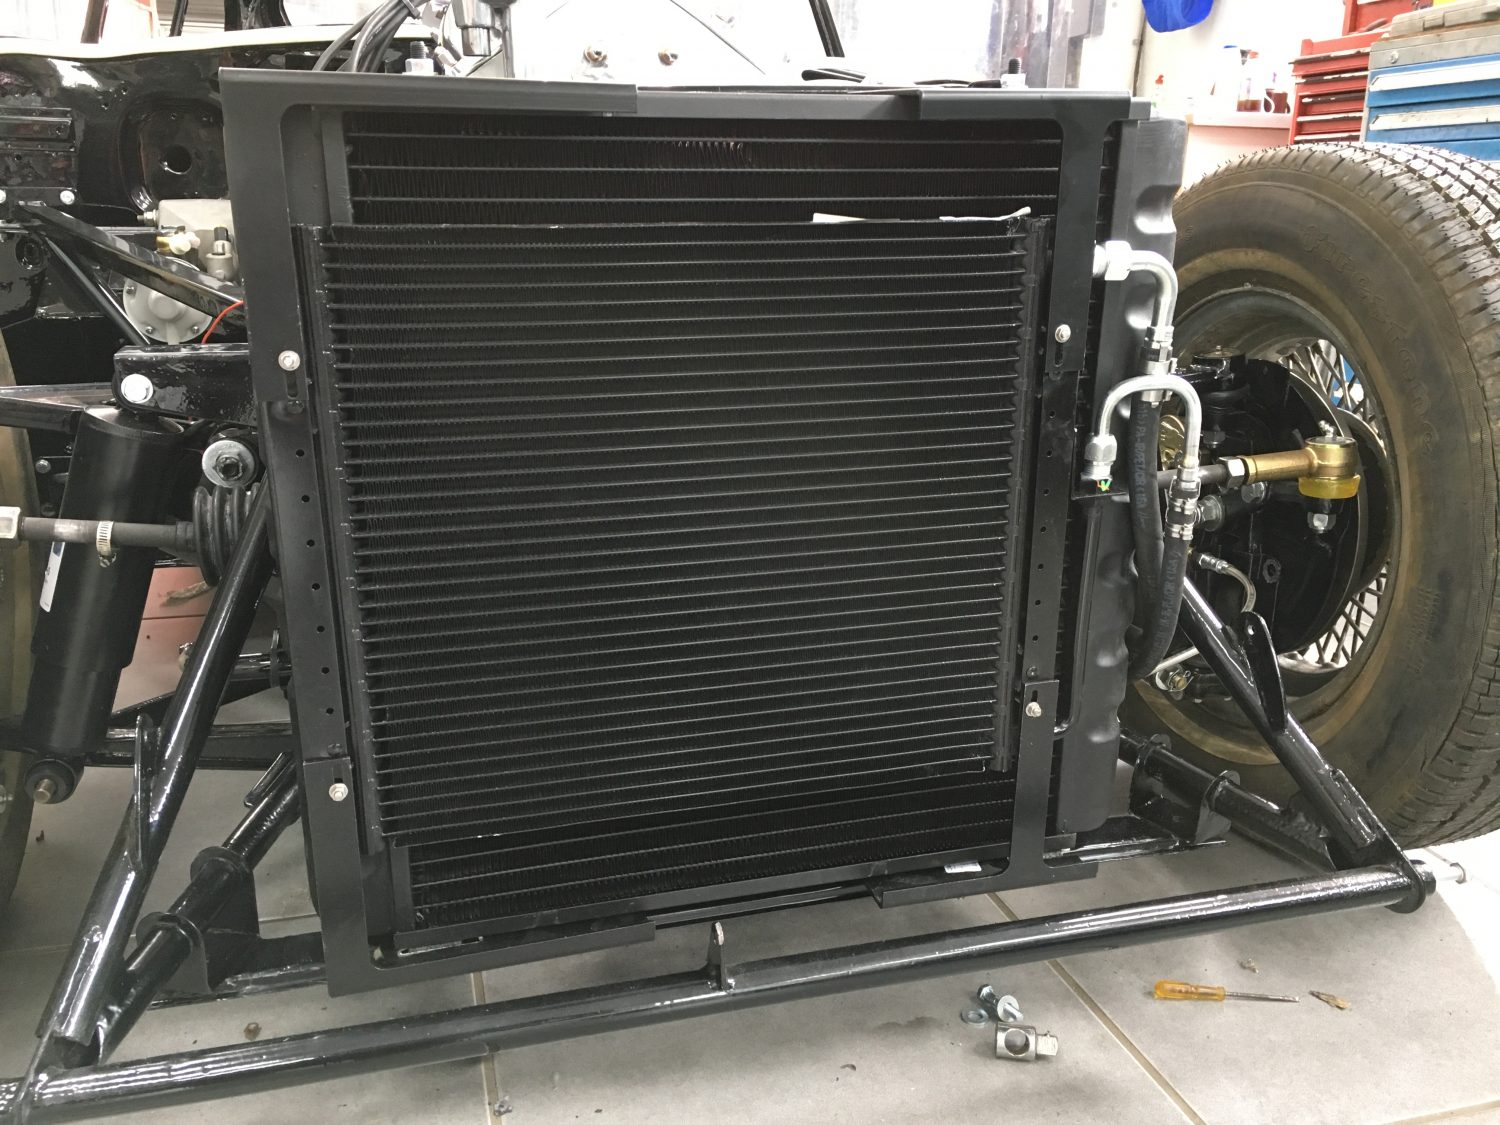
Since the early 1920s, Clayton Classics has been supplying products to the automotive industry and has always been at the forefront of technical innovation. Part of a larger business that provides vehicle heating, cooling and air conditioning solutions, the Clayton Classics division was created in 2005 and focuses on world-class restoration of classics cars.
The air conditioning systems have been developed, tested and enhanced over many years on Clayton Classics’ own cars.
There are several alternative air conditioning systems;
Heat insulation to the floor, transmission tunnel and under-bonnet air ducts is also strongly recommended (and is a very worthwhile improvement in itself ). Clayton Classics supply very effective aircraft quality non-combustible insulation in roll form, as well as Dynamat.
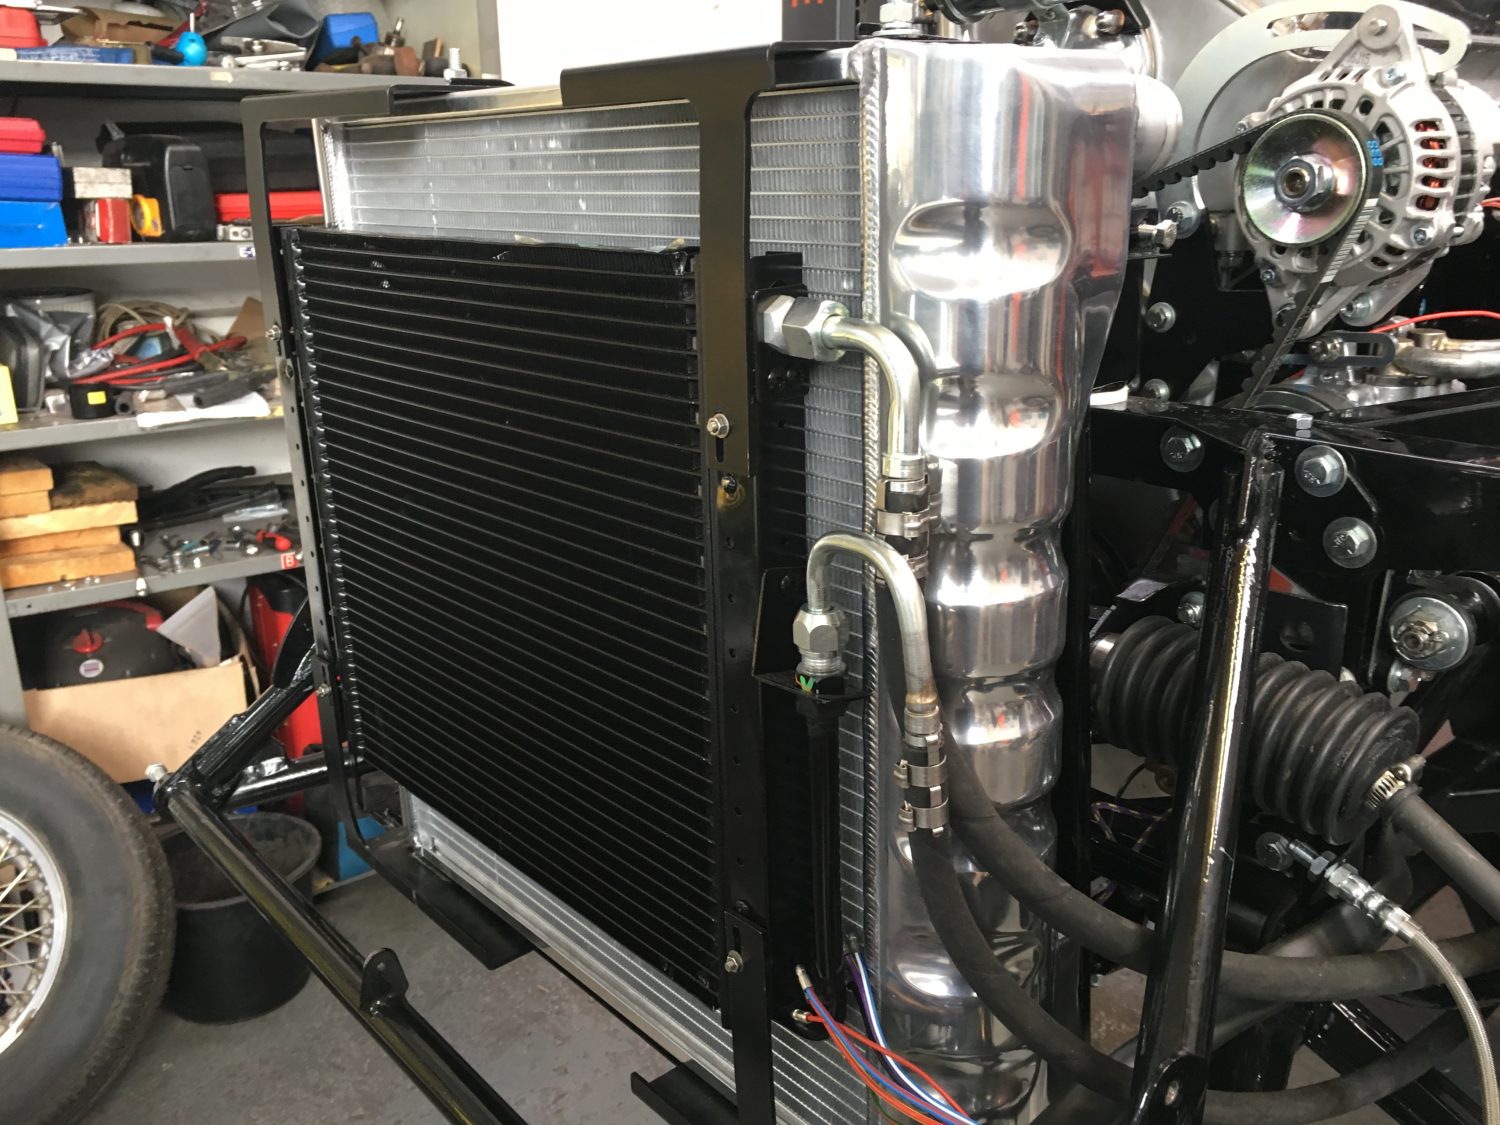
The performance of any new system will be compromised without better air flow, so we strongly recommend additional vents are added into the car to improve performance and air distribution. Different options are pictured below.
Vents are both essential and included on the centre console system, the alternatives shown here do not apply.
The kits are complete including a powerful engine fan, except for compressor mountings and pulley (which vary depending on engine spec and any previous modifications). Separate fitting kits are available for most configurations.
An upgraded radiator is strongly recommended. Clayton Classics can supply both aluminium and copper/brass radiators, up-rated performance.
Here we have pictures of the air-conditioning being installed into our 1967 Jaguar E-Type restoration project.
Some additional pieces of bright-work have been added to the collection over at Wyatt Polishing. No major repair work is required so this collection will just require stripping, chroming and polishing.

Tommy has now completed the task of refurbishing and re-painting our 1967 Jaguar E-Type gearbox tunnel. With the engine and gearbox now fitted into the car the tunnel can be re-fitted into position.

The new master cylinder has now been fitted up…
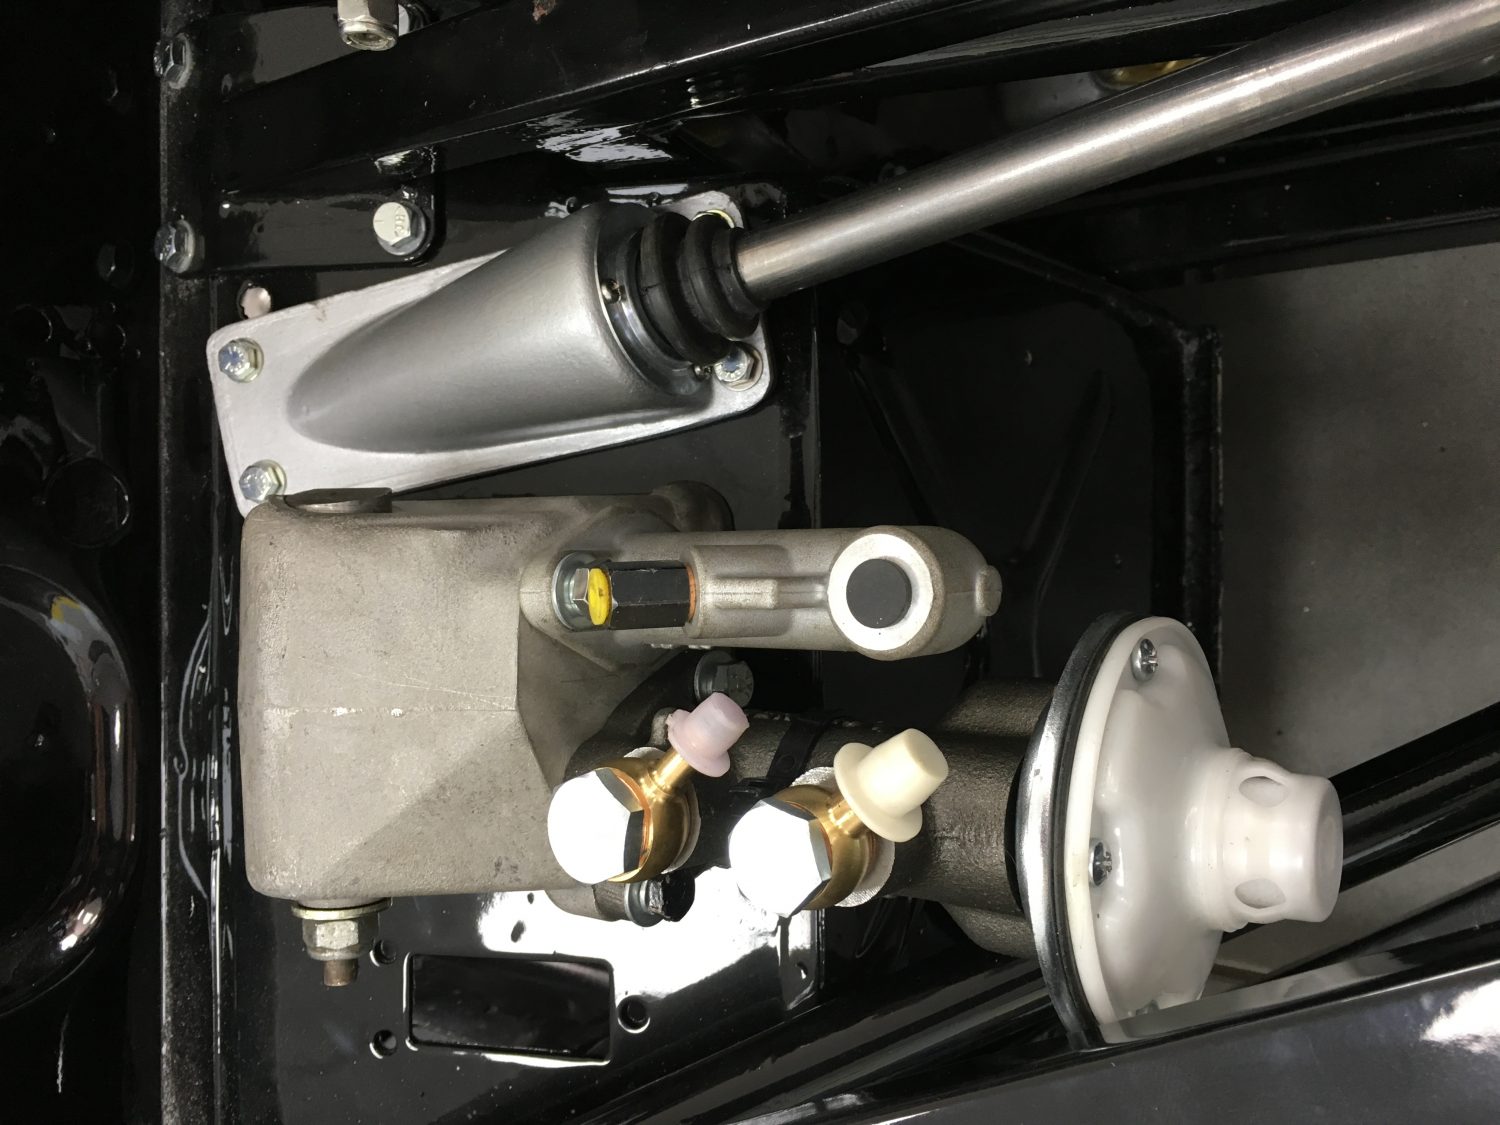
…along with the new heater hose pipes.
The time has come for our 1967 Jaguar E-Type to, once again, return to the floor.
It’s been a long time, sitting up high on our frame-work trolley but now with the donor wheels fully fitted she can be wheelled around once again and we can continue with the rebuild on the floor level…for now!


With the 4 speed gearbox and bell housing fully stripped, cleaned, repaired, powder coated and rebuilt, it is now ready to be married up to the engine and fitted back into our E-Type.


[vc_row][vc_column][vc_column_text]With the freshly painted body shell back with us it is time for Tommy to refit the newly refurbished components.
Here we have the back suspension cradle all fitted up and look incredible. We shown the newly built cradle on a previous post when we completed the rebuild.


 [/vc_column_text][/vc_column][/vc_row]
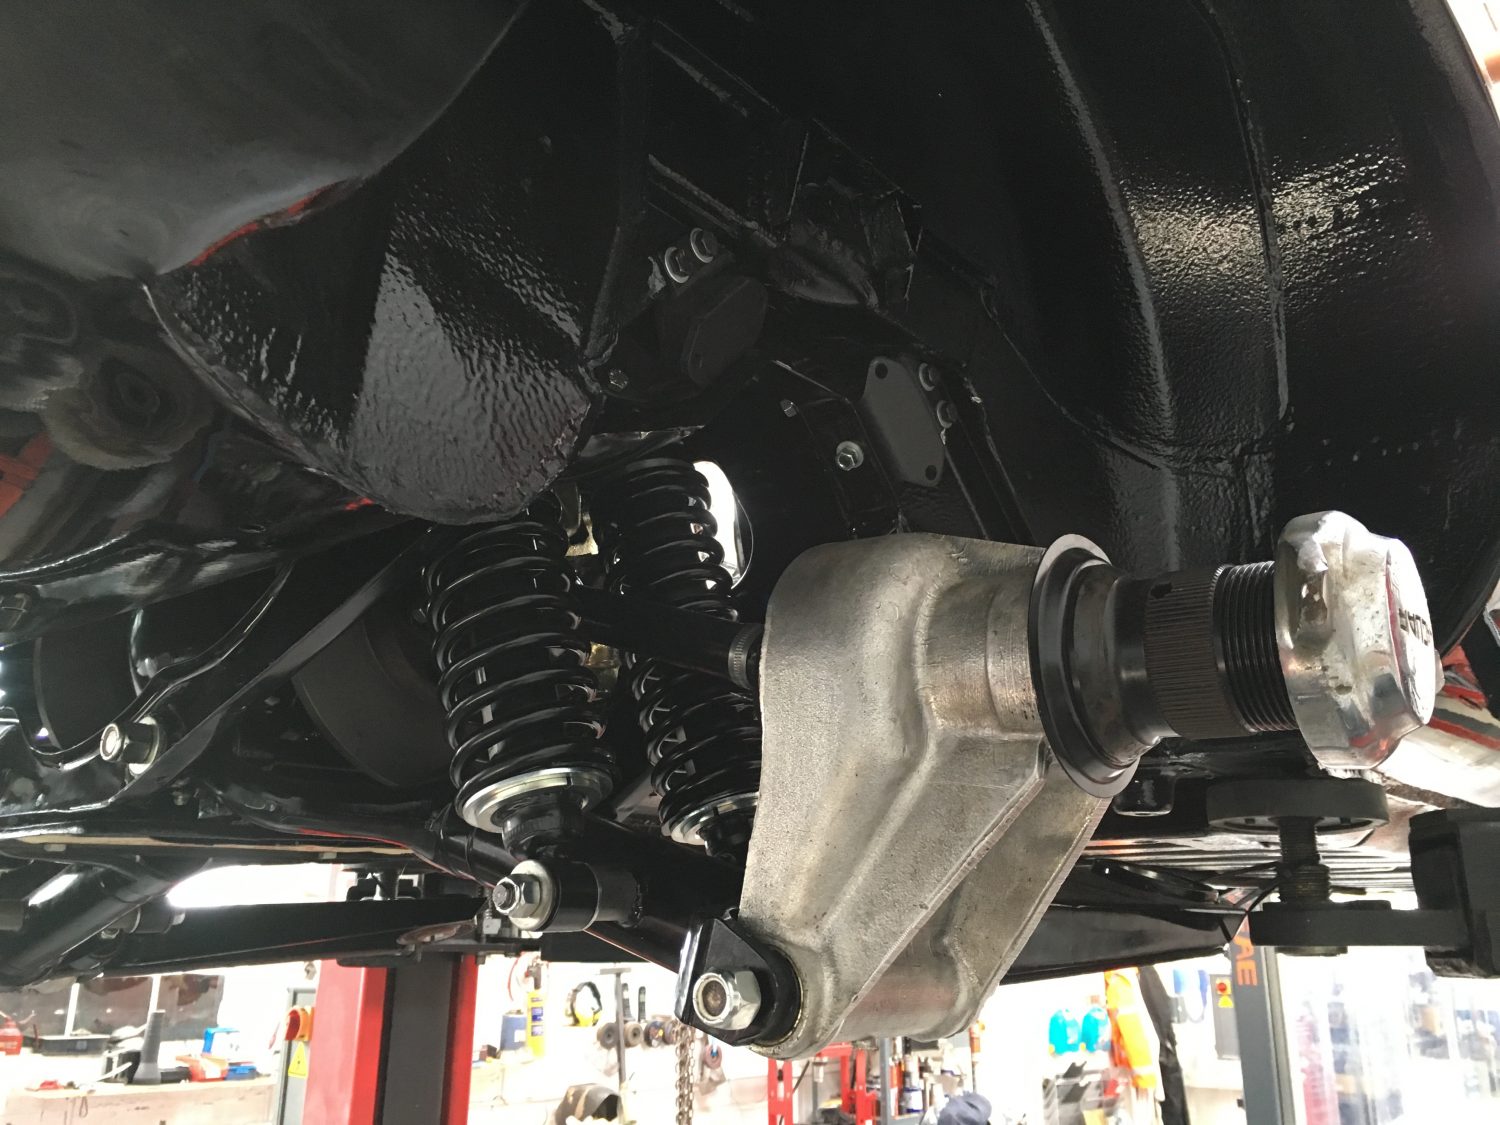
The front assembly of our 1967 Jaguar E-Type is really starting to take shape with the wishbones, calipers and discs all now fitted.


Extensive work was needed on our Jaguar E-Type seat brackets, so much so that a triple coating process was needed to be carried out to ensure the perfect end result.
Here they are in the copper plated stage.

When we next see them they’ll be 100% perfect and finished in polished chrome.

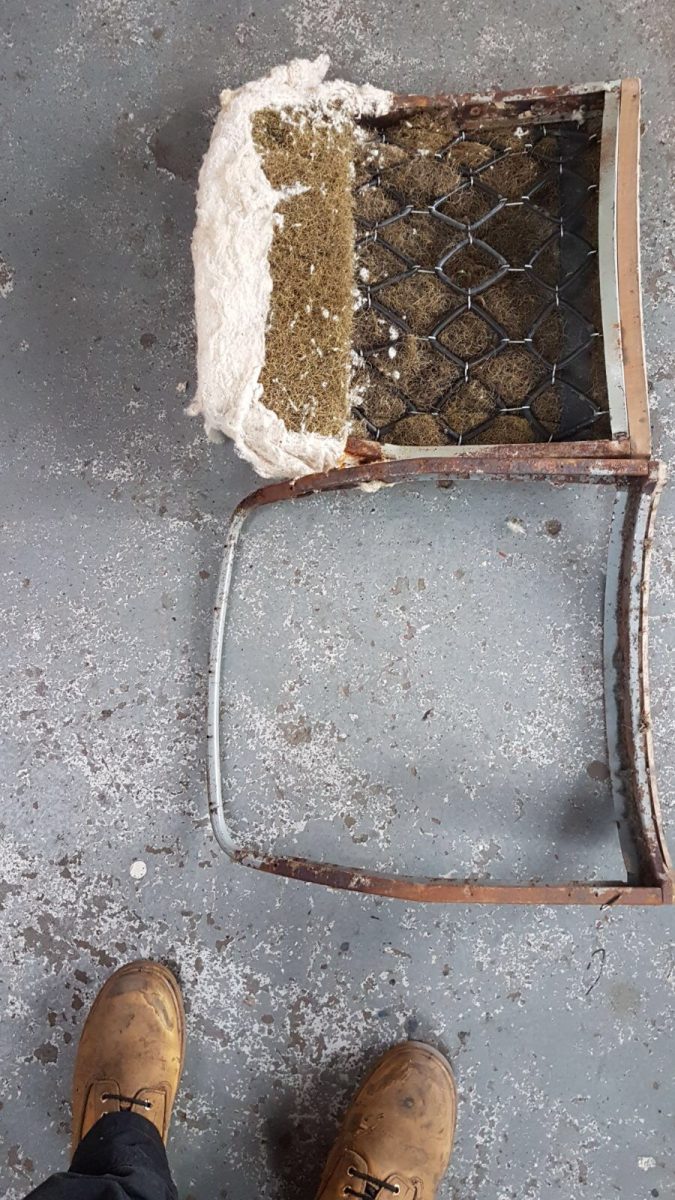


We have now started blasting the original Jaguar E-Type seat frames.

The seat runners were particularly challenging. With years and years of crud (technical term) built up inside they were near on impossible to release but eventually they came free and we able to be fixed up, repaired, cleaned up and painted.
It is always very rewarding, after months of preparation to see our car go into paint.
We can now embark on the reassembly of all of the refurbished and new parts that have been the focus of our attention over the passed few months.
When we look at the rebuilt engine and gearbox we can now see how it is going to compliment the beautiful black paintwork.


[vc_row][vc_column][vc_column_text]With the return of our painted Jaguar E-Type body imminent, Tommy has been working through some of the final pieces that require his attention.
Today, he has been busy blasting some of the smaller components as well as piecing together the recently acquired and very rare pedal box set up.
Once blasted, the pieces have undergone a single layer of primer. These will now be finished in gloss black.
Amongst the assortment we have: the pedals, blanking plates for the left to right conversion, the prop shaft, radius arm to body braces and accelerator pedal box.[/vc_column_text][/vc_column][/vc_row][vc_row][vc_column][vc_gallery type=”image_grid” images=”11552,11553,11554,11555,11556,11557,11558,11559,11560,11561,11562,11563,11564,11551″][/vc_column][/vc_row]
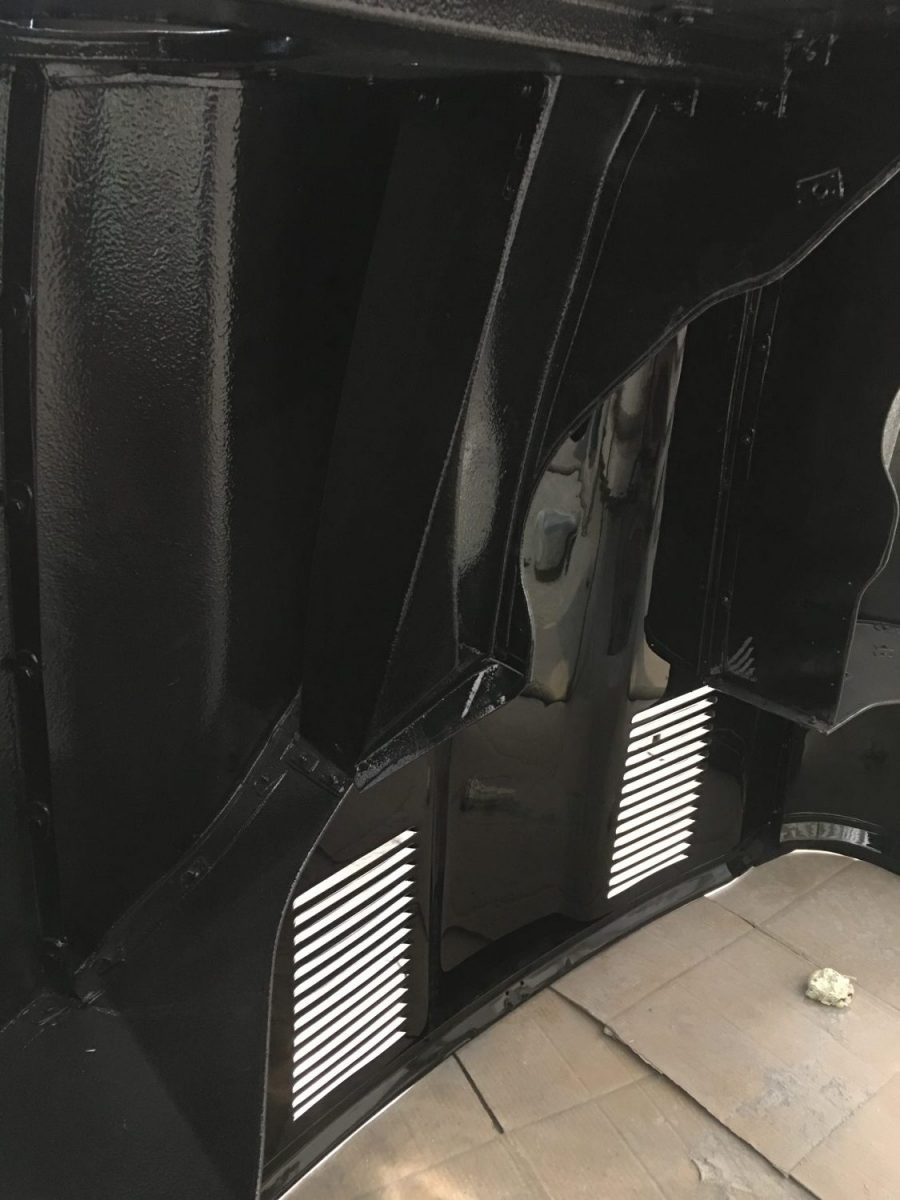
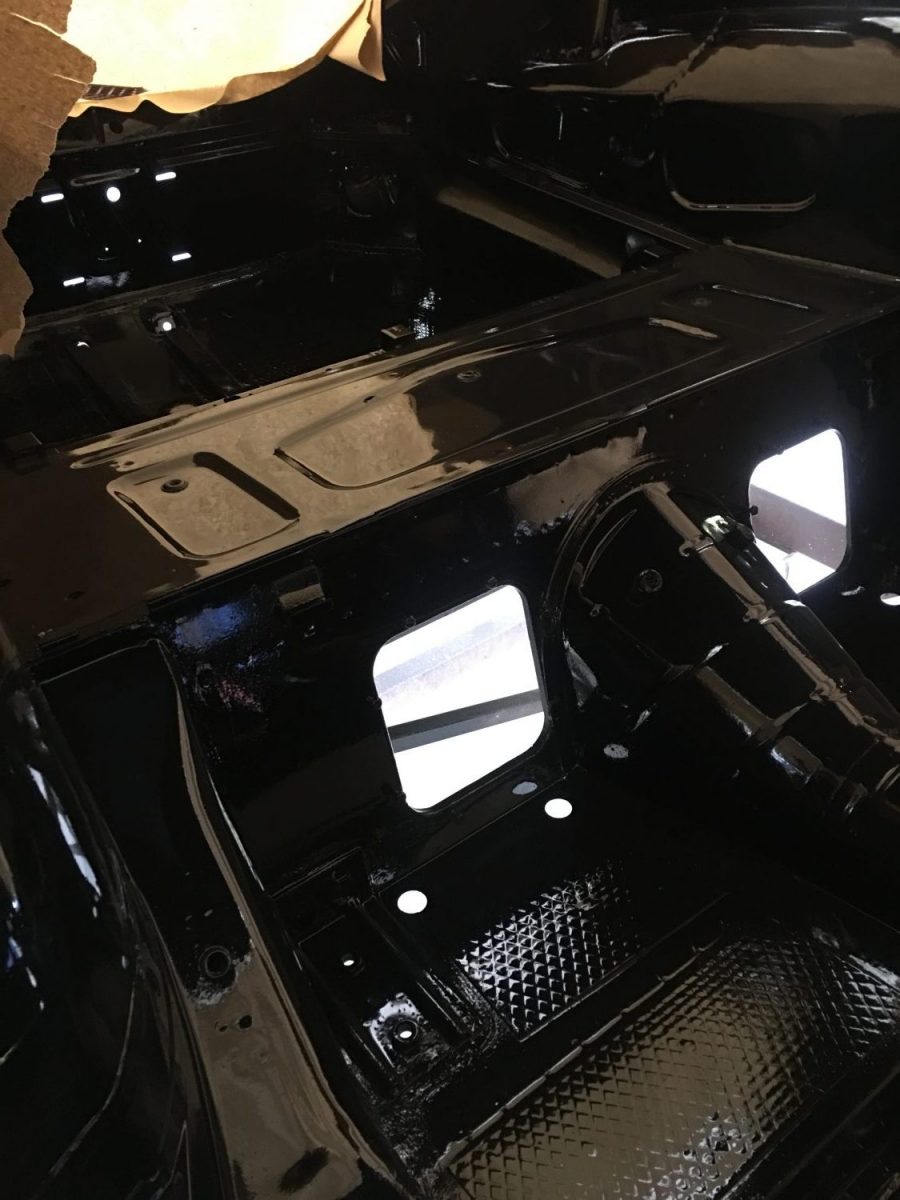
The pictures show the first stages of paint.
Smooth stone chip has been applied to the inner wings, high gloss black to the centre of the bonnet section, floors and bulk head.
We have continued the smooth stone chip to the underside of car.


We’ve now fitted the triple SU carburetors to our E-Type engine and Ady has carried out the first few test runs.


[vc_row][vc_column][vc_column_text]We are now working on the last few areas that needed our attention before the second stage of primer will be applied.[/vc_column_text][/vc_column][/vc_row][vc_row][vc_column][vc_gallery type=”image_grid” images=”10852,10853,10854,10855,10856,10857,10858,10859,10860,10861″][/vc_column][/vc_row]
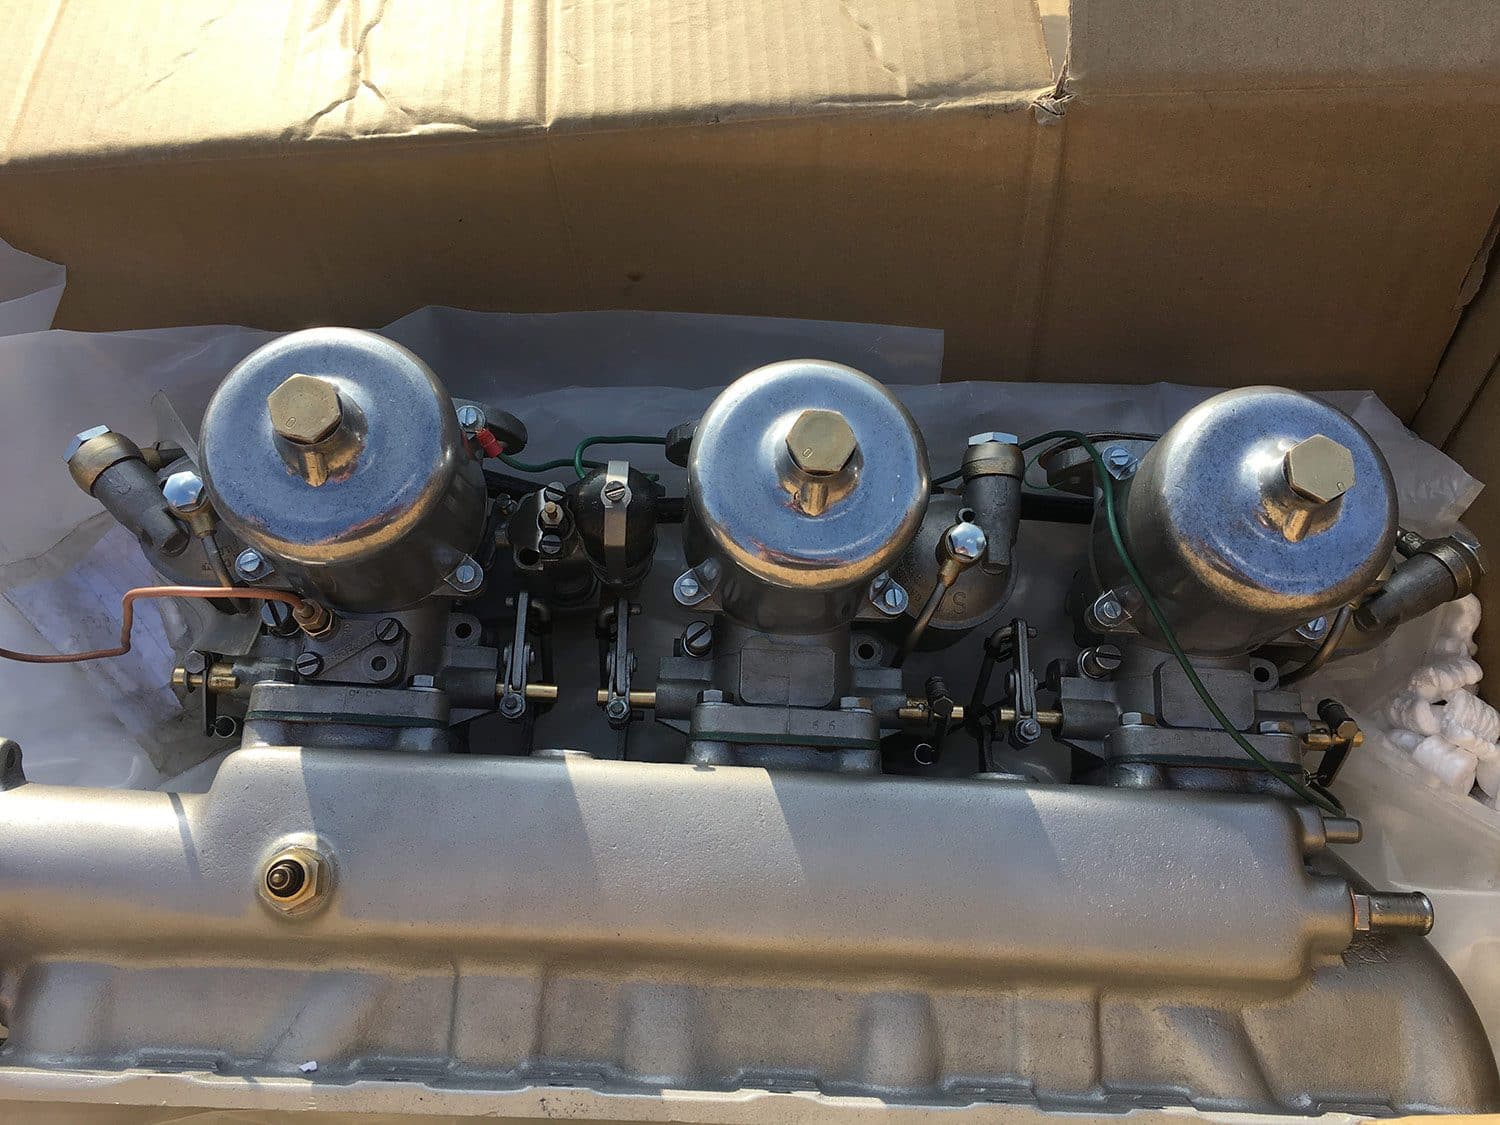
Our triple SU carburetors are now complete. Our renowned race engine builder Don Warman has carried out a fantastic job on restoring these tired looking Jaguar carbs back to their best.
We will now be able to fit them to our newly rebuilt 4.2 Jaguar engine ready for a full test run next week.
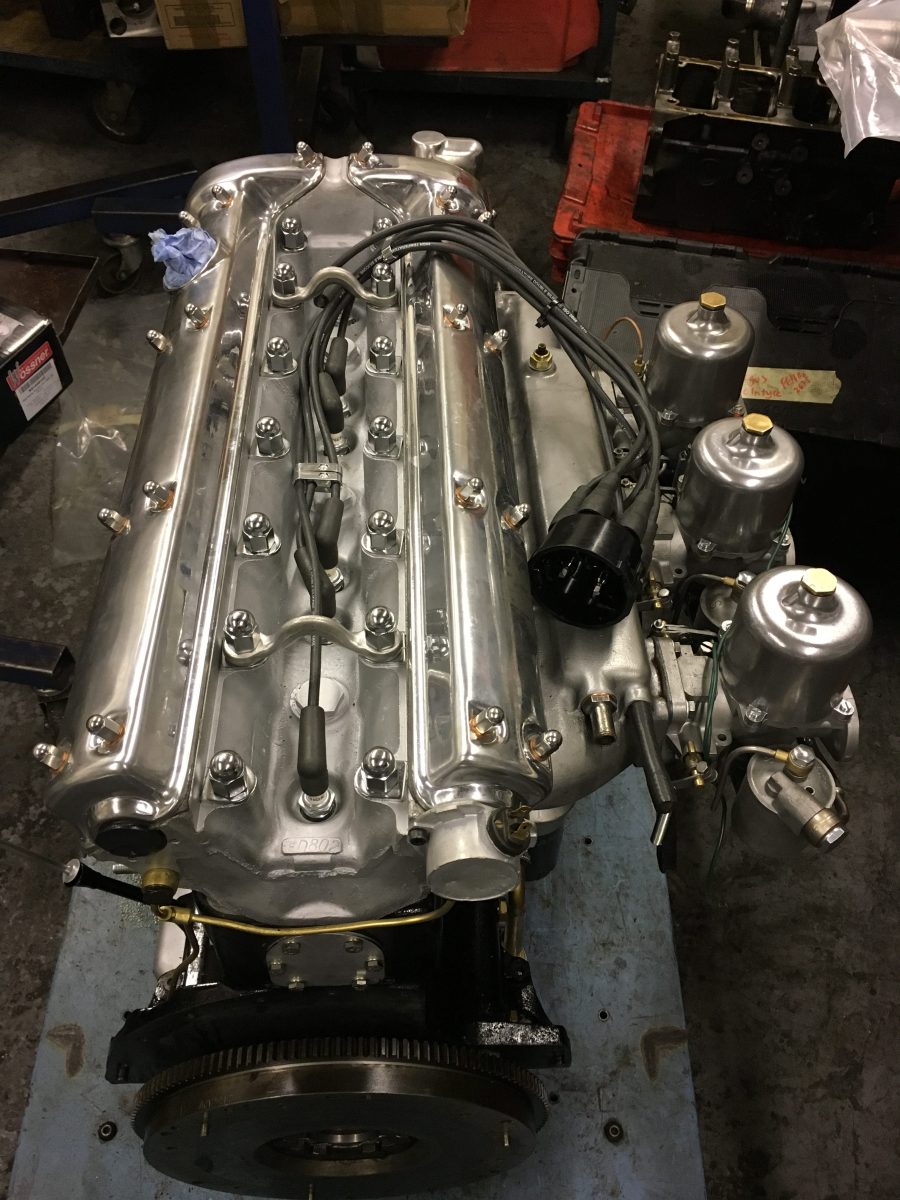
[vc_row][vc_column][vc_column_text]If you visited The London Classic Car Show at the Excel in London a few weeks back you may have seen our beautiful engine on display.
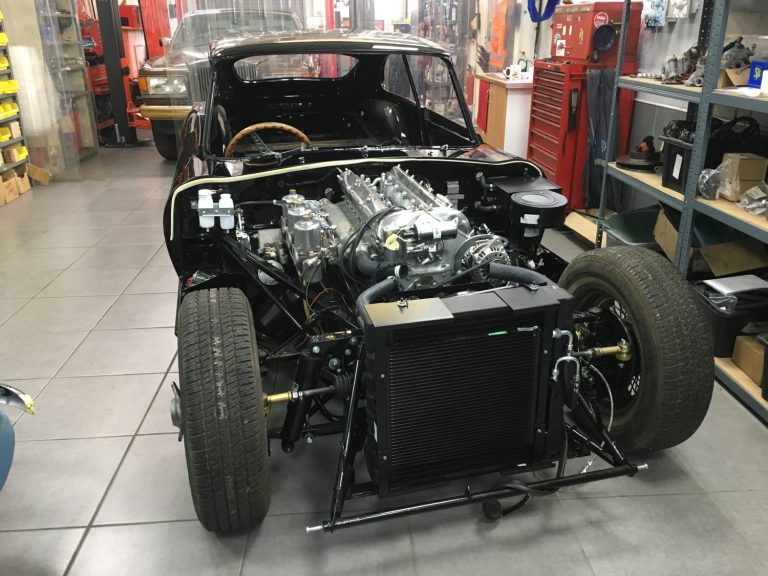
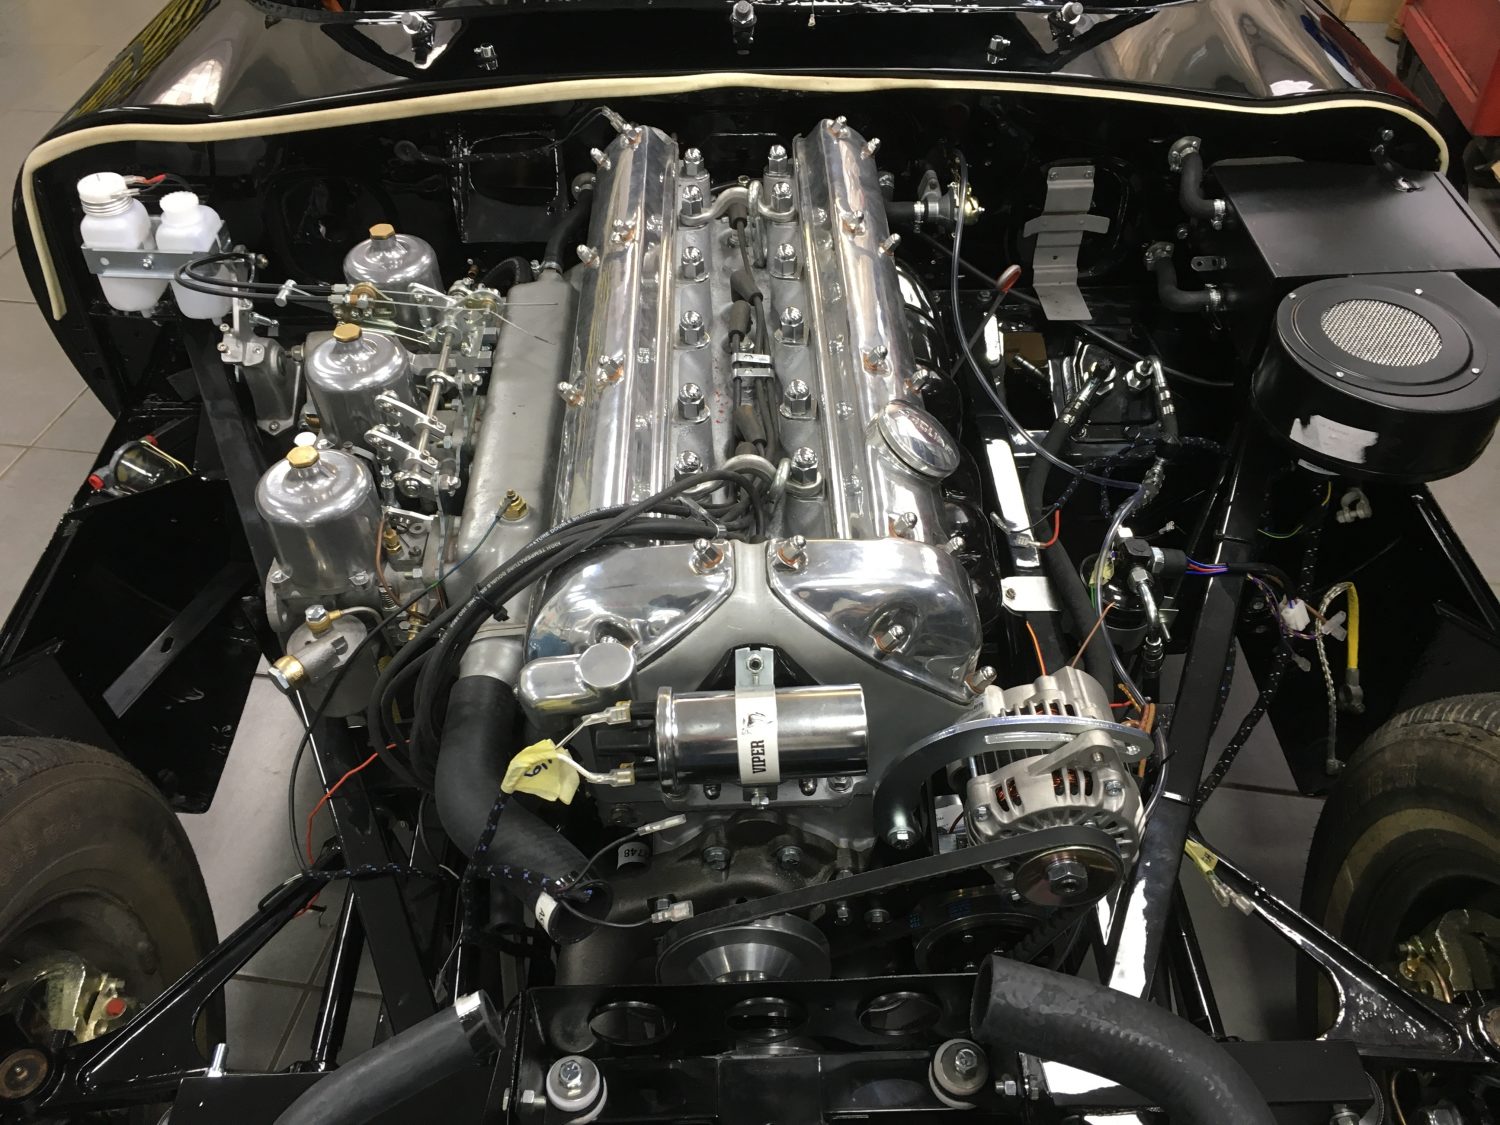
Our now complete Jaguar 4.2 engine which has been completely rebuilt to exceptional standards and sympathetically upgraded to our customers specification.
The beautiful Weber carbs, polished manifold, linkages and trumpets are only installed on the engine to allow testing, whilst the original triple SU carburettor setup is being completed.[/vc_column_text][/vc_column][/vc_row][vc_row][vc_column][vc_gallery type=”image_grid” images=”10569,10576,10575,10574,10573,10572,10571,10570″][/vc_column][/vc_row][vc_row][vc_column][vc_column_text]The Weber carbs shown above will be married to our 1967 Jaguar E-Type race replica engine which is currently being rebuilt to the same exacting standards. Then we will be fitting to a rebuilt 5 speed gearbox, whilst this engine will be fitted with the original 4 speed Jaguar E-Type set-up.[/vc_column_text][/vc_column][/vc_row]
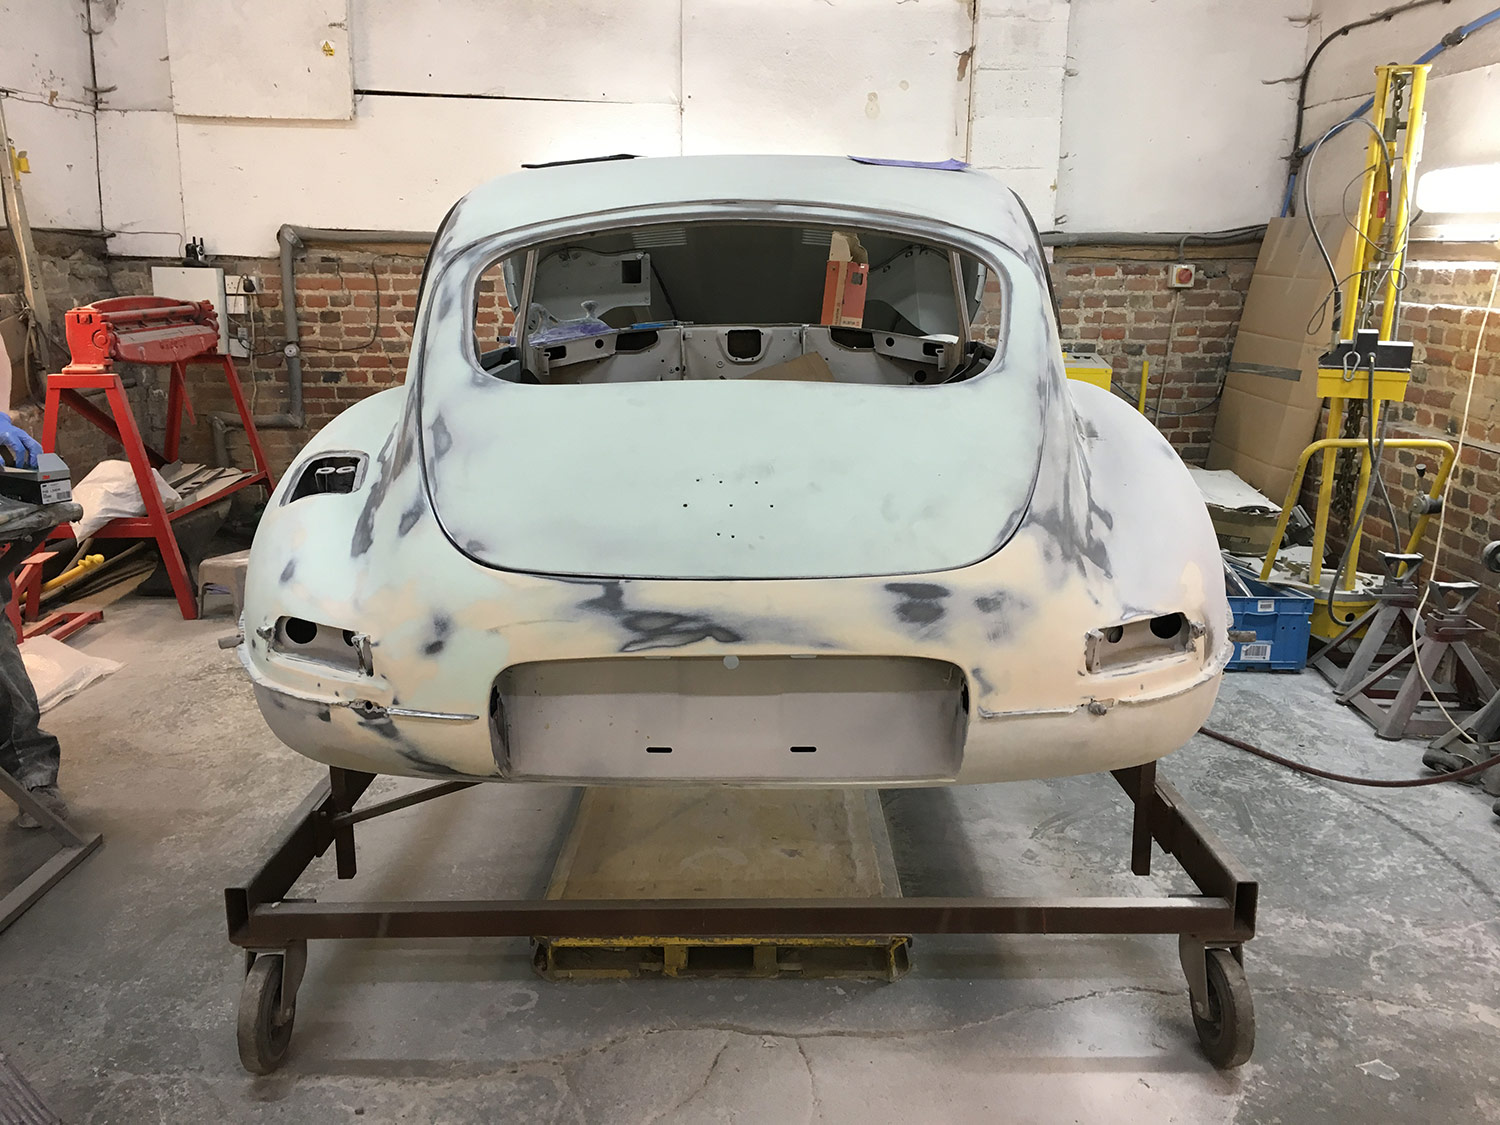
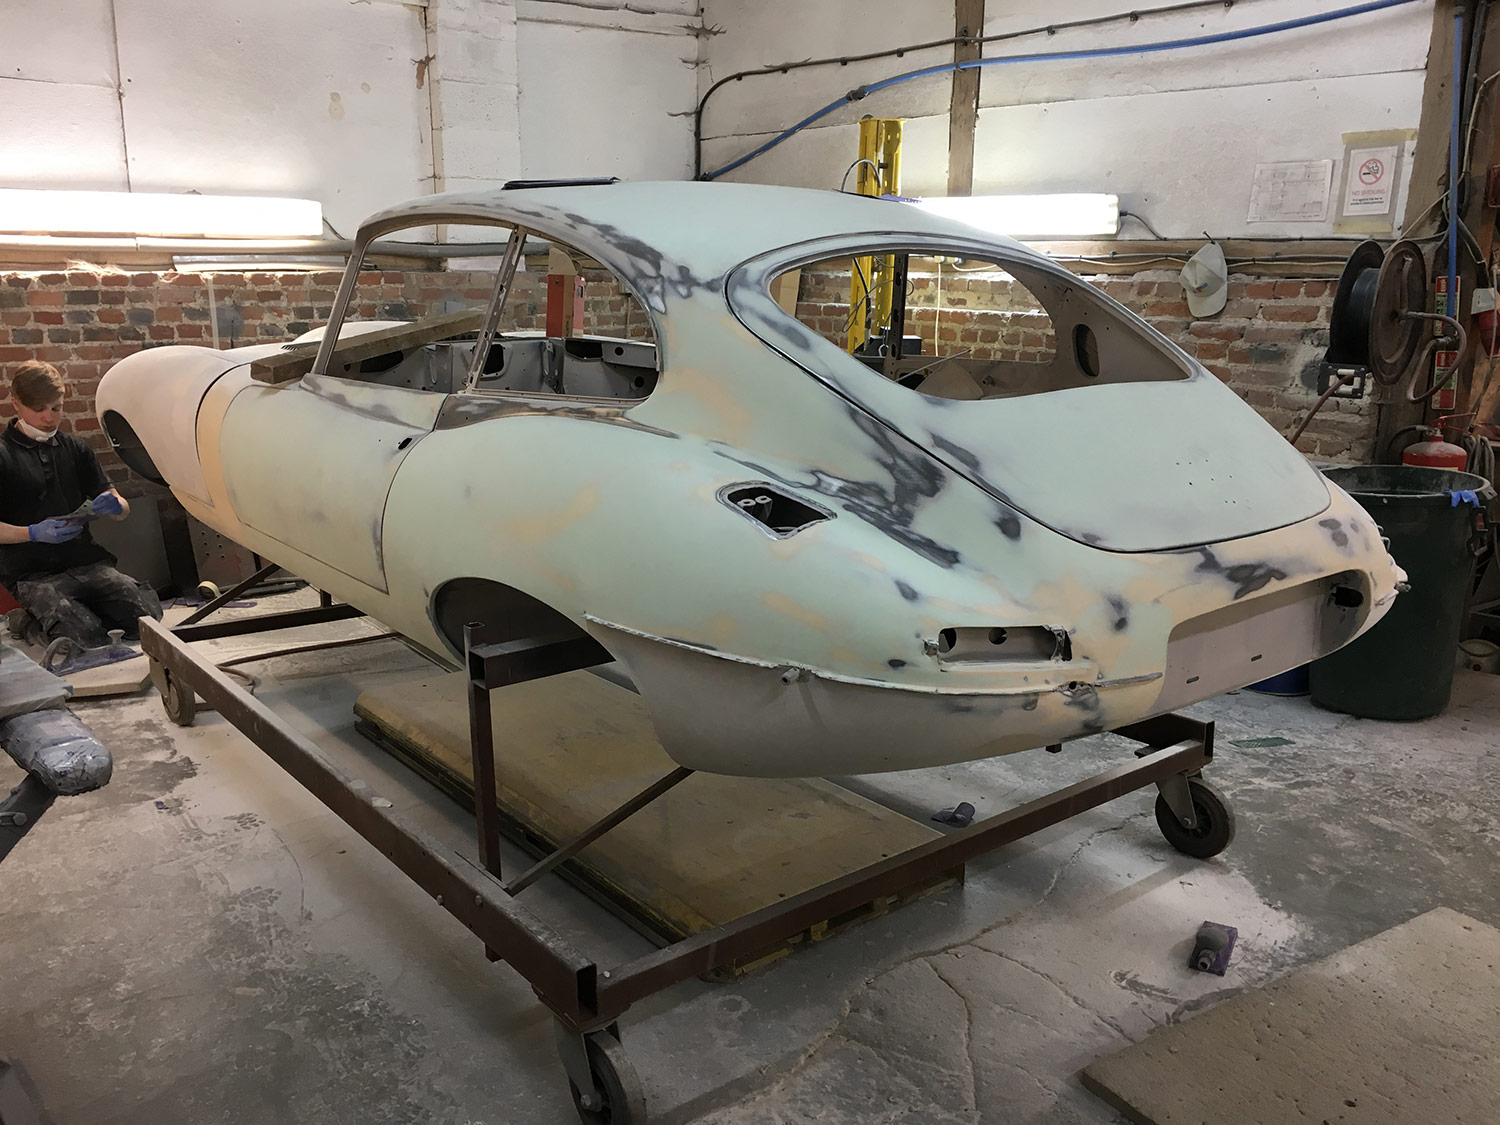
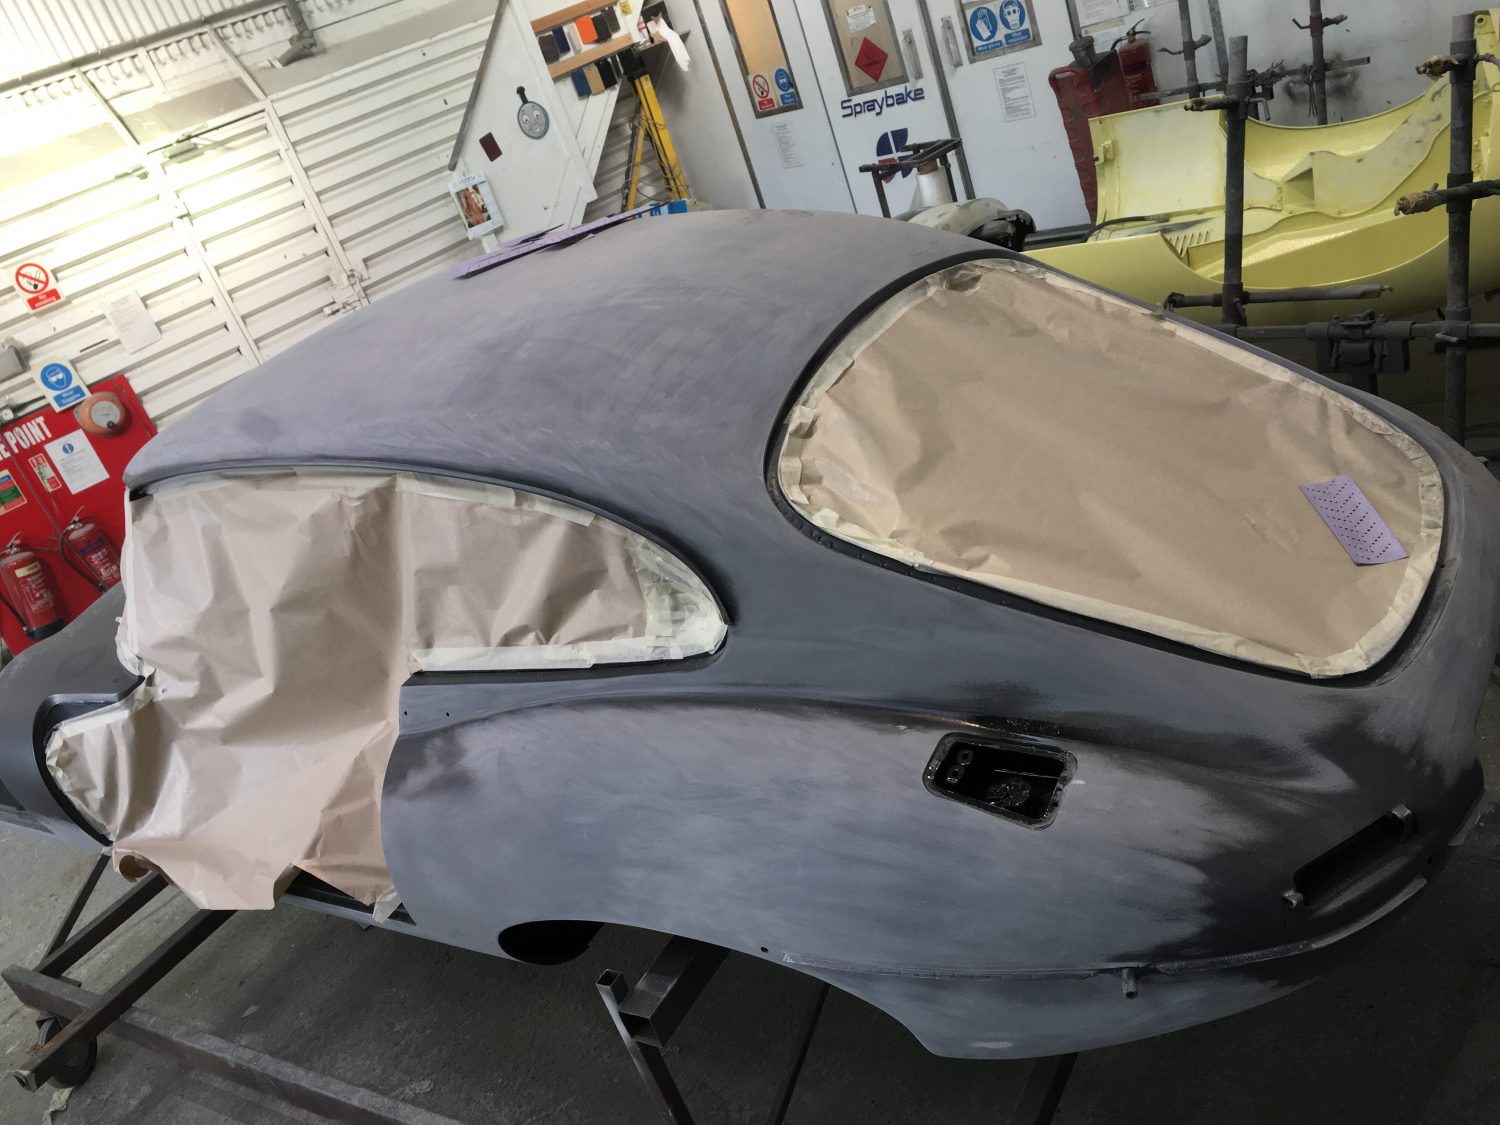
[vc_row][vc_column][vc_column_text]Here we have our 1967 Jaguar E-Type having been put through the first stages of primer. The first primer stage gives us a good visual to work to when finding the areas we now need to address.
Stage one of primer highlights certain areas that need extra work.
Once our thorough assessment takes place we then tidy up the areas in question before stripping back and reapplying a second coat of prime.
At this stage we like to think we are confident that the areas in question would have been corrected to an acceptable standard and only then will we consider applying the first coat of paint.
As you can see from the alignment images, the doors are spaced to an even 4mm around every edge and the bonnet is aligned to 5mm.[/vc_column_text][/vc_column][/vc_row][vc_row][vc_column][vc_gallery type=”image_grid” images=”10300,10301,10302,10303,10304,10305,10306,10307,10308,10309,10310,10311,10312,10313,10314,10315,10316,10317,10318,10319,10320,10321,10322,10323,10324,10325,10326,10327,10328,10329,10330,10331,10332,10333,10334″][/vc_column][/vc_row]
The triple carbs are now completely refurbished and awaiting completion of the restoration of the manifold to allow the final fitting to the engine.

Our 1967 Jaguar E-Type back axle cradle which houses the refurbished “Limited Slip Diff”, new discs, calipers and stub axles.
As you can see, the unit has been totally stripped, blasted and repainted to compliment the refurbished and new parts fitted.


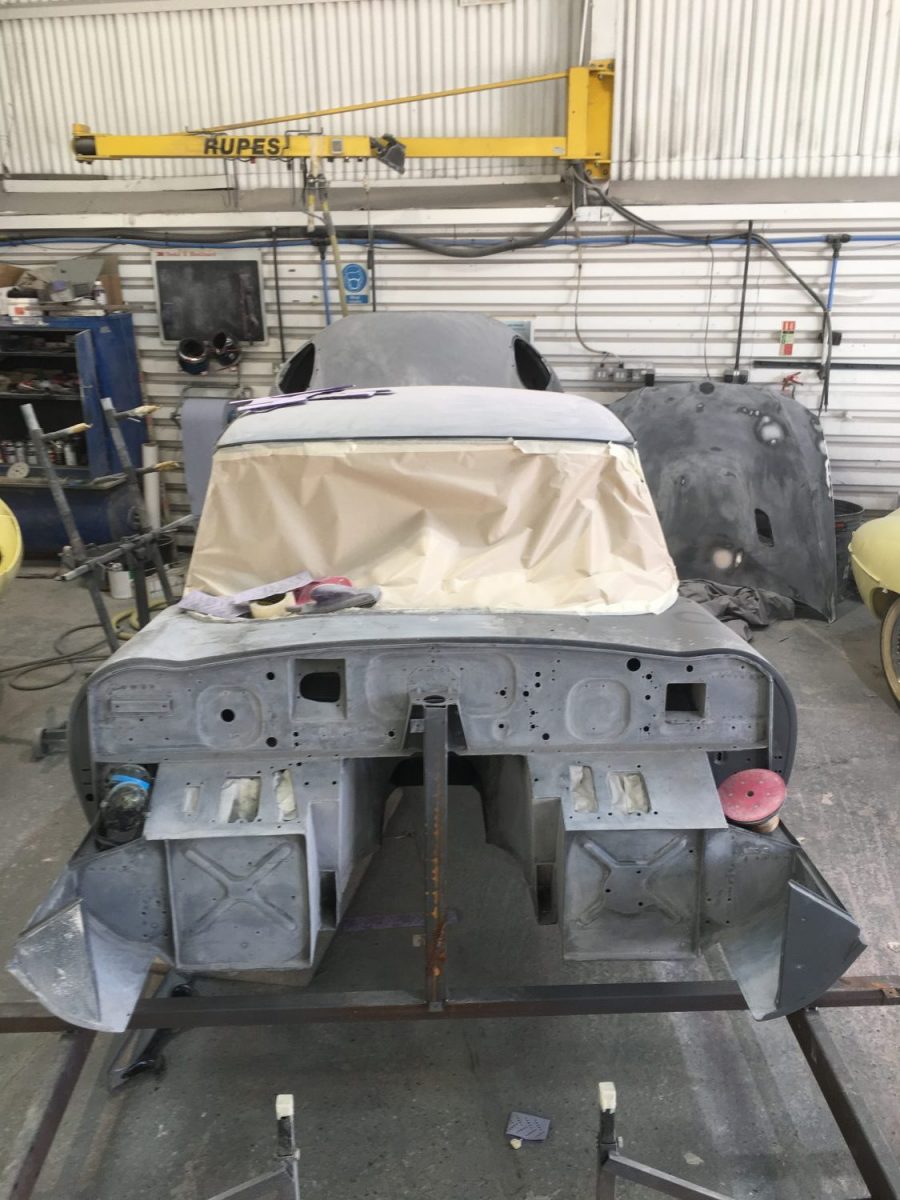
[vc_row][vc_column][vc_column_text]It’s the last day of preparation as our 1967 Jaguar E-Type is scheduled to be primed on Monday morning.

Just two more small areas that we need to concentrate on before this can happen; the bonnet needs a final skim and the rear boot needs to be aligned.
If you are familiar with Jaguar E-Type’s yourself you’ll appreciate the difficulties that can be faced when trying to align the bonnet, doors and boot.
As you can see from the pictures, we are really happy with the results of our alignment.
We have based our measurements on allowing for a 4mm and 5mm alignment spacing throughout but once the primer and paint has been evenly applied this spacing will be evenly reduced.[/vc_column_text][/vc_column][/vc_row][vc_row][vc_column][vc_gallery type=”image_grid” images=”10261,10262,10263,10264,10265,10266,10267,10268,10269,10270,10271,10272,10273,10274,10275,10276,10277,10278,10279,10280″][/vc_column][/vc_row]
Here we have Carl and Ryan working on the final few areas of the body of our 1967 Jaguar E-Type 2+2. The next stage will be getting it ready for primer before the full black respray.
Strange that as soon as the camera comes out, Carl and Ryan seem to disappear, it’s like they have something to hide…